(→Drops: added drops from wikiwiki) |
(Edited 5-3 to say you don't sink Hime, but the transport ship for map kills.) |
||
| Line 452: | Line 452: | ||
*There is a gold submarine in the boss node, unless you are confident to kill it quickly, bring less Light/Torpedo cruiser and more (aviation) heavy cruiser to hit the surface ship. Two destroyers are needed for I to K navigation, the rest should consist at least two heavy cruiser to hunt the boss. |
*There is a gold submarine in the boss node, unless you are confident to kill it quickly, bring less Light/Torpedo cruiser and more (aviation) heavy cruiser to hit the surface ship. Two destroyers are needed for I to K navigation, the rest should consist at least two heavy cruiser to hunt the boss. |
||
*Both enemy and ally submarines have lowered defense in night battles(except for end nodes which are normal battles) |
*Both enemy and ally submarines have lowered defense in night battles(except for end nodes which are normal battles) |
||
| + | *To lower map meter, you do NOT have the kill the hime. You only have to kill the transport ship that is in the flagship spot. |
||
===Nodes and Enemy Encounters=== |
===Nodes and Enemy Encounters=== |
||
Revision as of 14:01, 15 January 2014
Template:Under Construction
World 5-1: 南方海域前面
| Difficulty | ☆ ☆ ☆ ☆ ☆ ☆ ☆ ☆ | Map |
|---|---|---|
| EXP/node | 360 | 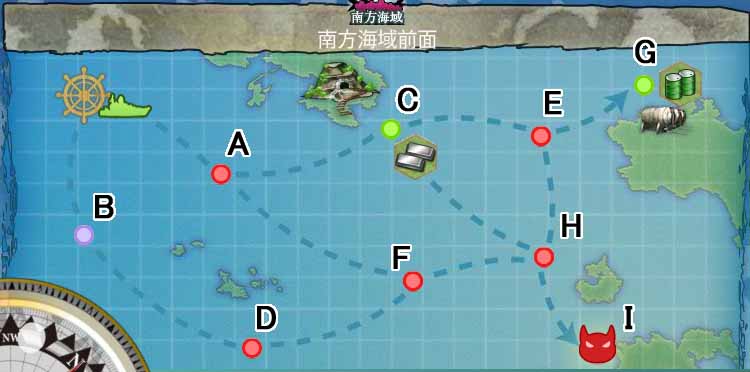 |
| Items | Steel, Fuel | |
| Fluff text | 南方海域進出作戦 | |
| 練度の高い水上打撃部隊を編成し、南方海域への進出を図れ! | ||
- Two CA/CAV to guarantee sortie start->A, and H -> I (boss) route
- Two DD for C to H.
Nodes and Enemy Encounters
| Area | Pattern | Encountered Vessels | Formation |
|---|---|---|---|
| A | Pattern 1 | CVL Nu-class, BB Ta-class, CA Ri-class, DD Ni-class x 2, SS Ka-class | |
| Pattern 2 | CVL Nu-class, BB Ta-class, CA Ri-class, CL Ho-class, DD Ni-class x 2 | ||
| Pattern 3 | BB Ta-class, CL He-class, CL(t) Chi-class x 2, DD Ro-class, SS Ka-class | ||
| B | Without Radar | Maelstorm: | |
| With Radar | Maelstorm: | ||
| C | |||
| D | Pattern 1 | SS Ka-class, SS Ka-class x 2, SS Ka-class x 3 | |
| Pattern 2 | SS Ka-class, SS Ka-class x 2, SS Ka-class x 2 | ||
| Pattern 3 | SS Ka-class, SS Ka-class x 2, SS Ka-class | ||
| E | Pattern 1 | CV Wo-class, CVL Nu-class, BB Ta-class, CA Ri-class, DD Ha-class x 2 | |
| Pattern 2 | CV Wo-class x 2,CVL Nu-class x 2, DD Ha-class x 2 | ||
| Pattern 3 | CV Wo-class, CVL Nu-class x 2, CL He-class, DD Ha-class, SS Ka-class | ||
| F | Pattern 1 | CVL Nu-class, BB Ru-class x 2, CL To-class, DD Ni-class x 2 | |
| Pattern 2 | BB Ru-class, CL He-class, CL(t) Chi-class x 3, DD Ro-class | ||
| G | |||
| H | Pattern 1 | CVL Nu-class x 2, CA Ri-class, CL He-class, DD Ni-class x 2 | |
| Pattern 2 | CVL Nu-class x 3, CL He-class, DD Ro-class x 2 | ||
| Pattern 3 | CVL Nu-class x 2, BB Ru-class, CL Ho-class, DD I-class x 2 | ||
|
I Boss Node |
Pattern 1 | CV Wo-class, BB Ta-class, CA Ri-class, CL To-class, DD Ha-class x 2 | |
| Pattern 2 | CV Wo-class, BB Ta-class, CL He-class, DD Ni-class x 2, SS Ka-class | ||
| Pattern 3 | AP Wa-class, BB Ta-class x 2, CL To-class, DD Ha-class x 2 | ||
Drops
| Destroyer | Light Cruiser | Heavy Cruiser | Seaplane Mothership | Aircraft Carrier | Submarine | Battleship | |
|---|---|---|---|---|---|---|---|
| A | |||||||
| D | |||||||
| E | |||||||
| F | |||||||
| H | |||||||
| I | Takao |
World 5-2: 珊瑚諸島沖 Offshore of Coral Islands
| Difficulty | ☆ ☆ ☆ ☆ ☆ ☆ ☆ ☆ ☆ | Map |
|---|---|---|
| EXP/node | 380 | 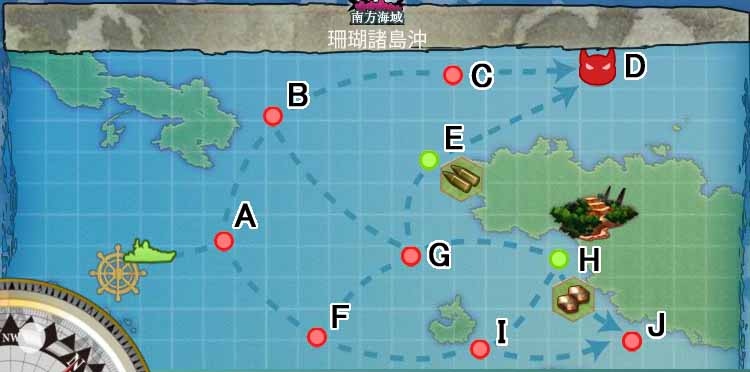  |
| Items | Ammo, Bauxite | |
| Fluff text | 珊瑚諸島沖海戦 | |
| MO作戦を実施する。空母機動部隊を展開し、南方海域に出没する敵機動部隊を叩け! | ||
- Two CV and one CVL (no more or less!) are needed to guarantee a boss fight.
- Killing the boss will bring down map meter 25%. You need to defeat the boss 4 times, and she will turn into a stronger form in the last battle. Map meter does not regenerate.
- Considering the difficulty of the map compared to others, this is a very good map to train on if you are bored with 3-2. Bar Node G, you can intentionally send fleets to get you to node J and generally defeat easy fleet comps. This is not resource or repair friendly though (since you will get damaged one way or another).
Nodes and Enemy Encounters
| Area | Pattern | Encountered Vessels | Formation |
|---|---|---|---|
| A | Pattern 1 | CL He-class, CA Ri-class x 2, CL(t) Chi-class, DD Ni-class x 2 | |
| Pattern 2 | CA Ri-class, CL(t) Chi-class x 3, DD Ro-class x 2 | ||
| B | Pattern 1 | SS Yo-class x 2, SS Ka-class, SS Ka-class x 2 | |
| Pattern 2 | SS Yo-class, SS Ka-class x 3, SS Ka-class x 2 | ||
| Pattern 3 | CVL Nu-class, DD Ro-class x 2, SS Yo-class, SS Ka-class x 2 | ||
| C | Pattern 1 | CV Wo-class, CA Ri-class, CA Ri-class, CL Ho-class, DD Ha-class, DD Ha-class | |
| Pattern 2 | CV Wo-class, CA Ri-class x 2, CL He-class, DD Ha-class, DD Ro-class | ||
| Pattern 3 | CV Wo-class, CA Ri-class, CL Ho-class, DD Ha-class, DD Ha-class x 2 | ||
|
D Boss Node |
Preliminary | AC Princess, AC Demon, CA Ri-class, CL Ho-class, CL To-class, DD Ha-class | |
| Final | Southern Demon(?), CV Wo-class x 2, BB Ta-class, DD Ro-class x 2 | ||
| Cleared | AC Princess, AC Demon, CA Ri-class, CL Ho-class, CL To-class, DD Ha-class | ||
| Southern Demon(?), CV Wo-class x 2, BB Ta-class, DD Ro-class x 2 | |||
| AC Princess, CV Wo-class, BB Ta-class, CA Ri-class, CL Ho-class, DD Ha-class | |||
| E | |||
| F | Pattern 1 | SS Yo-class x 2 SS Ka-class SS Ka-class x 2 | |
| Pattern 2 | SS Yo-class, SS Ka-class x 3, SS Ka-class x 2 | ||
| Pattern 3 | CVL Nu-class, DD Ro-class x 2, SS Yo-class, SS Ka-class x 2 | ||
| G | Pattern 1 | BB Ta-class, CA Ri-class x 2, CL(t) Chi-class, DD Ro-class, DD Ni-class | |
| Pattern 2 | BB Ru-class, CL He-class, CL(t) Chi-class x 2, DD Ro-class, DD Ni-class | ||
| H | |||
| I | Pattern 1 | AP Wa-class x 2, CA Ri-class, CL To-class, DD Ro-class x 2 | |
| Pattern 2 | AP Wa-class x 2, CL He-class, CL To-class, DD Ni-class x 2 | ||
| Pattern 3 | AP Wa-class, CL Ho-class, CL(t) Chi-class, DD Ni-class x 3 | ||
| J | Pattern 1 | CV Wo-class, CVL Nu-class, BB Ta-class, DD Ha-class, DD ??-class x 2 | |
| Pattern 2 | CV Wo-class, CA Ri-class x 2, CL He-class, DD Ro-class x 2 | ||
| Pattern 3 | CV Wo-class, CA Ri-class, CL Ho-class, DD Ha-class x 3 | ||
Drops
| Destroyer | Light Cruiser | Heavy Cruiser | Seaplane Mothership | Aircraft Carrier | Submarine | Battleship | |
|---|---|---|---|---|---|---|---|
| A |
Akatsuki, Hibiki, Ikazuchi, Inazuma, Samidare, Suzukaze, Asashio, Michishio, Arashio, Kasumi, Kagerou, Shiranui, Kuroshio, Akigumo |
Tenryuu, Tatsuta, Kuma, Tama, Kiso, Isuzu, Natori, Yura, Jintsuu, Naka | Mogami, Furutaka, Kako, Aoba, Myoukou, Nachi, Ashigara, Haguro, Takao, Atago, Maya, Choukai, Tone, Chikuma | Chitose, Chiyoda | Ryuujou, Hiyou, Junyou, Shouhou | Kongou, Hiei, Haruna, Kirishima, Fusou, Yamashiro | |
| B | Akatsuki, Hibiki, Ikazuchi, Inazuma, Samidare, Suzukaze, Asashio, Michishio, Arashio, Kasumi, Kagerou, Shiranui, Kuroshio, Maikaze, Akigumo | Tenryuu, Tatsuta, Kuma, Tama, Kiso, Isuzu, Natori, Yura, Jintsuu, Naka | Mogami, Furutaka, Kako, Aoba, Myoukou, Nachi, Ashigara, Haguro, Takao, Atago, Maya, Choukai, Tone, Chikuma | Chitose | Ryuujou, Hiyou, Junyou, Shouhou | Kongou, Hiei, Haruna, Kirishima, Fusou, Yamashiro | |
| C | Akatsuki, Hibiki, Ikazuchi, Inazuma, Samidare, Suzukaze, Asashio, Michishio, Arashio, Kasumi, Kagerou, Shiranui, Kuroshio, Akigumo | Tenryuu, Tatsuta, Kuma, Tama, Kiso, Isuzu, Natori, Yura, Jintsuu, Naka | Mogami, Furutaka, Kako, Aoba, Myoukou, Nachi, Ashigara, Haguro, Takao, Atago, Maya, Choukai, Tone, Chikuma | Chiyoda | Ryuujou, Hiyou, Junyou, Shouhou | Kongou, Hiei, Haruna, Kirishima, Fusou, Yamashiro | |
| D | Yukikaze, Hatsuharu, Maikaze, Akigumo, Yuugumo | Ooi, Kitakami, Tenryuu, Tatsuta, Nagara, Isuzu, Natori, Yura, Sendai, Yuubari | Mogami, Furutaka, Kako, Aoba, Myoukou, Nachi, Ashigara, Haguro, Takao, Atago, Maya, Choukai, Tone, Chikuma, Mikuma, Kinugasa | Chitose, Chiyoda | Akagi, Kaga, Souryuu, Hiryuu, Zuikaku, Shoukaku, Ryuujou, Hiyou, Junyou, Shouhou, Zuihou | Mutsu, Ise, Hyuuga, Kongou, Hiei, Haruna, Kirishima, Fusou, Yamashiro | |
| F | Akatsuki, Hibiki, Ikazuchi, Inazuma, Samidare, Kasumi, Asashio, Kuroshio, Michishio, Akigumo | Ooi, Tenryuu, Tatsuta, Tama, Kiso, Natori, Jintsuu, Naka | Mogami, Kako, Aoba, Myoukou, Nachi, Ashigara, Haguro, Takao, Atago, Maya, Choukai, Chikuma | Chitose, Chiyoda | Ryuujou, Shouhou | Kongou, Hiei, Haruna, Kirishima | |
| G | Akatsuki, Hibiki, Ikazuchi, Inazuma, Samidare, Suzukaze, Asashio, Michishio, Kagerou, Shiranui, Kuroshio, Akigumo | Tenryuu, Tatsuta, Kuma, Tama, Kiso, Isuzu, Natori, Yura, Naka | Mogami, Furutaka, Kako, Aoba, Myoukou, Nachi, Ashigara, Haguro, Takao, Atago, Maya, Choukai, Tone, Chikuma | Chitose, Chiyoda | Ryuujou, Hiyou, Junyou, Shouhou | Kongou, Hiei, Haruna, Kirishima, Fusou, Yamashiro | |
| I | Akatsuki, Ikazuchi, Michishio, Kasumi, Shiranui, Akigumo | Tenryuu, Tatsuta, Tama, Kiso, Isuzu, Natori, Yura, Naka | Mogami, Furutaka, Aoba, Nachi, Ashigara, Takao, Maya, Choukai | Hiyou, Shouhou | Kongou, Haruna, Kirishima, Fusou | ||
| J | Samidare, Suzukaze, Michishio, Arashio, Kasumi, Kagerou, Kuroshio, Akigumo | Tatsuta, Tama, Yura, Jintsuu | Mogami, Furutaka, Kako, Aoba, Nachi, Haguro, Maya, Chikuma | Chitose | Ryuujou, Shouhou | Haruna, Kirishima, Fusou, Yamashiro |
World 5-3: サブ島沖海域 Offshore of Sav Island
| Difficulty | ☆ ☆ ☆ ☆ ☆ ☆ ☆ ☆ ☆ | Map |
|---|---|---|
| EXP/node | 400 | 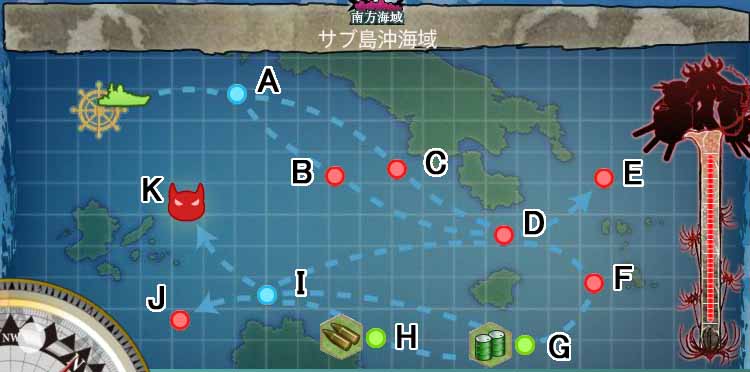  |
| Items | Fuel, Ammo | |
| Fluff text | 第一次サーモン沖海戦 | |
| 敵泊地に対して水上打撃部隊による夜戦突撃を敢行し、艦隊後方の敵輸送艦を叩け! | ||
- ALL fights (except end nodes) are night battles only! There is also a 'fuck you' submarine node if you send any carrier or BB into the map! It is therefore highly recommended to use CA,CL or DD's only! (Note: Fast battleships (Kongou-class) can avoid the submarine node)
- Fast ship only : A to C node
- D to E,F or I is random
- Three or more battleships: D to E node
- with 2+ DD : I to K (boss) node
- Killing the boss will bring down map meter 20%. You need to defeat the boss 5 times. Map meter does not regenerate.
- There is a gold submarine in the boss node, unless you are confident to kill it quickly, bring less Light/Torpedo cruiser and more (aviation) heavy cruiser to hit the surface ship. Two destroyers are needed for I to K navigation, the rest should consist at least two heavy cruiser to hunt the boss.
- Both enemy and ally submarines have lowered defense in night battles(except for end nodes which are normal battles)
- To lower map meter, you do NOT have the kill the hime. You only have to kill the transport ship that is in the flagship spot.
Nodes and Enemy Encounters
| Area | Pattern | Encountered Vessels | Formation |
|---|---|---|---|
| A | "Must be my imagination" (battle avoided) | ||
| B
Night Battle |
Pattern 1 | SS Yo-class x 2, SS Yo-class x 2 | |
| Pattern 2 | SS Yo-class x 2, SS Ka-class x 2, SS Ka-class x 2 | ||
| Pattern 3 | SS Ka-class x 2, SS Yo-class x 2, SS Yo-class x 2 | ||
| C
Night Battle |
Pattern 1 | CA Ri-class x 3, CL Ho-class, CL(t) Chi-class, DD Ha-class | |
| Pattern 2 | CL He-class, CA Ri-class x 2, CL(t) Chi-class x 2, DD Ro-class | ||
| Pattern 3 | BB Ru-class, CA Ri-class, CA Ri-class, CL(t) Chi-class, DD Ro-class x 2 | ||
| D
Night Battle |
Pattern 1 | BB Ta-class x 2, CA Ri-class, CL He-class, DD Ha-class x 2 | |
| Pattern 2 | BB Ta-class, CA Ri-class x 3, DD Ha-class, DD Ro-class | ||
| E
Day Battle |
Pattern 1 | CV Wo-class x 2, BB Ta-class, CL Ho-class, DD Ro-class | |
| Pattern 2 | CV Wo-class, CVL Nu-class x 2, BB Ta-class, DD Ha-class x 2 | ||
| F
Night Battle Transport Node |
Pattern 1 | AP Wa-class x 2, AP Wa-class, CL Ho-class, DD Ha-class | |
| Pattern 2 | AP Wa-class, AP Wa-class x 3, DD Ha-class x 2 | ||
| Pattern 3 | AP Wa-class x 3, CA Ri-class, DD Ha-class x 2 | ||
| G | |||
| H | |||
| I | "Must be my imagination" (battle avoided) | ||
| J
Day Battle |
Pattern 1 | SS Ka-class x 4, CA Ri-class, CL He-class | |
| Pattern 2 | CV Wo-class, BB Ta-class, DD Ha-class x 2, SS Ka-class x 2 | ||
| Pattern 3 | AP Wa-class x 2, CA Ri-class, CL He-class, DD Ha-class x 2 | ||
|
K Boss Node |
Preliminary | AP Wa-class, Southern Princess(?), BB Ta-class, DD Ha-class x 2, SS Ka-class | |
| Final | AP Wa-class, Southern Princess(?), BB Ta-class x 2, CL He-class, SS Yo-class | ||
| Cleared | AP Wa-class, Southern Princess(?), BB Ta-class, DD Ha-class x 2, SS Ka-class | ||
| AP Wa-class, Southern Princess(?), BB Ta-class x 2, CL He-class, SS Yo-class | |||
| CV Wo-class, Southern Princess(?), CA Ri-class x 2, DD Ro-class x 2 | |||
Drops
| Destroyer | Light Cruiser | Heavy Cruiser | Seaplane Mothership | Aircraft Carrier | Submarine | Battleship | |
|---|---|---|---|---|---|---|---|
| B | |||||||
| C | |||||||
| D | |||||||
| E | |||||||
| F | |||||||
| J | |||||||
| K |
World 5-4: TBA
Links
| Sortie Worlds | ||
|---|---|---|