(→Tips) |
No edit summary |
||
| Line 47: | Line 47: | ||
*Random between O and P if fleet contains SS(V) |
*Random between O and P if fleet contains SS(V) |
||
|M -> P = |
|M -> P = |
||
| − | *Pass the LoS check ('''>= |
+ | *Pass the LoS check ('''>= 24 F33 Cn1''') |
*'''Fast+''' fleet ('''Ignores''' LoS check above) |
*'''Fast+''' fleet ('''Ignores''' LoS check above) |
||
*Random between O and P if fleet contains SS(V) |
*Random between O and P if fleet contains SS(V) |
||
| Line 65: | Line 65: | ||
===Tips=== |
===Tips=== |
||
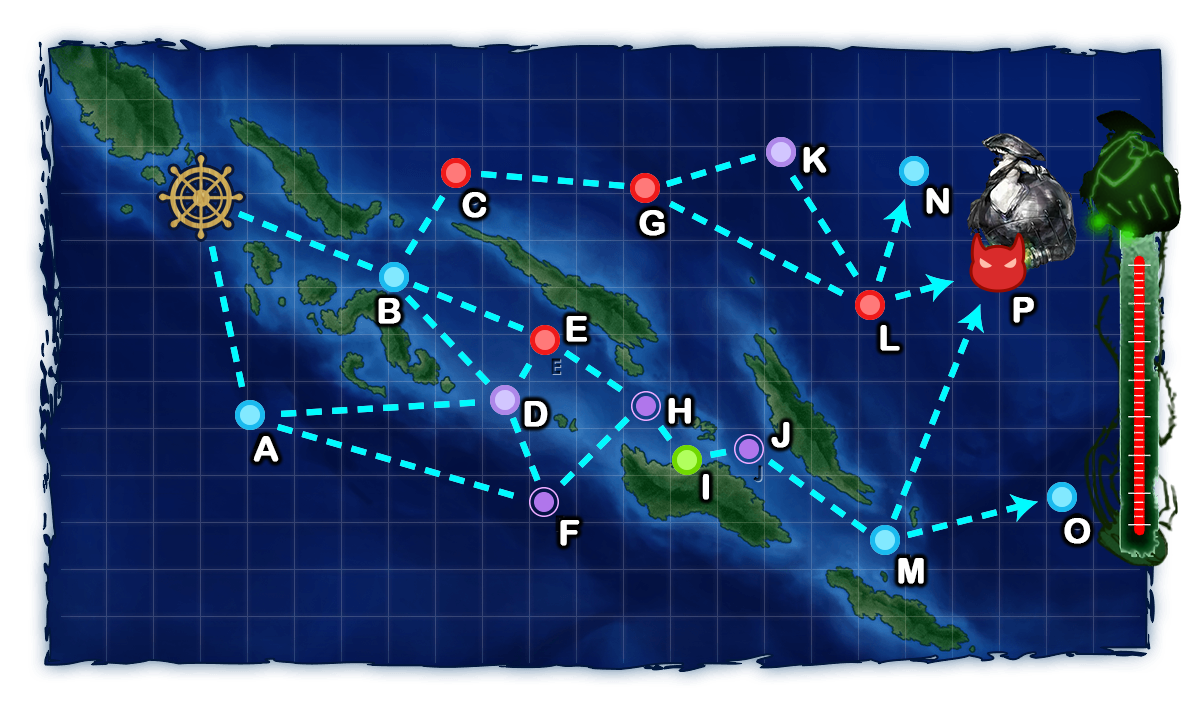
*Like [[5-3]], you must sink the flagship at the boss node '''5 times''' to clear the map. |
*Like [[5-3]], you must sink the flagship at the boss node '''5 times''' to clear the map. |
||
| − | *There is a LoS Check in {{Event/Route|L|red}} to go to the Boss Node. You require approximately above eLoS '''(F33)''' Cn=1 of 34 |
+ | *There is a LoS Check in {{Event/Route|L|red}} to go to the Boss Node. You require approximately above eLoS '''(F33)''' Cn=1 of 34 or higher. |
| − | *There is a LoS Check in {{Event/Route|M|blue}} to go to the Boss Node. It is ignored if your fleet is Fast+. If your fleet is just Fast (and not Fast+), it requires approximately above eLoS '''(F33)''' Cn=1 of |
+ | *There is a LoS Check in {{Event/Route|M|blue}} to go to the Boss Node. It is ignored if your fleet is Fast+. If your fleet is just Fast (and not Fast+), it requires approximately above eLoS '''(F33)''' Cn=1 of 24 or higher. |
*Node {{Event/Route|C|red}} has a pattern with 1-2 Enemy Submarines, sometimes in '''Line Ahead'''. You are recommended go Line Abreast against this Node (Heavy Ships such as BB/CV can handle all Surface Enemies in the Node even in this formation), and bring OASW capable Destroyers to deal with them. |
*Node {{Event/Route|C|red}} has a pattern with 1-2 Enemy Submarines, sometimes in '''Line Ahead'''. You are recommended go Line Abreast against this Node (Heavy Ships such as BB/CV can handle all Surface Enemies in the Node even in this formation), and bring OASW capable Destroyers to deal with them. |
||
*There are {{ShipLink|Light Cruiser Tsu-Class}} nearly everywhere in this Map. If using a composition with CVs, you are recommended to use ones with high capacity aircraft slots, and place Bombers only in the Highest Capacity Slots on your CVs to avoid all of your Bombers getting shot down to 0 by the time you reach the Boss Node. |
*There are {{ShipLink|Light Cruiser Tsu-Class}} nearly everywhere in this Map. If using a composition with CVs, you are recommended to use ones with high capacity aircraft slots, and place Bombers only in the Highest Capacity Slots on your CVs to avoid all of your Bombers getting shot down to 0 by the time you reach the Boss Node. |
||
Revision as of 10:28, 23 January 2019
InformationEdit
|
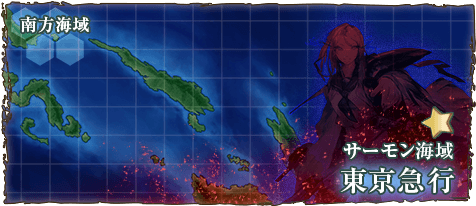
Salmon Sea Area サーモン海域 | |
 | |
 | |
| Information | |
| Special Mechanics | LoS Check |
| Experience | HQ: 210 non-boss, 3020 boss |
| Kills required | 5? |
| In-game description | |
| Operation | 東京急行 Tokyo Express |
| Task | 南方海域に有力な艦隊を投入し鼠輸送作戦を敢行、可能であれば同方面の敵艦隊も撃滅せよ! Deploy a powerful fleet and perform a vital "rat transport" operation. If possible, also destroy the enemy fleet in the area! |
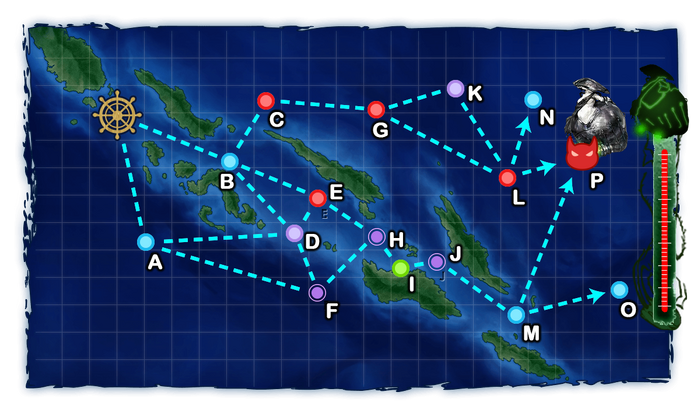
| Branching Rules | ||
|---|---|---|
| Nodes | Rules | |
| Start | A |
|
B | ||
A |
D |
|
F | ||
B |
C |
|
D | ||
E | ||
D |
E |
|
F | ||
G |
K |
|
L | ||
L |
N |
|
P |
| |
M |
O |
|
P |
| |
Tips
- Like 5-3, you must sink the flagship at the boss node 5 times to clear the map.
- There is a LoS Check in L to go to the Boss Node. You require approximately above eLoS (F33) Cn=1 of 34 or higher.
- There is a LoS Check in M to go to the Boss Node. It is ignored if your fleet is Fast+. If your fleet is just Fast (and not Fast+), it requires approximately above eLoS (F33) Cn=1 of 24 or higher.
- Node C has a pattern with 1-2 Enemy Submarines, sometimes in Line Ahead. You are recommended go Line Abreast against this Node (Heavy Ships such as BB/CV can handle all Surface Enemies in the Node even in this formation), and bring OASW capable Destroyers to deal with them.
- There are Light Cruiser Tsu-Class nearly everywhere in this Map. If using a composition with CVs, you are recommended to use ones with high capacity aircraft slots, and place Bombers only in the Highest Capacity Slots on your CVs to avoid all of your Bombers getting shot down to 0 by the time you reach the Boss Node.
- Seaplane Fighters are required should you go south route and wish to obtain Air Superiority at the boss node.

Recommended Fleets
- B C G L P
- 2 BB(V) 2 DD 2 CV(B)
- 2 BB(V) 2 CA(V) 2 CV(B)
- B E H I J M P (must be fast fleet)
- 1 fBB(V) 1 CLT 4 DD
- 2 fBB(V)/CA(V) 1 CL 3 DD
- Standard comp for south route, suitable for quest Bq6 (Naganami Kai Ni quarterly 5-4 quest)
- A D F H I J M P
- 4 CA 2 CAV
- Suitable for quest Bq7 (Mikawa Quarterly 5-4 quest). Being able to gain Air Superiority at the boss node to stop enemy's Artillery Spotting, but you have to bypass the fairly dangerous night node F which has Battleship Ta-Class Flagship awaiting.
- 6 SS(V)
- Please note that due to the LoS check, you will be required to bring some LoS Equipment such as Seaplanes
 or Submarine Radars on your Submarines.
- Please note that due to the LoS check, you will be required to bring some LoS Equipment such as Seaplanes
- 4 CA 2 CAV
- A D E H I J M P
- 3 CA 1 CL 2DD
- Also suitable for quest Bq7. Avoiding the night node F completely, but may suffer at the boss node as you have no air power while enemy can perform Artillery Spotting at your ships.
- 3 CA 1 CL 2DD


Enemy patterns
Lua error in package.lua at line 80: module 'Module:Collection/EnemyShips' not found. Lua error in package.lua at line 80: module 'Module:Collection/EnemyShips' not found. Lua error in package.lua at line 80: module 'Module:Collection/EnemyShips' not found. Lua error in package.lua at line 80: module 'Module:Collection/EnemyShips' not found. Lua error in package.lua at line 80: module 'Module:Collection/EnemyShips' not found. Lua error in package.lua at line 80: module 'Module:Collection/EnemyShips' not found. Lua error in package.lua at line 80: module 'Module:Collection/EnemyShips' not found. Lua error in package.lua at line 80: module 'Module:Collection/EnemyShips' not found. Lua error in package.lua at line 80: module 'Module:Collection/EnemyShips' not found. Lua error in package.lua at line 80: module 'Module:Collection/EnemyShips' not found. Lua error in package.lua at line 80: module 'Module:Collection/EnemyShips' not found. Lua error in package.lua at line 80: module 'Module:Collection/EnemyShips' not found. Lua error in package.lua at line 80: module 'Module:Collection/EnemyShips' not found. Lua error in package.lua at line 80: module 'Module:Collection/EnemyShips' not found. Lua error in package.lua at line 80: module 'Module:Collection/EnemyShips' not found.