InformationEdit
|
Operation Ta-gō Kai
多号作戦改 | |
 | |
 | |
| Information | |
| Special Mechanics | Striking Force Abyssal Combined Fleet Land Base Aerial Support LoS Check Ship Locking |
| Boss gauge (HQ 120) |
Casual: 500 TP + 1400 HP Easy: 500 TP + 1400 HP Medium: 600 TP + 1400 HP Hard: 800 TP + 1400 HP |
| Kills required |
All: 4 |
| Rewards | |
|
Casual:
 1 1 1 1Easy:
1 12 12Medium:
 1 1 1112 1112Hard:
1 1113 1113 | |
| E-5 Branching Rules Starting Points | ||
|---|---|---|
| Nodes | Rules | |
| Start | 1 |
|
2 |
| |
| E-5 Branching Rules Part 1 | ||
|---|---|---|
| Nodes | Rules | |
1 |
B |
|
C |
| |
B |
A |
|
D |
| |
J |
K |
|
L |
| |
| E-5 Branching Rules Part 2 | ||
|---|---|---|
| Nodes | Rules | |
O |
R |
|
N |
| |
R |
N |
|
S |
| |
N |
M |
|
P |
| |
P |
Q |
|
T |
| |
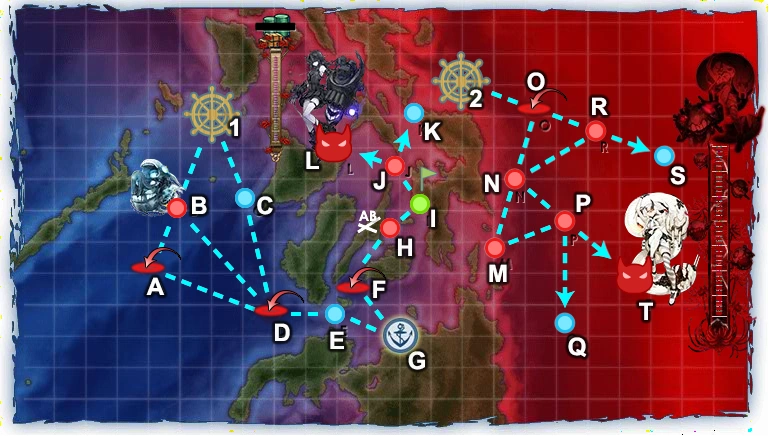
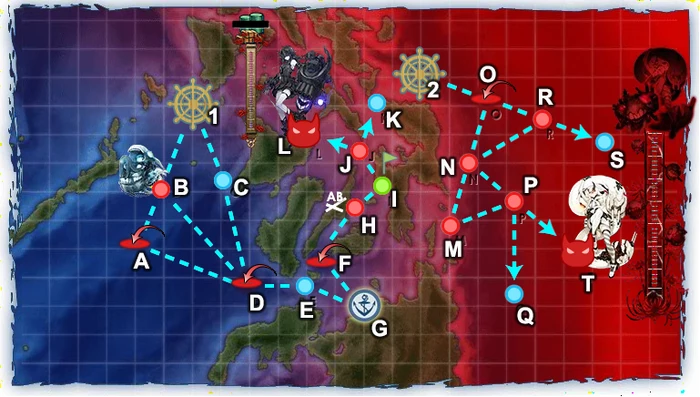
Map Guide
- This map does not allow the use of (F)BB(V) and CV(L/B).
- You can place a BB or CV on your 1st fleet to avoid mistakenly sorting it.
- NOTE: It is possible to sortie either the First Fleet, or the Striking Force Fleet (3rd Fleet) in this map.
- LBAS: Two Land Base Aerial Supports are available for sorties. Enemy's air raid is present.
- 2+ range is required in order to reach the first boss node L and 6+ for the 2nd T
Historical Fleet: Battle of Ormoc Bay
The historical fleet that has participated in Operation Ta-gō Kai.
- CA: Ashigara, Nachi
- CL: Kinu
- DD: Akebono, Asashimo, Hatsuharu, Hatsushimo, Kasumi, Naganami, Okinami, Shimakaze, Ushio, Uranami, Wakaba
- DE: Shimushu


Phases
- Completely Deplete the Transport Gauge to unlock the Boss Node T.
- Depending on difficulty selected, you must also:
- Sink the Heavy Cruiser Princess and her combined fleet.

Depleting the Transport Gauge

- Recommended: Strike Force (3rd Fleet)
- You must fully clear the TP Gauge Bar for this phase.
- Like any other Transport Operation, you must obtain at least a minimum of A-Rank Victory to deplete the TP Gauge Bar. Refer to Transport Loadoff for more information regarding the mechanic.
- Using a certain number of Shima Fleet, ≥2/3/5 on Easy/Medium/Hard, it can route you through C D E G F H I J L for the shortest path.
- NOTE: Abukuma is NOT a member of the Shima Fleet
- Possible Composition: 1-2 CL + 2 CA(V) + 2-4 DD + 0-1 Akitsu Maru Kai
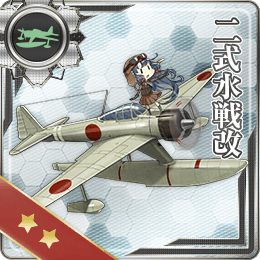
- You may use Akitsu Maru Kai, and/or multiple Seaplane Fighters
 on a CAV to obtain AS. However, it is also possible to fight without Air Power by utilizing a setup for non-Artillery Spotting (no AS) situation, though you still might be required to use Recon plane(s) to satisfy the LoS requirement.
- You may use Akitsu Maru Kai, and/or multiple Seaplane Fighters
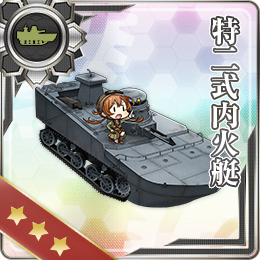
- NOTE: Special Type 2 Amphibious Tank depletes a bonus 20 TP from the TP bar for this map. It is recommended that you bring it, if available.
- Because of the Short Range required by the LBAS to reach the boss node, it is recommended to send all of your LBAS into it to have a good chance in obtaining at least an A-rank victory.
- However, sending one of your bases full of interceptors/fighters to the Enemy Air Raid Nodes D and F can help make reaching the boss node easier.
- Alternatively you can send them both to the Air-Raid nodes (4 and 2 range) in lower difficulties and have them deal with those if your fleet is strong enough to obtain A- or S-Rank at the boss node without support.
- You may also consider the option to use the Support Expedition Fleet for the Boss Node.
- However, sending one of your bases full of interceptors/fighters to the Enemy Air Raid Nodes D and F can help make reaching the boss node easier.

Unlocking the Boss Node

- Just depleting the Transport Gauge will not be enough to open up the Boss Node T.
- Depending on difficulty selected, you must also:
Obtaining Air Superiority/Parity in Node D
- To obtain Air Superiority (Hard-Only) or Air Parity in (Easy/Medium) from D, you are recommended to bring CAV(s) (or Italian CA(s) such as Pola or Zara with multiple Seaplane Fighters, and/or Akitsu Maru Kai with Fighters, and have all of your LBAS fully equipped with Land-based Fighters or Carrier-based Fighters and sent to Node D.
- Another option for your LBAS is to equip them with both Land-based Attack Aircrafts and Land-based Fighters/Carrier-based Fighters and sent to Node D, where the Bombers will sink the Enemy Carriers, where they will become unable to participate in the Aerial Battle Phase.
- However as there are chances that the Enemy Carrier(s) may not be sunk from this attack, this option is slightly risky to use.
- Another option for your LBAS is to equip them with both Land-based Attack Aircrafts


Defeating the Heavy Cruiser Princess

Winter 2018 Event E-5 Hard Final Kill
- You are to use the Striking Force Fleet (3rd Fleet) for this Phase.
- Recommended Composition: 2 CA(V) 1 CL 4 DD
- Route: O N P T
- Please note that to avoid routing from O to R, having 4 Destroyers in the fleet is Mandatory.
- Due to this fact, use of Striking Force Fleet Command Facility to retreat a Destroyer on node O is discouraged, as having even one of them retreated will cause your fleet to go through the extra node R before the boss node.
- Route: O N P T
- Recommended Composition: 2 CA(V) 1 CL 4 DD
- To pass through the Route with a safer chance, you are highly recommended to continue to use the Vanguard Formation all the way until your fleet reaches the Boss Node.
- You are recommended to bring at least 1 CAV fully equipped with multiple Seaplane Fighters.
- Unfortunately due to the extremely high Air Power requirements in Nodes O and N, you will most likely have to deal with getting Air Denial, or at worse Air Incapability (制空権喪失!) if lacking in Seaplane Fighters or just outright not using any at all.
- Although you may choose to use your LBAS with Fighters to reduce the Air Power of the Enemy Fleet, this will mean you will have less support at the Boss Node.
- You are highly recommended to bring at least 1-2 Ship capable of using Anti-Air Cut-In.
- Unfortunately due to the extremely high Air Power requirements in Nodes O and N, you will most likely have to deal with getting Air Denial, or at worse Air Incapability (制空権喪失!) if lacking in Seaplane Fighters or just outright not using any at all.
- Node P has an Enemy Fleet Pattern which contains a Submarine So-Class. This will cause your Destroyer/Light Cruisers to be forced to attack it, making them unable to take out the other enemies.
- You are recommended to bring at least 1 OASW capable Destroyer or Light Cruiser to get rid of it immediately.
- To fight against the Boss Fleet more easily, you are recommended to send both of your LBAS with 3 Land-based Attack Aircrafts and 1 Fighter each to the Boss Node.
- Use of Support Expedition is not required for Pre-Finals, but you may wish to consider it for the Final Kill in the Boss Node.

Map progression
")
")
LBAS Flight Range

Enemy patterns
Lua error in package.lua at line 80: module 'Module:Collection/EnemyShips' not found. Lua error in package.lua at line 80: module 'Module:Collection/EnemyShips' not found. Lua error in package.lua at line 80: module 'Module:Collection/EnemyShips' not found. Lua error in package.lua at line 80: module 'Module:Collection/EnemyShips' not found. Lua error in package.lua at line 80: module 'Module:Collection/EnemyShips' not found. Lua error in package.lua at line 80: module 'Module:Collection/EnemyShips' not found. Lua error in package.lua at line 80: module 'Module:Collection/EnemyShips' not found. Lua error in package.lua at line 80: module 'Module:Collection/EnemyShips' not found. Lua error in package.lua at line 80: module 'Module:Collection/EnemyShips' not found. Lua error in package.lua at line 80: module 'Module:Collection/EnemyShips' not found. Lua error in package.lua at line 80: module 'Module:Collection/EnemyShips' not found. Lua error in package.lua at line 80: module 'Module:Collection/EnemyShips' not found. Lua error in package.lua at line 80: module 'Module:Collection/EnemyShips' not found. Lua error in package.lua at line 80: module 'Module:Collection/EnemyShips' not found.
Lua error in package.lua at line 80: module 'Module:Collection/EnemyShips' not found. Lua error in package.lua at line 80: module 'Module:Collection/EnemyShips' not found. Lua error in package.lua at line 80: module 'Module:Collection/EnemyShips' not found. Lua error in package.lua at line 80: module 'Module:Collection/EnemyShips' not found. Lua error in package.lua at line 80: module 'Module:Collection/EnemyShips' not found. Lua error in package.lua at line 80: module 'Module:Collection/EnemyShips' not found. Lua error in package.lua at line 80: module 'Module:Collection/EnemyShips' not found. Lua error in package.lua at line 80: module 'Module:Collection/EnemyShips' not found. Lua error in package.lua at line 80: module 'Module:Collection/EnemyShips' not found. Lua error in package.lua at line 80: module 'Module:Collection/EnemyShips' not found. Lua error in package.lua at line 80: module 'Module:Collection/EnemyShips' not found. Lua error in package.lua at line 80: module 'Module:Collection/EnemyShips' not found. Lua error in package.lua at line 80: module 'Module:Collection/EnemyShips' not found. Lua error in package.lua at line 80: module 'Module:Collection/EnemyShips' not found.
Lua error in package.lua at line 80: module 'Module:Collection/EnemyShips' not found. Lua error in package.lua at line 80: module 'Module:Collection/EnemyShips' not found. Lua error in package.lua at line 80: module 'Module:Collection/EnemyShips' not found. Lua error in package.lua at line 80: module 'Module:Collection/EnemyShips' not found. Lua error in package.lua at line 80: module 'Module:Collection/EnemyShips' not found. Lua error in package.lua at line 80: module 'Module:Collection/EnemyShips' not found. Lua error in package.lua at line 80: module 'Module:Collection/EnemyShips' not found. Lua error in package.lua at line 80: module 'Module:Collection/EnemyShips' not found. Lua error in package.lua at line 80: module 'Module:Collection/EnemyShips' not found. Lua error in package.lua at line 80: module 'Module:Collection/EnemyShips' not found. Lua error in package.lua at line 80: module 'Module:Collection/EnemyShips' not found. Lua error in package.lua at line 80: module 'Module:Collection/EnemyShips' not found. Lua error in package.lua at line 80: module 'Module:Collection/EnemyShips' not found.
Lua error in package.lua at line 80: module 'Module:Collection/EnemyShips' not found. Lua error in package.lua at line 80: module 'Module:Collection/EnemyShips' not found. Lua error in package.lua at line 80: module 'Module:Collection/EnemyShips' not found. Lua error in package.lua at line 80: module 'Module:Collection/EnemyShips' not found. Lua error in package.lua at line 80: module 'Module:Collection/EnemyShips' not found. Lua error in package.lua at line 80: module 'Module:Collection/EnemyShips' not found. Lua error in package.lua at line 80: module 'Module:Collection/EnemyShips' not found. Lua error in package.lua at line 80: module 'Module:Collection/EnemyShips' not found. Lua error in package.lua at line 80: module 'Module:Collection/EnemyShips' not found.