(Add Carrier Task Force) Tag: rte-source |
がか (Message Wall | contribs) mNo edit summary Tag: sourceedit |
||
| (23 intermediate revisions by 7 users not shown) | |||
| Line 1: | Line 1: | ||
__NOTOC__ |
__NOTOC__ |
||
<div style="text-align:center;margin-top:20px;">{{Event/DetailToggle}}</div> |
<div style="text-align:center;margin-top:20px;">{{Event/DetailToggle}}</div> |
||
| − | |||
| − | {{Warning|text_align = left|title = Notice |
||
| − | |message = This Section is currently under construction and is incomplete. For a more smoother and easier time with the Event, please be patient for all of the critical information to be released. Otherwise please try to look for other available sources, or ask the Comment Section Directly. Thank you for your understanding. |
||
| − | }} |
||
==Information== |
==Information== |
||
| Line 21: | Line 17: | ||
|tag = Convoy Fleet |
|tag = Convoy Fleet |
||
|transport = true |
|transport = true |
||
| − | |hp_easy = |
+ | |hp_easy = 290 |
|hp_normal = 400 |
|hp_normal = 400 |
||
|hp_hard = 500 |
|hp_hard = 500 |
||
| Line 65: | Line 61: | ||
|E -> G = |
|E -> G = |
||
* Fleet contains AV |
* Fleet contains AV |
||
| − | * Fleet |
+ | * Fleet went through node B |
| + | * Amount of Seaplanes equipped ≦ 2 |
||
* The fleet is a Transport Escort Combined Fleet and {{EquipmentLink|Fleet Command Facility}} is activated.(Not equipped, but activated) |
* The fleet is a Transport Escort Combined Fleet and {{EquipmentLink|Fleet Command Facility}} is activated.(Not equipped, but activated) |
||
|E -> H = |
|E -> H = |
||
| Line 75: | Line 72: | ||
* Amount of (F)BB(V)+CV(B) ≧ 5 (CVL does not count) |
* Amount of (F)BB(V)+CV(B) ≧ 5 (CVL does not count) |
||
* Slow Fleet |
* Slow Fleet |
||
| + | |G -> I = |
||
| ⚫ | |||
| + | * Amount of Seaplanes equipped ≦ 2 |
||
| ⚫ | |||
|G -> J = * Does not meet the requirements to go to either F or I |
|G -> J = * Does not meet the requirements to go to either F or I |
||
| Line 81: | Line 80: | ||
* If the TP gauge is not destroyed yet: |
* If the TP gauge is not destroyed yet: |
||
** TP gauge is below 25% '''and''' fleet is Transport Escort Combined Fleet (once per sortie) |
** TP gauge is below 25% '''and''' fleet is Transport Escort Combined Fleet (once per sortie) |
||
| − | |H -> K = |
+ | |H -> K/resource = |
* Fleet came from node J |
* Fleet came from node J |
||
* TP gauge is destroyed |
* TP gauge is destroyed |
||
| Line 99: | Line 98: | ||
All ships used in the historical routing are involved with {{ShipLink|Matsukaze}} in some way. |
All ships used in the historical routing are involved with {{ShipLink|Matsukaze}} in some way. |
||
* '''Kamikaze-class (same class)''' |
* '''Kamikaze-class (same class)''' |
||
| − | **{{ShipLink|Kamikaze}}, {{ShipLink|Harukaze}}, {{ShipLink|Asakaze}} |
+ | **{{ShipLink|Kamikaze}}, {{ShipLink|Harukaze}}, {{ShipLink|Asakaze}}, {{ShipLink|Matsukaze}} |
* '''Attack on Pearl Harbour (DesDiv 22)''' |
* '''Attack on Pearl Harbour (DesDiv 22)''' |
||
**{{ShipLink|Satsuki|kai_ni=x}}, {{ShipLink|Fumizuki}}, {{ShipLink|Minazuki}}, {{ShipLink|Nagatsuki}} |
**{{ShipLink|Satsuki|kai_ni=x}}, {{ShipLink|Fumizuki}}, {{ShipLink|Minazuki}}, {{ShipLink|Nagatsuki}} |
||
| Line 107: | Line 106: | ||
**{{ShipLink|Fumizuki}} |
**{{ShipLink|Fumizuki}} |
||
| + | ===Notes=== |
||
| ⚫ | |||
| ⚫ | |||
| + | *For the boss node, the final form will trigger based on the amount of TP that will be depleted with a S-rank and TP remaining. |
||
| + | **If the S-rank TP depletion exceeds the TP remaining, the final form will appear even if more than 25% of the TP bar is remaining.[http://imgur.com/a/2QTSb] |
||
| + | **If the bar is at or under 25%, the final form will always appear. |
||
===Tips=== |
===Tips=== |
||
*This is a Transport Operation map. Equipping many [[Drum Canister (Transport Use)]] and [[Daihatsu Landing Craft]] will help deplete the TP gauge quickly. |
*This is a Transport Operation map. Equipping many [[Drum Canister (Transport Use)]] and [[Daihatsu Landing Craft]] will help deplete the TP gauge quickly. |
||
**A or S-rank victories are required to deplete the TP gauge. B-ranks will result in a fail (no gauge depleted). |
**A or S-rank victories are required to deplete the TP gauge. B-ranks will result in a fail (no gauge depleted). |
||
| + | * Avoid using a Slow Fleet at all costs. Using slow fleets will give yield the longest routes possible. |
||
*For Transport Combined Fleet (TCF), it is recommended to bring 3 or more seaplane fighters ([[Type 2 Seaplane Fighter Kai]] or [[Ro.44 Seaplane Fighter]]) to gain Air Parity against the boss so that the enemy doesn't gain access to [[Artillery Spotting]]. |
*For Transport Combined Fleet (TCF), it is recommended to bring 3 or more seaplane fighters ([[Type 2 Seaplane Fighter Kai]] or [[Ro.44 Seaplane Fighter]]) to gain Air Parity against the boss so that the enemy doesn't gain access to [[Artillery Spotting]]. |
||
| − | **With a 4th seaplane fighter, and depending on the [[Land |
+ | **With a 4th seaplane fighter, and depending on the [[Land Base Aerial Support]] setup, it is possible to gain Air Superiority (AS) at the boss while using the Transport Combined Fleet. |
*It is possible to use Surface Task Force (STF) or Carrier Task Force (CTF) to deplete the TP gauge. However, compared to the use of the Transport Combined Fleet (TCF), fleets will be taking a longer route and depletion of the TP gauge will be slower. |
*It is possible to use Surface Task Force (STF) or Carrier Task Force (CTF) to deplete the TP gauge. However, compared to the use of the Transport Combined Fleet (TCF), fleets will be taking a longer route and depletion of the TP gauge will be slower. |
||
| + | **But recommended over Transport Combined Fleet (TCF) if |
||
| ⚫ | |||
| + | ***Your TCF lacking too much of air control power. |
||
| ⚫ | |||
| + | ***You have many high level (F)BB,CV(B) but less high level DD. |
||
| − | *For Boss node, its last dance will trigger based on the amount of TP you can deplete with your S-rank run. If it exceeds the TP-left, then you will face the Final Form even if you have more than 25% of the TP bar left. As above, having more than 25% of the bar left will still lead you from J-> K and J->H for at or below. [http://imgur.com/a/2QTSb] |
||
| + | ***You can't pass last dance with TCF. |
||
| + | ===Ranking Up Land-Based Attack Aircrafts' Aircraft Proficiency in node A=== |
||
| + | *If in need of Power Ranking up your Aircraft Proficiency for your Land-based Attack Aircrafts, you may do so in E-2 Node A (also available in node C but then you need the historical ships) |
||
| + | **You must setup a Transport Combined Fleet with 4 DDs minimum in 1st fleet, and have 1 CL 3~5 DDs in 2nd fleet, equipped with ASW equipment. It is recommended that these 1 CL 3~5 DDs in the 2nd fleet to have the ability to use OASW attacks by either having Isuzu Kai Ni included, and/or having members with 100 ASW stats, as much as possible. |
||
| + | **Send your LBAS to node A, full of Land-based Attack Aircrafts (you may also add in Carrier-based Aircraft as well if you wish to rank their AIrcraft Proficiency as well) |
||
| + | **Morale on both your LBAS and your fleet can be completely ignored, as ASW attacks aren't very affected by morale. |
||
| + | **Retreat after finished, and repeat until all of your Aircrafts are fully ranked up to Double Chevron. |
||
| + | **As node A is a Submarine node, it will not consume ammo. |
||
==User Submitted Fleet compositions== |
==User Submitted Fleet compositions== |
||
| − | + | ===Transport Combined Fleet (TCF)=== |
|
'''South Route''' |
'''South Route''' |
||
| − | *{{Event/Route|A|red|D|blue|E|red|H|red|K|green|M|red}}<br>{{Event/Route|A|red|D|blue|G|red|J|red|K|green|M|red}} |
+ | *{{Event/Route|A|red|D|blue|E|red|H|red|K|green|M|red}}<br />{{Event/Route|A|red|D|blue|G|red|J|red|K|green|M|red}} |
** 2 BBV/CAV/AV (Fast-Only) 4 DD + 1 CL 2 CA(V) 3 DD |
** 2 BBV/CAV/AV (Fast-Only) 4 DD + 1 CL 2 CA(V) 3 DD |
||
| − | ** Most generic fleet setup to be used without the use of the historical ships. |
+ | ** Most generic fleet setup to be used without the use of the historical ships. |
** All fleet members must be Fast speed. Any slow ships present will cause off-routing. |
** All fleet members must be Fast speed. Any slow ships present will cause off-routing. |
||
*** To use any normally slow ships for this composition, the ship must have [[Improved Kanhon Type Turbine]] and [[Enhanced Kanhon Type Boiler]]/[[New Model High Temperature High Pressure Boiler]] equipped change their speeds from Slow to Fast. |
*** To use any normally slow ships for this composition, the ship must have [[Improved Kanhon Type Turbine]] and [[Enhanced Kanhon Type Boiler]]/[[New Model High Temperature High Pressure Boiler]] equipped change their speeds from Slow to Fast. |
||
| − | ** Once the TP gauge is at or below a certain amount (25%?), this fleet will route H -> J, and also J -> H even if H has already been visited once. |
+ | ** Once the TP gauge is at or below a certain amount (25%?), this fleet will route H -> J, and also J -> H even if H has already been visited once. Consider using Surface Task Force or Carrier Task Force instead. |
***Alternatively ADGJHKM route can be used to clear the remaining gauge. |
***Alternatively ADGJHKM route can be used to clear the remaining gauge. |
||
| + | <!-- |
||
| − | |||
{| style="width:700px;" class="wikitable mw-collapsible mw-collapsed" |
{| style="width:700px;" class="wikitable mw-collapsible mw-collapsed" |
||
|- |
|- |
||
| Line 157: | Line 171: | ||
|- |
|- |
||
|{{ShipBattleCardKai|Ooshio/Kai Ni}} |
|{{ShipBattleCardKai|Ooshio/Kai Ni}} |
||
| − | + | |{{LandingCraft}}[[Daihatsu Landing Craft]]<br /> |
|
'''OR'''<br /> |
'''OR'''<br /> |
||
{{Drum}}[[Drum Canister (Transport Use)]] |
{{Drum}}[[Drum Canister (Transport Use)]] |
||
| − | + | |{{LandingCraft}}[[Daihatsu Landing Craft]]<br /> |
|
'''OR'''<br /> |
'''OR'''<br /> |
||
{{Drum}}[[Drum Canister (Transport Use)]] |
{{Drum}}[[Drum Canister (Transport Use)]] |
||
| − | + | |{{LandingCraft}}[[Daihatsu Landing Craft]]<br /> |
|
'''OR'''<br /> |
'''OR'''<br /> |
||
{{Drum}}[[Drum Canister (Transport Use)]] |
{{Drum}}[[Drum Canister (Transport Use)]] |
||
| Line 169: | Line 183: | ||
|- |
|- |
||
|{{ShipBattleCardKai|Kasumi/Kai Ni}} |
|{{ShipBattleCardKai|Kasumi/Kai Ni}} |
||
| − | + | |{{LandingCraft}}[[Daihatsu Landing Craft]]<br /> |
|
'''OR'''<br /> |
'''OR'''<br /> |
||
{{Drum}}[[Drum Canister (Transport Use)]] |
{{Drum}}[[Drum Canister (Transport Use)]] |
||
| − | + | |{{LandingCraft}}[[Daihatsu Landing Craft]]<br /> |
|
'''OR'''<br /> |
'''OR'''<br /> |
||
{{Drum}}[[Drum Canister (Transport Use)]] |
{{Drum}}[[Drum Canister (Transport Use)]] |
||
| − | + | |{{LandingCraft}}[[Daihatsu Landing Craft]]<br /> |
|
'''OR'''<br /> |
'''OR'''<br /> |
||
{{Drum}}[[Drum Canister (Transport Use)]] |
{{Drum}}[[Drum Canister (Transport Use)]] |
||
| Line 181: | Line 195: | ||
|- |
|- |
||
|{{ShipBattleCardKai|Asashio/Kai Ni D}} |
|{{ShipBattleCardKai|Asashio/Kai Ni D}} |
||
| − | + | |{{LandingCraft}}[[Daihatsu Landing Craft]]<br /> |
|
'''OR'''<br /> |
'''OR'''<br /> |
||
{{Drum}}[[Drum Canister (Transport Use)]] |
{{Drum}}[[Drum Canister (Transport Use)]] |
||
| − | + | |{{LandingCraft}}[[Daihatsu Landing Craft]]<br /> |
|
'''OR'''<br /> |
'''OR'''<br /> |
||
{{Drum}}[[Drum Canister (Transport Use)]] |
{{Drum}}[[Drum Canister (Transport Use)]] |
||
| − | + | |{{LandingCraft}}[[Daihatsu Landing Craft]]<br /> |
|
'''OR'''<br /> |
'''OR'''<br /> |
||
{{Drum}}[[Drum Canister (Transport Use)]] |
{{Drum}}[[Drum Canister (Transport Use)]] |
||
| Line 193: | Line 207: | ||
|- |
|- |
||
|{{ShipBattleCardKai|Arashio/Kai Ni}} |
|{{ShipBattleCardKai|Arashio/Kai Ni}} |
||
| − | + | |{{LandingCraft}}[[Daihatsu Landing Craft]]<br /> |
|
'''OR'''<br /> |
'''OR'''<br /> |
||
{{Drum}}[[Drum Canister (Transport Use)]] |
{{Drum}}[[Drum Canister (Transport Use)]] |
||
| − | + | |{{LandingCraft}}[[Daihatsu Landing Craft]]<br /> |
|
'''OR'''<br /> |
'''OR'''<br /> |
||
{{Drum}}[[Drum Canister (Transport Use)]] |
{{Drum}}[[Drum Canister (Transport Use)]] |
||
| − | + | |{{LandingCraft}}[[Daihatsu Landing Craft]]<br /> |
|
'''OR'''<br /> |
'''OR'''<br /> |
||
{{Drum}}[[Drum Canister (Transport Use)]] |
{{Drum}}[[Drum Canister (Transport Use)]] |
||
| Line 223: | Line 237: | ||
|- |
|- |
||
|{{ShipBattleCardKai|Kawakaze/Kai Ni}} |
|{{ShipBattleCardKai|Kawakaze/Kai Ni}} |
||
| − | + | |{{LandingCraft}}[[Daihatsu Landing Craft]]<br /> |
|
'''OR'''<br /> |
'''OR'''<br /> |
||
{{Drum}}[[Drum Canister (Transport Use)]] |
{{Drum}}[[Drum Canister (Transport Use)]] |
||
| − | + | |{{GreenGunDP}}[[10cm Twin High-angle Gun Mount + Anti-Aircraft Fire Director]] |
|
| − | + | |{{GreenGunDP}}[[10cm Twin High-angle Gun Mount + Anti-Aircraft Fire Director]] |
|
| |
| |
||
|- |
|- |
||
|{{ShipBattleCardKai|Shimakaze/Kai}} |
|{{ShipBattleCardKai|Shimakaze/Kai}} |
||
| − | + | |{{Drum}}[[Drum Canister (Transport Use)]] |
|
| − | + | |{{GreenGunDP}}[[10cm Twin High-angle Gun Mount + Anti-Aircraft Fire Director]] |
|
| − | + | |{{GreenGunDP}}[[10cm Twin High-angle Gun Mount + Anti-Aircraft Fire Director]]| |
|
| |
| |
||
|- |
|- |
||
|{{ShipBattleCardKai|Verniy}} |
|{{ShipBattleCardKai|Verniy}} |
||
| − | + | |{{LandingCraft}}[[Daihatsu Landing Craft]]<br /> |
|
'''OR'''<br /> |
'''OR'''<br /> |
||
{{Drum}}[[Drum Canister (Transport Use)]] |
{{Drum}}[[Drum Canister (Transport Use)]] |
||
| − | + | |{{GreenGunDP}}[[10cm Twin High-angle Gun Mount + Anti-Aircraft Fire Director]] |
|
| − | + | |{{GreenGunDP}}[[10cm Twin High-angle Gun Mount + Anti-Aircraft Fire Director]]| |
|
| |
| |
||
|} |
|} |
||
| + | --> |
||
'''North Route''' |
'''North Route''' |
||
* {{Event/Route|C|blue|F|red|I|red|J|red|K|green|M|red}} |
* {{Event/Route|C|blue|F|red|I|red|J|red|K|green|M|red}} |
||
| − | ** Fleet setup is 2 |
+ | ** Fleet setup is 2 CAV/AV (Fast) 4 DD + 2 CA(V) 1 CL 3 DD. |
| + | ** A number of historical ships is required depending on the selected map difficulty. See Branching Rules above for details. |
||
| − | ** Requires 2 or more from {{ShipLink|Kamikaze}}, {{ShipLink|Harukaze}}, and/or {{ShipLink|Asakaze}} in the fleet. |
||
| − | *** |
+ | *** For hard, the minimum number possible is 2 Kamikaze-class DD and one other historical ship. |
| + | *** For normal, the minimum number possible is 2 Kamikaze-class DD. |
||
| − | ** One of {{ShipLink|Nagatsuki}}, {{ShipLink|Fumizuki}}, {{ShipLink|Minazuki}}, or {{ShipLink|Satsuki}} is also required in the fleet. |
||
| + | *** For easy, the minimum number possible is 1 Kamikaze-class DD and one other historical ship. |
||
| + | *** Other combinations (that bring more historical ships) are possible. |
||
** All fleet members must be Fast speed. Any slow speed ships without speed boost present in the fleet will cause the fleet to start from south instead. |
** All fleet members must be Fast speed. Any slow speed ships without speed boost present in the fleet will cause the fleet to start from south instead. |
||
| − | ** Once the TP gauge is at or below a certain amount (25%?), this fleet will route J -> H. |
+ | ** Once the TP gauge is at or below a certain amount (25%?), this fleet will route J -> H. Consider using Surface Task Force or Carrier Task Force instead. |
***Alternatively CFIJHKM route can be used to clear the remaining gauge. |
***Alternatively CFIJHKM route can be used to clear the remaining gauge. |
||
**This route is Transport Combined Fleet exclusive and cannot be taken via Surface Task Force or Carrier Task Force. |
**This route is Transport Combined Fleet exclusive and cannot be taken via Surface Task Force or Carrier Task Force. |
||
| + | <!-- |
||
{| style="width:700px;" class="wikitable mw-collapsible mw-collapsed" |
{| style="width:700px;" class="wikitable mw-collapsible mw-collapsed" |
||
|- |
|- |
||
| Line 286: | Line 304: | ||
|{{ShipBattleCardKai|Satsuki/Kai Ni}}<br /> |
|{{ShipBattleCardKai|Satsuki/Kai Ni}}<br /> |
||
'''MANDATORY''' |
'''MANDATORY''' |
||
| − | + | |{{LandingCraft}}[[Daihatsu Landing Craft]]<br /> |
|
'''OR'''<br /> |
'''OR'''<br /> |
||
{{Drum}}[[Drum Canister (Transport Use)]] |
{{Drum}}[[Drum Canister (Transport Use)]] |
||
| − | + | |{{LandingCraft}}[[Daihatsu Landing Craft]]<br /> |
|
'''OR'''<br /> |
'''OR'''<br /> |
||
{{Drum}}[[Drum Canister (Transport Use)]] |
{{Drum}}[[Drum Canister (Transport Use)]] |
||
| − | + | |{{LandingCraft}}[[Daihatsu Landing Craft]]<br /> |
|
'''OR'''<br /> |
'''OR'''<br /> |
||
{{Drum}}[[Drum Canister (Transport Use)]] |
{{Drum}}[[Drum Canister (Transport Use)]] |
||
| Line 298: | Line 316: | ||
|- |
|- |
||
|{{ShipBattleCardKai|Kasumi/Kai Ni}} |
|{{ShipBattleCardKai|Kasumi/Kai Ni}} |
||
| − | + | |{{LandingCraft}}[[Daihatsu Landing Craft]]<br /> |
|
'''OR'''<br /> |
'''OR'''<br /> |
||
{{Drum}}[[Drum Canister (Transport Use)]] |
{{Drum}}[[Drum Canister (Transport Use)]] |
||
| − | + | |{{LandingCraft}}[[Daihatsu Landing Craft]]<br /> |
|
'''OR'''<br /> |
'''OR'''<br /> |
||
{{Drum}}[[Drum Canister (Transport Use)]] |
{{Drum}}[[Drum Canister (Transport Use)]] |
||
| − | + | |{{LandingCraft}}[[Daihatsu Landing Craft]]<br /> |
|
'''OR'''<br /> |
'''OR'''<br /> |
||
{{Drum}}[[Drum Canister (Transport Use)]] |
{{Drum}}[[Drum Canister (Transport Use)]] |
||
| Line 310: | Line 328: | ||
|- |
|- |
||
|{{ShipBattleCardKai|Asashio/Kai Ni D}} |
|{{ShipBattleCardKai|Asashio/Kai Ni D}} |
||
| − | + | |{{LandingCraft}}[[Daihatsu Landing Craft]]<br /> |
|
'''OR'''<br /> |
'''OR'''<br /> |
||
{{Drum}}[[Drum Canister (Transport Use)]] |
{{Drum}}[[Drum Canister (Transport Use)]] |
||
| − | + | |{{LandingCraft}}[[Daihatsu Landing Craft]]<br /> |
|
'''OR'''<br /> |
'''OR'''<br /> |
||
{{Drum}}[[Drum Canister (Transport Use)]] |
{{Drum}}[[Drum Canister (Transport Use)]] |
||
| − | + | |{{LandingCraft}}[[Daihatsu Landing Craft]]<br /> |
|
'''OR'''<br /> |
'''OR'''<br /> |
||
{{Drum}}[[Drum Canister (Transport Use)]] |
{{Drum}}[[Drum Canister (Transport Use)]] |
||
| Line 322: | Line 340: | ||
|- |
|- |
||
|{{ShipBattleCardKai|Arashio/Kai Ni}} |
|{{ShipBattleCardKai|Arashio/Kai Ni}} |
||
| − | + | |{{LandingCraft}}[[Daihatsu Landing Craft]]<br /> |
|
'''OR'''<br /> |
'''OR'''<br /> |
||
{{Drum}}[[Drum Canister (Transport Use)]] |
{{Drum}}[[Drum Canister (Transport Use)]] |
||
| − | + | |{{LandingCraft}}[[Daihatsu Landing Craft]]<br /> |
|
'''OR'''<br /> |
'''OR'''<br /> |
||
{{Drum}}[[Drum Canister (Transport Use)]] |
{{Drum}}[[Drum Canister (Transport Use)]] |
||
| − | + | |{{LandingCraft}}[[Daihatsu Landing Craft]]<br /> |
|
'''OR'''<br /> |
'''OR'''<br /> |
||
{{Drum}}[[Drum Canister (Transport Use)]] |
{{Drum}}[[Drum Canister (Transport Use)]] |
||
| Line 352: | Line 370: | ||
|- |
|- |
||
|{{ShipBattleCardKai|Hatsushimo/Kai Ni}} |
|{{ShipBattleCardKai|Hatsushimo/Kai Ni}} |
||
| − | + | |{{Drum}}[[Drum Canister (Transport Use)]] |
|
| − | + | |{{TorpedoWeapon}}[[61cm Quintuple (Oxygen) Torpedo Mount]]<br /> |
|
Only Recommended for Ships above 30 Luck |
Only Recommended for Ships above 30 Luck |
||
| − | + | |{{TorpedoWeapon}}[[61cm Quintuple (Oxygen) Torpedo Mount]]]<br /> |
|
Only Recommended for Ships above 30 Luck |
Only Recommended for Ships above 30 Luck |
||
| |
| |
||
| Line 361: | Line 379: | ||
|{{ShipBattleCardKai|Kamikaze/Kai}}<br /> |
|{{ShipBattleCardKai|Kamikaze/Kai}}<br /> |
||
'''MANDATORY''' |
'''MANDATORY''' |
||
| − | + | |{{Drum}}[[Drum Canister (Transport Use)]] |
|
| − | + | |{{TorpedoWeapon}}[[61cm Quadruple (Oxygen) Torpedo Mount]]<br /> |
|
Only Recommended for Ships above 30 Luck |
Only Recommended for Ships above 30 Luck |
||
| − | + | |{{TorpedoWeapon}}[[61cm Quadruple (Oxygen) Torpedo Mount]]<br /> |
|
Only Recommended for Ships above 30 Luck |
Only Recommended for Ships above 30 Luck |
||
| |
| |
||
| Line 370: | Line 388: | ||
|{{ShipBattleCardKai|Harukaze/Kai}}<br /> |
|{{ShipBattleCardKai|Harukaze/Kai}}<br /> |
||
'''MANDATORY''' |
'''MANDATORY''' |
||
| − | + | |{{Drum}}[[Drum Canister (Transport Use)]] |
|
| − | + | |{{TorpedoWeapon}}[[61cm Quadruple (Oxygen) Torpedo Mount]]<br /> |
|
Only Recommended for Ships above 30 Luck |
Only Recommended for Ships above 30 Luck |
||
| − | + | |{{TorpedoWeapon}}[[61cm Quadruple (Oxygen) Torpedo Mount]]<br /> |
|
Only Recommended for Ships above 30 Luck |
Only Recommended for Ships above 30 Luck |
||
| |
| |
||
|} |
|} |
||
| + | --> |
||
| ⚫ | |||
| + | |||
| − | + | ===Carrier Task Force (CTF)=== |
|
* {{Event/Route|A|red|B|orange|E|red|G|red|J|red|K|green|M|red}} |
* {{Event/Route|A|red|B|orange|E|red|G|red|J|red|K|green|M|red}} |
||
| + | ** All members must be Fast speed to avoid G → F offroute. |
||
| − | ** 2 FBB |
+ | ** 2 FBB 2 CV(B) 2 CA(V) + 1 CL 4 DD 1 CLT |
| − | ** Fast Fleet |
||
| + | ** 1 FBB 2 CV(B) 2 CVL 1 CA(V) + 1 CL 3 DD 2 CA(V) |
||
| + | ** 4 CV(B) 2 CA(V) + 1 CL 2 DD 2 CA(V) 1 CLT |
||
| + | ** 1 FBB 3 CV(B) 1 CVL 1 CA(V) + 1 CL 2 DD 2 CA(V) 1 CLT |
||
| + | ** 2 FBB 2 CV(B) 2 CVL + 1 CL 2 DD 1 CA(V) 2 CLT |
||
| + | |||
| + | |||
| ⚫ | |||
{{Include|Enemy patterns}} |
{{Include|Enemy patterns}} |
||
{{Include|Drop list}} |
{{Include|Drop list}} |
||
Latest revision as of 01:11, 4 March 2017
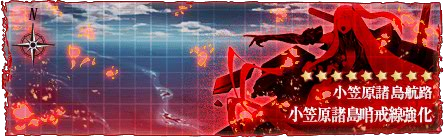
Information[]
|
Strengthening the Patrol Line in Ogasawara Islands
小笠原諸島哨戒線強化 | |
 | |
 | |
| Information | |
| Special Mechanics | Combined Fleet Abyssal Combined Fleet LoS Check Transport Load-Off Ship Locking |
| Boss gauge (HQ 120) |
Easy: 290 TP Medium: 400 TP Hard: 500 TP |
| Rewards | |
All:
Casual:
Easy:
 1 1Medium:
2 1 1 1 1Hard:
311 | |
| E-2 Branching Rules | ||
|---|---|---|
| Nodes | Rules | |
| Start | A |
|
C |
| |
A |
B |
|
D |
| |
D |
E |
|
G | ||
E |
G |
|
H |
| |
F |
I |
|
G |
F |
|
I |
| |
J |
| |
H |
J |
|
K |
| |
I |
J |
|
L |
| |
J |
H |
|
K |
| |


Historical Ships[]
All ships used in the historical routing are involved with Matsukaze in some way.
- Kamikaze-class (same class)
- Attack on Pearl Harbour (DesDiv 22)
- Battle of Kolombangara
- Battle of Vella Lavella

Notes[]
- Compositions which went J -> K via Transport Combined Fleet initially will route J -> H after the TP gauge has been reduced to at or below 25% [1].
- This will not happen for Surface Task Force or Carrier Task Force fleets.
- For the boss node, the final form will trigger based on the amount of TP that will be depleted with a S-rank and TP remaining.
- If the S-rank TP depletion exceeds the TP remaining, the final form will appear even if more than 25% of the TP bar is remaining.[2]
- If the bar is at or under 25%, the final form will always appear.
Tips[]
- This is a Transport Operation map. Equipping many Drum Canister (Transport Use) and Daihatsu Landing Craft will help deplete the TP gauge quickly.
- A or S-rank victories are required to deplete the TP gauge. B-ranks will result in a fail (no gauge depleted).
- Avoid using a Slow Fleet at all costs. Using slow fleets will give yield the longest routes possible.
- For Transport Combined Fleet (TCF), it is recommended to bring 3 or more seaplane fighters (Type 2 Seaplane Fighter Kai or Ro.44 Seaplane Fighter) to gain Air Parity against the boss so that the enemy doesn't gain access to Artillery Spotting.
- With a 4th seaplane fighter, and depending on the Land Base Aerial Support setup, it is possible to gain Air Superiority (AS) at the boss while using the Transport Combined Fleet.
- It is possible to use Surface Task Force (STF) or Carrier Task Force (CTF) to deplete the TP gauge. However, compared to the use of the Transport Combined Fleet (TCF), fleets will be taking a longer route and depletion of the TP gauge will be slower.
- But recommended over Transport Combined Fleet (TCF) if
- Your TCF lacking too much of air control power.
- You have many high level (F)BB,CV(B) but less high level DD.
- You can't pass last dance with TCF.
- But recommended over Transport Combined Fleet (TCF) if
Ranking Up Land-Based Attack Aircrafts' Aircraft Proficiency in node A[]
- If in need of Power Ranking up your Aircraft Proficiency for your Land-based Attack Aircrafts, you may do so in E-2 Node A (also available in node C but then you need the historical ships)
- You must setup a Transport Combined Fleet with 4 DDs minimum in 1st fleet, and have 1 CL 3~5 DDs in 2nd fleet, equipped with ASW equipment. It is recommended that these 1 CL 3~5 DDs in the 2nd fleet to have the ability to use OASW attacks by either having Isuzu Kai Ni included, and/or having members with 100 ASW stats, as much as possible.
- Send your LBAS to node A, full of Land-based Attack Aircrafts (you may also add in Carrier-based Aircraft as well if you wish to rank their AIrcraft Proficiency as well)
- Morale on both your LBAS and your fleet can be completely ignored, as ASW attacks aren't very affected by morale.
- Retreat after finished, and repeat until all of your Aircrafts are fully ranked up to Double Chevron.
- As node A is a Submarine node, it will not consume ammo.
User Submitted Fleet compositions[]
Transport Combined Fleet (TCF)[]
South Route
- A D E H K M
A D G J K M- 2 BBV/CAV/AV (Fast-Only) 4 DD + 1 CL 2 CA(V) 3 DD
- Most generic fleet setup to be used without the use of the historical ships.
- All fleet members must be Fast speed. Any slow ships present will cause off-routing.
- To use any normally slow ships for this composition, the ship must have Improved Kanhon Type Turbine and Enhanced Kanhon Type Boiler/New Model High Temperature High Pressure Boiler equipped change their speeds from Slow to Fast.
- Once the TP gauge is at or below a certain amount (25%?), this fleet will route H -> J, and also J -> H even if H has already been visited once. Consider using Surface Task Force or Carrier Task Force instead.
- Alternatively ADGJHKM route can be used to clear the remaining gauge.
North Route
- C F I J K M
- Fleet setup is 2 CAV/AV (Fast) 4 DD + 2 CA(V) 1 CL 3 DD.
- A number of historical ships is required depending on the selected map difficulty. See Branching Rules above for details.
- For hard, the minimum number possible is 2 Kamikaze-class DD and one other historical ship.
- For normal, the minimum number possible is 2 Kamikaze-class DD.
- For easy, the minimum number possible is 1 Kamikaze-class DD and one other historical ship.
- Other combinations (that bring more historical ships) are possible.
- All fleet members must be Fast speed. Any slow speed ships without speed boost present in the fleet will cause the fleet to start from south instead.
- Once the TP gauge is at or below a certain amount (25%?), this fleet will route J -> H. Consider using Surface Task Force or Carrier Task Force instead.
- Alternatively CFIJHKM route can be used to clear the remaining gauge.
- This route is Transport Combined Fleet exclusive and cannot be taken via Surface Task Force or Carrier Task Force.
Carrier Task Force (CTF)[]
- A B E G J K M
- All members must be Fast speed to avoid G → F offroute.
- 2 FBB 2 CV(B) 2 CA(V) + 1 CL 4 DD 1 CLT
- 1 FBB 2 CV(B) 2 CVL 1 CA(V) + 1 CL 3 DD 2 CA(V)
- 4 CV(B) 2 CA(V) + 1 CL 2 DD 2 CA(V) 1 CLT
- 1 FBB 3 CV(B) 1 CVL 1 CA(V) + 1 CL 2 DD 2 CA(V) 1 CLT
- 2 FBB 2 CV(B) 2 CVL + 1 CL 2 DD 1 CA(V) 2 CLT
Enemy patterns[]

Lua error in package.lua at line 80: module 'Module:Collection/EnemyShips' not found. Lua error in package.lua at line 80: module 'Module:Collection/EnemyShips' not found. Lua error in package.lua at line 80: module 'Module:Collection/EnemyShips' not found. Lua error in package.lua at line 80: module 'Module:Collection/EnemyShips' not found. Lua error in package.lua at line 80: module 'Module:Collection/EnemyShips' not found. Lua error in package.lua at line 80: module 'Module:Collection/EnemyShips' not found. Lua error in package.lua at line 80: module 'Module:Collection/EnemyShips' not found. Lua error in package.lua at line 80: module 'Module:Collection/EnemyShips' not found. Lua error in package.lua at line 80: module 'Module:Collection/EnemyShips' not found.
Lua error in package.lua at line 80: module 'Module:Collection/EnemyShips' not found. Lua error in package.lua at line 80: module 'Module:Collection/EnemyShips' not found. Lua error in package.lua at line 80: module 'Module:Collection/EnemyShips' not found. Lua error in package.lua at line 80: module 'Module:Collection/EnemyShips' not found. Lua error in package.lua at line 80: module 'Module:Collection/EnemyShips' not found. Lua error in package.lua at line 80: module 'Module:Collection/EnemyShips' not found. Lua error in package.lua at line 80: module 'Module:Collection/EnemyShips' not found. Lua error in package.lua at line 80: module 'Module:Collection/EnemyShips' not found. Lua error in package.lua at line 80: module 'Module:Collection/EnemyShips' not found.
Lua error in package.lua at line 80: module 'Module:Collection/EnemyShips' not found. Lua error in package.lua at line 80: module 'Module:Collection/EnemyShips' not found. Lua error in package.lua at line 80: module 'Module:Collection/EnemyShips' not found. Lua error in package.lua at line 80: module 'Module:Collection/EnemyShips' not found. Lua error in package.lua at line 80: module 'Module:Collection/EnemyShips' not found. Lua error in package.lua at line 80: module 'Module:Collection/EnemyShips' not found. Lua error in package.lua at line 80: module 'Module:Collection/EnemyShips' not found. Lua error in package.lua at line 80: module 'Module:Collection/EnemyShips' not found. Lua error in package.lua at line 80: module 'Module:Collection/EnemyShips' not found.