Foreword[]
This post is used for saving experiment data from other Kancolle testers, on the trigger rates & effectiveness of AACI (Anti-Air Cut-In). For a higher level of objectivity, I will refrain from concluding or formulating from anything below. In order to help readers understand the exp't, I attached some information beside the original data according to my understanding of the experiments. Therefore you're always welcome to evaluate my work & translation.
Since the following tests are all about probability, data from smaller sample sizes would be surrounded by parenthesis, which indicates less reliability. For more information on its significance, please visit Calculating Confidence Intervals for Underlying Probabilities by Winzongod.
Since some pictures below were downloaded from websites with no explicit citation, please contact me if you know any of the sources. Also, if you consider any unauthorized using of exp't data, you'll have my apology and associated content shall be deleted immediately.
If you noticed an error on my translation, ambiguity in the language, any important info were missing, or just need help with anything, please leave me a comment. I hope the following will be helpful.
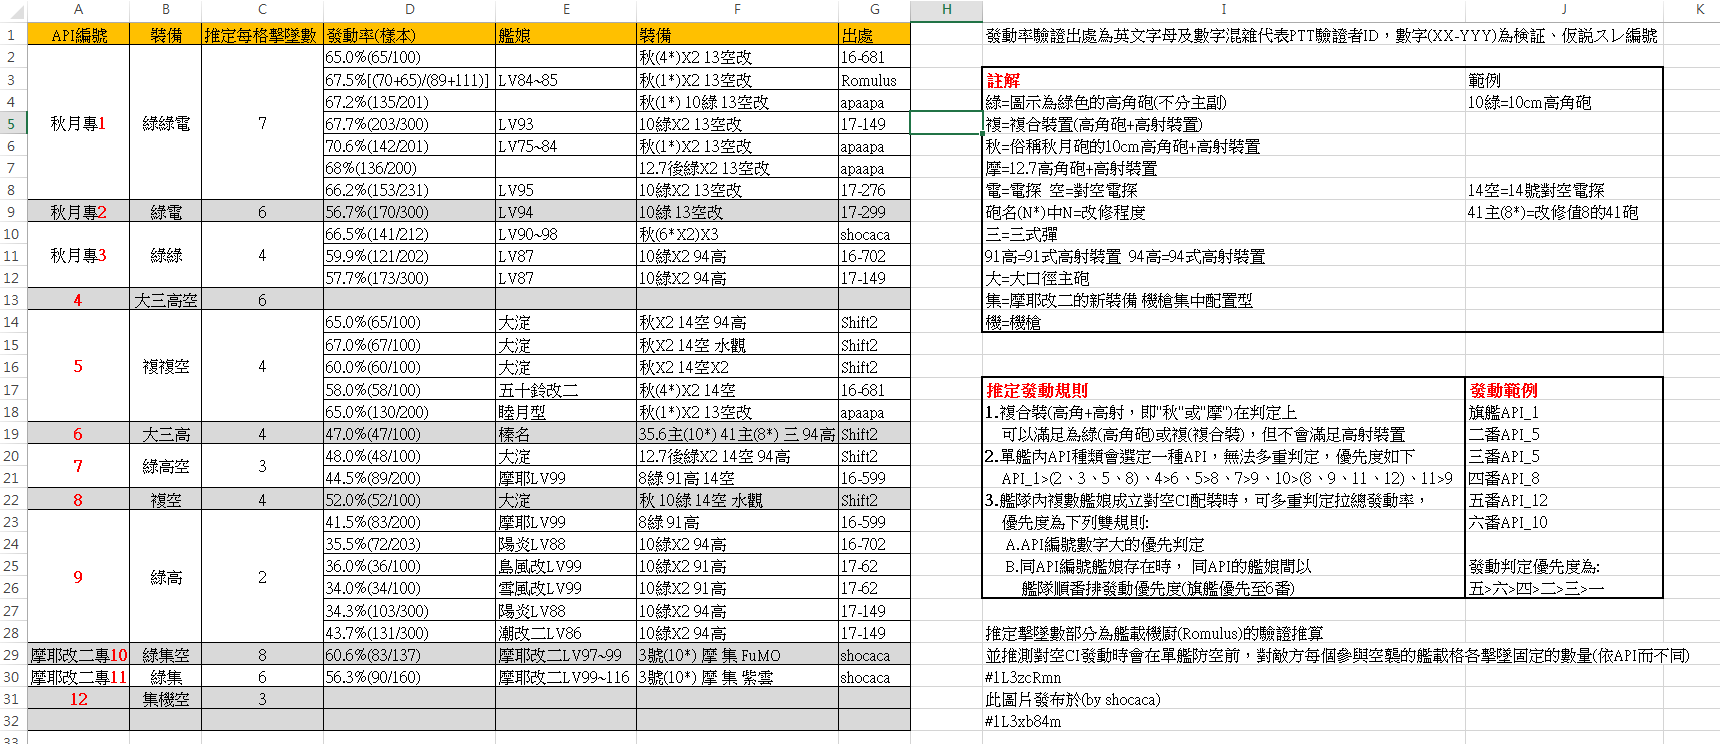
I - Categorization of AACI Type & Comparison[]
Source: 對空CI一覽表 與多重配置期望值
Data Collection: shocaca (小咖)
Contributor: VARIOUS (Users on PTT BBS + Results posted on Shitaraba BBS)
Exp't Date: ~ April, 2015
Explaination:
By reading network traffic (API data), it shows that the game currently recognizes 12 types of AACIs and identifies them as API_1, API_2, ... API_12. The types are determined by equipment setup only. It is also hypothesized that each AACI type shoots down a fixed number of planes in every slot in addition to the random planes that you will shoot down through normal fleet AA mechanics.
Furthermore, only one AA cut-in can be triggered per round of combat.
- If one of your ship fulfills the prerequisite for multiple AACI types, the better one shall take the priority. For example, when you equip your Akizuki with "[H]A mount + [H]A mount + Air [R]adar", it will always trigger type H.H.R., which overrides type H.R. or H.H.
- In addition, the system recognizes type H.H.R. as api_1, and type H.R. as api_2. That is being said, each type has its corresponding API value.
- if you are running multiple AACI ships in your fleet, the fleet total AACI chance can be increased. To illustrate, the ship with the highest API value rolls first. If it fails to trigger, it goes to the next lowest AACI ship., so on and so forth.
- Any other set up combination will NOT change the mode, effectiveness or trigger rates of AACI. (~ June, 2015)
Simplified Table[]
The following table summarizes all relevant data so far collected by Homuhomu123, and is not limited to this report by shocaca.
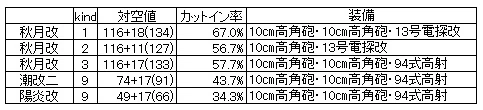
| API value | Type | #Shot down
per slot |
AACI Rate | Note |
|---|---|---|---|---|
| 1 | H.H.R. | +7 | 67% | Akizuki only. [H]A mount *2 + [R]adar |
| 2 | H.R. | +6 | ~57% | Akizuki only. HA mount + Radar. |
| 3 | H.H. | +4 | ~62% | Akizuki only. HA mount *2. |
| 4 | M.S.A.R | +6 | ? | BB(V) only. [S]anshiki + [R]adar setup. |
| 5 | B.B.R. | +4 | ~62% | [B]uilt-in HA mount *2 + radar. |
| 6 | M.S.A. | +4 | ~50% ? | BB(V) only. Sanshiki setup. |
| 7 | H.A.R. | +3 | ~45% | HA mount + [A]AFD + Radar. |
| 8 | B.R. | +4 | ~40% | Built-in HA mount + Radar. |
| 9 | H.A. | +2 | 34%~43% | HA mount + AAFD |
| 10 | H.C.R. | +8 | ~62% | Maya K2 only. HA + 25mm[C]D + Radar |
| 11 | H.C. | +6 | ~56% ? | Maya K2 only. HA + 25mmCD |
| 12 | C.G.R. | +3 | ? | 25mmCD + AA [G]un + Radar |
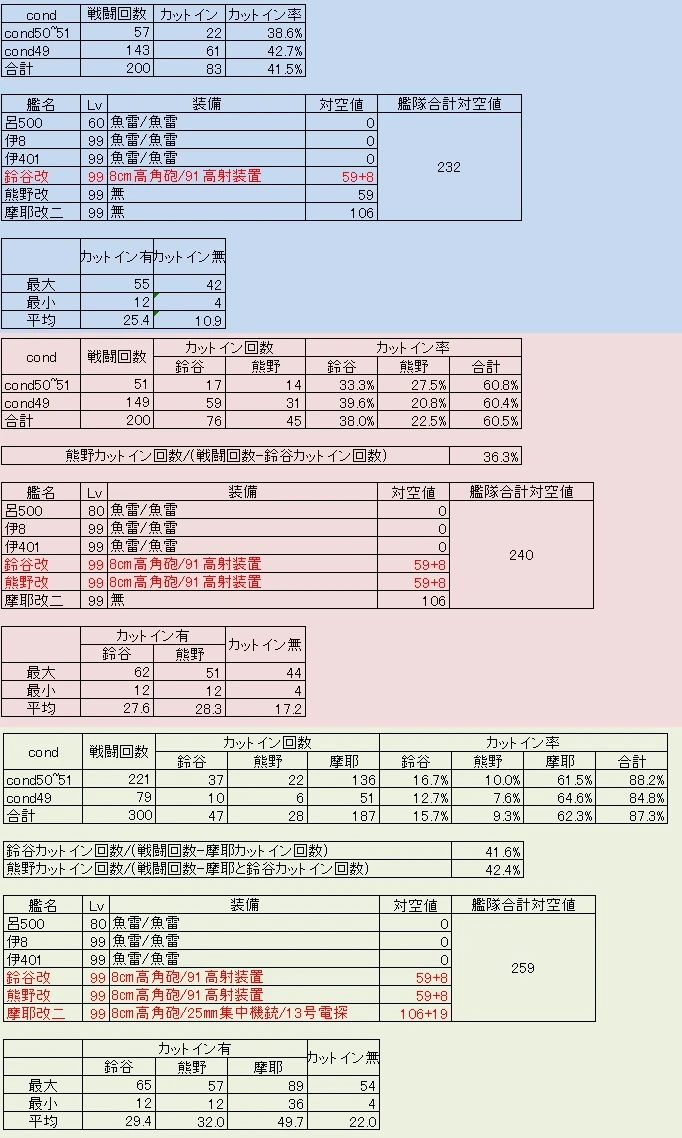
Full Translation on the Original Data[]
The following tests were conducted as if only one ship is capable of AACI in your fleet.
- HA = High angle mount
- AAFD = Anti-Air Fire Director
- AKZK = Akizuki Gun = 10cm HA Mount + AAFD
- T13/RK = Type 13 Air Radar Kai
- Sanshiki = Sanshiki-dan = Type 3 Shell
- 25mm(CD) = 25mm Triple AM (C.D) = 25mm Triple Autocannon Mount (Conentrated.Deployment)
|
API value |
(Type)
|
#Shot down
per slot |
AACI Rate (Sample) |
Test Ship (Lv) |
Test Equipment | Source |
|---|---|---|---|---|---|---|
|
1* Akizuki Only |
(H.H.R.)*
|
+7 | 65.0% (100) | Akizuki |
AKZK(4*) x2, T13/RK |
16-681 |
| 67.5% (200) | Akizuki (84~85) |
AKZK(1*) x2, T13/RK |
Romulus | |||
| 67.2% (201) | Akizuki |
AKZK(1*), T13/RK |
apaapa | |||
| 67.7% (300) | Akizuki (93) | 10cmHA x2, T13/RK | 17-149 | |||
| 70.6% (201) | Akizuki (75~84) | AKZK(1*) x2, T13/RK | apaapa | |||
| 68% (200) | Akizuki | 12.7cm(LM) x2, T13/RK | apaapa | |||
| 66.2% (231) | Akizuki (95) | 10cmHA x2, T13/RK | 17-276 | |||
|
2* Akizuki Only |
(H.R.)*.
|
+6 | 56.7% (300) | Akizuki (94) |
10cmHA, T13/RK |
17-299 |
|
3* Akizuki Only |
(H.H.)*
|
+4 | 66.5% (212) | Akizuki (90~98) | AKZK(6*) x3 | shocaca |
| 59.9% (202) | Akizuki (87) | 10cmHA x2, T94/AAFD | 16-702 | |||
| 57.7% (300) | Akizuki (87) | 10cmHA x2, T94/AAFD | 17-149 | |||
|
4 BB(V) Only |
(M.S.A.R.)
|
+6 | ||||
| 5 |
(B.B.R.)
|
+4 | 65.0% (100) | Ooyodo |
AKZK x2, T14/Radar, T94/AAFD |
Shift2 |
| 67.0% (100) | Ooyodo | AKZK x2, T14/R, Obsv.S | Shift2 | |||
| 60.0% (100) | Ooyodo | AKZK x2, T14/R x2 | Shift2 | |||
| 58.0% (100) | Isuzu K2 | AKZK(4*) x2, T14/R | 16-681 | |||
| 65.0% (200) | Mutsuki class | AKZK(1*) x2, T13/RK | apaapa | |||
|
6 BB(V) Only |
(M.S.A.)
|
+4 | 47.0% (100) | Haruna |
35.6cm(10*), 41cm(8*), Sanshiki, T94/AAFD |
Shift2 |
| 7 |
(H.A.R.)
|
+3 | 48.0% (100) | Ooyodo |
12.7cm(LM) x2, T14/Radar, T94/AAFD |
Shift2 |
| 44.5% (200) | Maya (99) |
8cmHA, T91/AAFD, T14/R |
16-599 | |||
| 8 |
(B.R.)
|
+4 | 52.0% (100) | Oyoodo |
AKZK, 10cmHA, T14/R, Obsv.S |
Shift2 |
| 9 |
(H.A.)
|
+2 | 41.5% (200) | Maya (99) | 8cmHA, T91/AAFD | 16-599 |
| 35.5% (203) | Kagerou (88) | 10cmHA x2, T94/AAFD | 16-702 | |||
| 36.0% (100) | Shimakaze (99) | 10cmHA x2, T94/AAFD | 17-62 | |||
| 34.0% (100) | Yukikze (99) | 10cmHA x2, T94/AAFD | 17-62 | |||
| 34.3% (300) | Kagerou (88) | 10cmHA x2, T94/AAFD | 17-149 | |||
| 43.7% (300) | Ushio K2 (86) | 10cmHA x2, T94/AAFD | 17-149 | |||
|
10* Maya K2 Only |
(H.C.R.)*
|
+8 | 60.6% (137) | Maya K2 (97~99) |
20.3cm(3, 10*), 12.7cmHA + AAFD, 25mm(CD), FuMO |
shocaca |
|
11* Maya K2 Only |
(H.C.)*
|
+6 | 56.3% (160) | Maya K2 (99~116) |
20.3cm(3, 10*), 12.7cmHA + AAFD, 25mm(CD) Shiun. |
shocaca |
| 12 |
(C.G.R.)
|
+3 |
Note: the column "#Shot Down per slot" are based on the estimation from Romulus, on how many additional bombers would be shot down per slot if AACI was activated. It was hypothesized that before your ship encounters the hostile bombers, AACI flatly kills a fixed number of plane per enemy slot, [Homu: these estimates shall be further verified thru experiments. See the following sections]
Tentative Rules of Activation:[]
- HA mount with built-in AAFD, (e.g.. AkizukiGun or MayaGun), is treated as either normal HA mount (H.) or special HA mount with Built-in AAFD (B.), but never as Anti-Air Fire Director (A.).
- A certain type of AACI will be assigned to an individual ship according its equipment setup. When the prerequisite of multiple types of AACI are fulfilled, the one with higher priority shall be considered: To illustrate:
|
Higher Priority |
api. | Lower Priority | api. | |
|---|---|---|---|---|
| Akizuki | H.H.R* | 1 |
H.R* / H.H* / B.B.R / B.R |
2, 3, 5, 8 |
| BB(V) | M.S.A.R | 4 | M.S.A | 6 |
| B.B.R | 5 | B.R | 8 | |
| H.A.R | 7 | H.A | 9 | |
| Maya K2 | H.C.R* | 10 | B.R / H.A / H.C* / C.G.R | 8, 9, 11, 12 |
| Maya K2 | H.C* | 11 | H.A | 9 |
- where
- H = [H]A mount, R = Air [R]adar,
- M = Heavy [M]ain gun, S = [S]anshiki, A = [A]nti-Air Fire Director
- B = HA mount w/ [B]uilt-in AAFD,
- C = 25mm Triple Ac.Mount ([C]oncentrated Deployment)
- When multiple ships in your fleet are capable of AACI, the total activation rate can be increased.
- Ship with higher api value rolls first.
- For ships with the same api value, the one placed in higher position rolls first.
- Only one type of AACI can be trigger per battle.
- 90mm single HA has a build-in AAFD, which functions exactly the same as 12.7cmHA+AAFD. That is being said, it is classified as either "Built-in" or "High-Angle Mount" in the activation pattern..
Original Data
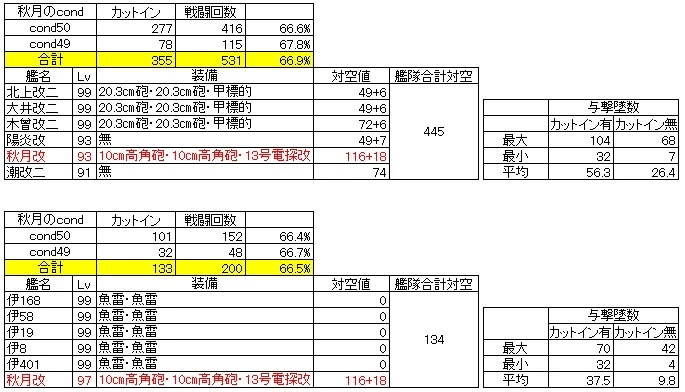
II - Fleet Total Anti-Air[]
Exp't name: 対空カットインその4
Blog / Author: 艦これ-チラ裏検証- / by くうぼをきゅう
Exp't Date: April 12, 2015
Explanation:
This test is used to evaluate if fleet total AA would affect the trigger chance of AACI.
Two fleets with huge differences in their fleet AA (445 vs 134) were sent to 1-4. Whenever an enemy carrier appears, relevent data (morale of Akizuki, #plane shot down, AACI) would be recorded.
Using formation line ahead, kept advancing until taiha'ed. Sortie again when fully repaired &/or morale recovered. Also, there's always a total of 4 slots of enemy bombers (dive + torp), whenever a carrier presents in the hostile fleet.
Full Translation on the Original Data[]
Only Akizuki (placed as non-flagship) is equipped with AACI equipment. Thus all data below pertain to Akizuki.
Since the fleet kept advancing, Akizuki may be automatically sparkled on the 2nd & 3rd battles.
Info about Akizuki:
- 10cmHA x2 + T13/RK
- AACI type = (H.H.R.)*
- AA stat: (116+18)
| Morale | #AACI | #Battle | CI Rate | Fleet Total AA | |
|
Fleet I 3CLT + 3DD |
49~50 | 355 | 531 | 66.9% | 445 |
| 50 | 277 | 416 | 66.6% | ||
| 49 | 78 | (115) | 67.8% | ||
|
Fleet II 5SS + 1DD |
49~50 | 133 | 200 | 66.5% | 134 |
| 50 | 101 | (152) | 66.4% | ||
| 49 | 32 | (48) | 66.7% |
Tables below pertain to #shot down by the two fleets. Differences in morale are neglected. These are the S2 values obtained from reading the traffic data. Note that there are always 4 enemy bomber slots in total.
| Fleet I AA = 445 |
AACI | normal | |
|---|---|---|---|
| Max | 104 | 68 | |
| Min | 32 | 7 | |
| Avg. | 56.3 | 26.4 | +29.9 / 4sl |
| Fleet II AA = 134 |
AACI | normal | |
|---|---|---|---|
| Max | 70 | 42 | |
| Min | 32 | 4 | |
| Avg. | 37.5 | 9.8 | +27.7 / 4sl |
In another word, when AACI was triggered, ceteris paribus, #shot down +7 per enemy bomber slot. (for type 1 AA cut-in)
Original Data[]
Click here for the spreadsheet.
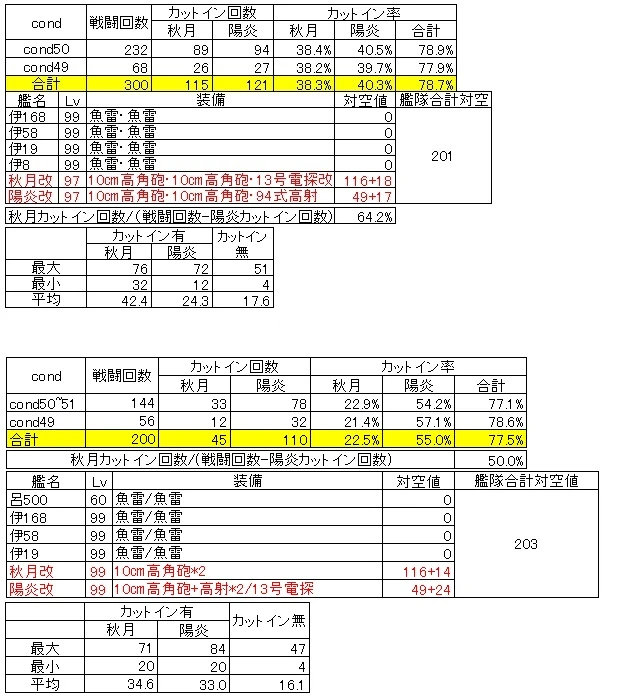
IiI - Individual Ship's AA stat & Various Setups[]
Exp't name: 対空カットインその3
Blog / Author: 艦これ-チラ裏検証- / by くうぼをきゅう
Exp't Date: January ~ April, 2015
Explanation:
Fleets with the same total AA were sent to 1-4. Each of them were accompanied by a different AACI destroyer. Whenever an enemy carrier appears, relevent data (morale of the test ship, #plane shot down, AACI) would be recorded.
In the first part, 3 DDs (Kagerou, Ushio K2, Akitsuki) with same equipment setup but very different individual AA stats were tested and compared.
In the second part, Akitsuki with different AACI equipment would be tested and compared.
Using formation line ahead, kept advancing until taiha'ed. Sortie again when fully repaired &/or morale recovered. Also, there's a total of 4 slots of enemy bombers (dive + torp), whenever a carrier presents in the hostile fleet.
Full Translation on the Original Data[]
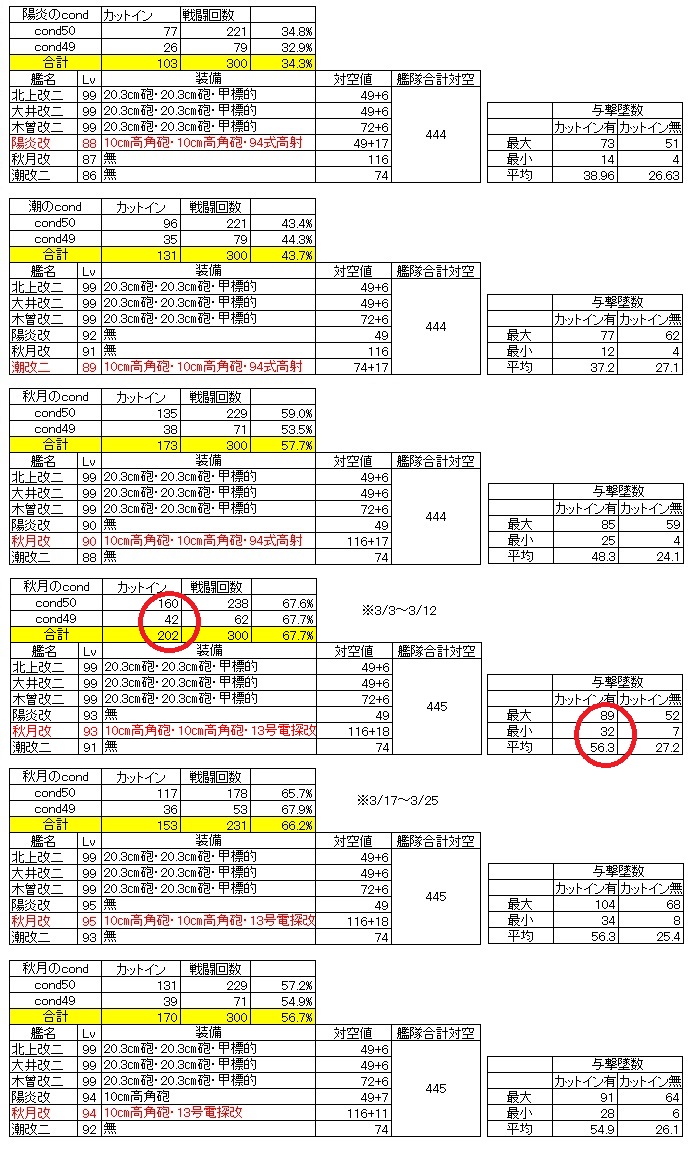
| Morale | #AACI | #Battle | CI Rate | Individual AA stat | Equipment & API | Fleet total AA | |
|---|---|---|---|---|---|---|---|
| Kagerou | 49~50 | 103 | 300 | 34.3% | 66
(49+17) |
10cmHA x2, T94/AAFD | 444 |
| 50 | 77 | 221 | 34.8% | api_9, | |||
| 49 | 26 | (79) | 32.9% | (H.A.) | |||
| Ushio.K2 | 49~50 | 131 | 300 | 43.7% | 91
(74+17) |
10cmHA x2, T94/AAFD | 444 |
| 50 | 91 | 221 | 43.4% | api_9, | |||
| 49 | 35 | (79) | 44.3% | (H.A.) | |||
| Akizuki | 49~50 | 173 | 300 | 57.7% | 133
(116+17) |
10cmHA x2, T94/AAFD | 444 |
| 50 | 135 | 229 | 59.0% | api_3, | |||
| 49 | 38 | 71 | 53.5% | (H.H.)* | |||
| Akizuki | 49~50 | 202+153 | 300+231 | 67.0% | 134
(116+18) |
10cmHA x2, T13/RK | 445 |
| 50 | 160+117 | 239+178 | 66.4% | api_1, | |||
| 49 | 42+36 | 62+53 | 67.8% | (H.H.R.)* | |||
| Akizuki | 49~50 | 170 | 300 | 56.7% | 127
(116+11) |
10cmHA, T13/RK | 445 |
| 50 | 131 | 229 | 57.2% | api_2, | |||
| 49 | 39 | (71) | 54.9% | (H.R.)* |
The table below pertains to #shot down by each fleet, accompanied by each of the following destroyers. Differences in morale are neglected.
- Instead of writing "+12.4 / 4slot", the "per slot" value will be automatically calculated for the following tables. i.e., "+3.1 / slot".
| Ship name /
(AA stat) |
API Value
(AACI Type) |
AACI? |
Max | Min | Avg. |
Diff. (Avg) |
|---|---|---|---|---|---|---|
|
Kagerou / (66) | ||||||
|
api_9 (H.A.) |
O | 73 | 14 | 39.0 | +3.1 / slot | |
| X | 51 | 4 | 26.6 | |||
| Ushio K2 / (91) | ||||||
| api_9 (H.A.) | O | 77 | 12 | 37.2 | +2.5 / slot | |
| X | 62 | 4 | 27.1 | |||
| Akizuki / (133) | ||||||
| api_3 (H.H.)* | O | 85 | 25 | 48.3 | +6.1 / slot | |
| X | 59 | 4 | 24.1 | |||
| Akizuki / (134) | ||||||
| api_1 (H.H.R)* | O | 104 | 32 | 56.3 | +7.5 / slot | |
| X | 68 | 7 | 26.4 | |||
| Akizuki / (133) | ||||||
| api_2 (H.R.)* | O | 91 | 28 | 54.9 | +7.2 / slot | |
| X | 64 | 6 | 26.1 |
Original Data[]
IV - Verification of the API Value Theory[]
Exp't name: VARIOUS
Blog / Author: VARIOUS
Exp't Date: ~ July, 2015
Explanation:
It was believed that the sequence in triggering AACI is determined by the api values assigned to each capable ship, where the api values are determined by equipment setup. The following tests (pics) could serve as direct proof for that theory.