(Add E5 road map) Tag: sourceedit |
m (typo) Tag: sourceedit |
||
| Line 776: | Line 776: | ||
E5 = |
E5 = |
||
=E5= |
=E5= |
||
| − | Dubbed "Scratch world" or "Death by a thousand cuts", this map is designed to bleed the player's fleet dry on the way to boss. This map features long, six-battle path to |
+ | Dubbed "Scratch world" or "Death by a thousand cuts", this map is designed to bleed the player's fleet dry on the way to boss. This map features long, six-battle path to boss ridden with [[Submarine So-Class|deadly So-class flagship]] (node A), [[PT Imp Pack|PTSD imps]] mixed with Wa-class wall (node D), and a crazy number of Abyssal bombers (up to 510 bombers! after fighter combat) in all flavors; "Revenge Kai", "Hell Dive", "Patrolling Hawk" and "Liberation Ace"; concentrated in a single node that hurts like a Death Star (node F). |
While it is very difficult to reach boss, once reached, boss fleet can be destroyed utterly and easily with the help of debuff and LBAS. Though, since it is the player's single fleet versus the Abyssal combined fleet, losing any of the primary combatants preboss (which happens all the darn time) can prove tricky. |
While it is very difficult to reach boss, once reached, boss fleet can be destroyed utterly and easily with the help of debuff and LBAS. Though, since it is the player's single fleet versus the Abyssal combined fleet, losing any of the primary combatants preboss (which happens all the darn time) can prove tricky. |
||
Revision as of 21:37, 16 August 2017
This blog contains strategies and compositions used in Summer 2017 Event. This road map will be updated as I progress further into the event.
All maps are cleared on Hard mode without support expedition unless stated otherwise.
E1
There is no complicated strategy here. Depending on how opening anti-sub strikes one has at his disposal, the first slot can be tuned for easier preboss in exchange for a slightly tougher boss fight. Weak/Dupe CLTs can be deployed here. No other map will require opening anti-sub so go crazy.
- I-J-G-D-Boss
- 1CL(T), 1CVL, 1(F)BB(V), 2DD, 1CL
- Fleet arrangement
| Anti-submarine slot | Secondary surface killer slot |
| Air team slot | |
| Primary surface killer slot | |
| Anti-submarine slot | |
| Anti-submarine slot | |
| Anti-submarine slot | |
- Information
- DE can be used instead of DD but their low armor will prove to be problematic preboss.
- New depth charge combo (Sonar + old DC projector + new DC) has unknown damage bonus and might in fact be weaker than traditional Sonar + old DC projector setup. Use it at your own discretion.
- Saiun is absolutely necessary for LoS check.
- The main surface threat at boss is the CVL, a strong surface killer should be placed before or in the 4th slot. The arrangement of all other slots are flexible, though it is wise to let ships with weak anti-sub capability (CVL, surface CLT, etc.) strike first for some scratch damage.
- Sample fleet
E2
Shortcut is recommended but not required. It is possible to defeat E2H boss without taking the shortcut.

- A-C-F-J-L-Boss
- 1FBB, 1CV, 1fCVL, 2DD, 1CL
- A-C-F-J-L-K-Boss
- 1FBB, 1CV, 1fCVL, 2DD, 1CA(V)
- 1FBB, 1CV, 1fCVL, 2DD, 1CLT
- Fleet arrangement
| Primary boss killer slot | |
| Secondary boss killer slot | Air team slot |
| Escort killer slot | Air team slot |
| Secondary boss killer slot | |
| AACI slot | |
| Primary boss killer slot | |
- Information
- First slot is recommended to be the FBB as this should be the only ship in your fleet that can disable Ne-class, Nu-class, Tsu-class reliably during day battle, without sacrificing first turn advantage of night battle.
- A minimum of 260 fighter power is necessary for Hard mode. If an Italian CA is committed to this map, seaplane fighter can be deployed in tandem with Saiun to negate T-red at boss (albeit it is trivial to S-rank boss even under T-red).
- Akizuki-class can be used for AACI in both E-2 and E-3. Don't hesitate to use them.
- One sonar will be sufficient against node C as there are only three subs there. This is an optional equipment for the non-Akizuki-class DD.
- Sample fleet
For last dance, consider replacing CL with CA for more firepower and survivability (longer route)
Script error: No such module "EventComp".
E3
This map has two phases and shares the same ship lock with E2.

TP phase
- A-C-D-E-F-I-K-Boss
- 2CAV, 4DD -- 1CL, 2CA, 3DD
- Fleet arrangement (Primary)
| Air team slot | |
| Air team slot | |
| AACI slot | |
| Drum carrier | |
| Drum carrier | |
| Drum carrier |
- Fleet arrangement (Escort)
| Mandatory light cruiser slot | |
| Primary boss killer slot | |
| Primary boss killer slot | |
| Secondary boss killer slot | |
| Secondary boss killer slot | |
| Primary boss killer slot |
- Information
- For Hard mode 160-170 fighter power is required to maintain Air Parity preboss. This means turning one of the CAVs into seaplane fighter mule for this purpose. Air Parity greatly reduces airstrike damage and greatly increases the fleet's survival. Fast AV (Chitose-class) can be used as seaplane mule instead of CAV for this purpose.
- If Air Parity cannot be achieved (not enough seaplane fighters), one might op for Air Denial (around 80 fighter power) and bring more AA equipment to compensate.
- DDs using HA guns provide significantly more air defense than torpedoes though it might be desirable to use maximize torp damage in last dance or when facing hell balls Na-class.
- Sample fleet
Script error: No such module "EventComp". Script error: No such module "EventComp".
HP phase
The fleet below is a carrier task force.
- A-C-D-E-H-N-Boss
- A-C-D-E-H-M-Boss
- 1FBB, Souryuu, Hiryuu, 2CA(V), 1DD -- 1CLT, 2CA, 1CL, 2DD
- Kongou-class, 2CV, 2CA(V), 1DD -- 1CLT, 2CA, 1CL, 2DD
- Fleet arrangement (Primary)
| Primary boss killer slot | |
| Secondary boss killer slot | Air team slot |
| Secondary boss killer slot | Air team slot |
| Escort killer slot | Air team slot |
| Supp slot | Air team slot |
| AACI slot | |
- Fleet arrangement (Escort)
| Primary boss killer slot | |
| Secondary boss killer slot | |
| Secondary boss killer slot | |
| Primary boss killer slot | |
| Primary boss killer slot | |
| Support slot |
- Information
- There are up to four heavy targets at boss and it is necessary to bring at least five boss killers. Please note that CAs using DA setup cannot kill CA-hime reliably in yasen and thus they are considered "Secondary boss killer" for this battle. This also holds true for Kiso's and all CL's DA. Only torpedo CI ships and Ooi/KTKM using DA setup can be considered "Primary boss killer".
- While Hiryuu and Souryuu enjoys bonus shelling damage versus boss in this map. They are extremely vulnerable and can rarely do anything. Consider having one of them in flagship slot to increase her survival chance.
- At least 350 fighter power is necessary to maintain AS throughout the map on Hard mode. One CAV from first fleet can be sacrificed as seaplane mule in order to bring Saiun while maintaining two-attack-slot policy for carriers.
- Use boss support on LD, those hell balls are evil.
- Sample fleet
Script error: No such module "EventComp".
Script error: No such module "EventComp".
E4
This map has two bosses and extremely high armor final boss. In the first phase, the main threat is Ru wall node C. In the second phase, the presence of PT Imp Pack in mixed heavy fleet is the biggest threat to overcome. A fine balance between anti-imp and boss killing power must be reached in order to clear the map.
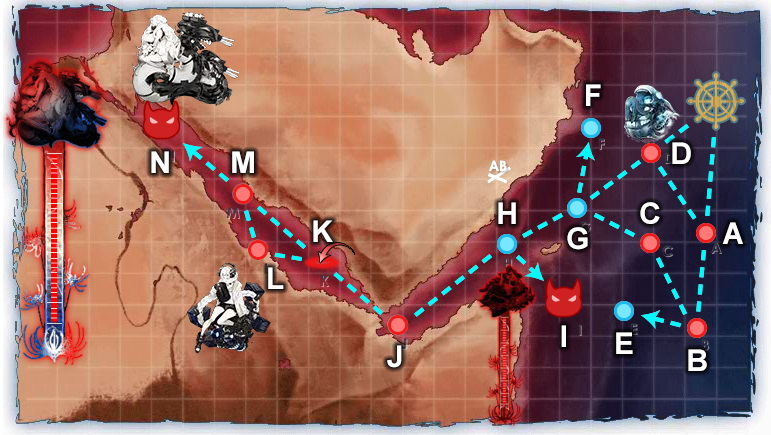
Phase 1
- A-B-C-G-H-Boss
- 1(F)BB(V), 3CV(L), 2CA -- 2CA, 1FBB, 1CL, 2DD
- Fleet arrangement (Primary)
The fleet below is a carrier task force
| Secondary boss killer slot | Air team slot |
| Primary boss killer slot | |
| Escort killer slot | Air team slot |
| Escort killer slot | Air team slot |
| Escort killer slot | |
| Escort killer slot | |
- Fleet arrangement (Escort)
| Primary boss killer slot | |
| Secondary boss killer slot | |
| Secondary boss killer slot | |
| Primary boss killer slot | |
| Primary boss killer slot | |
| Primary boss killer slot |
- Information
- With CTF, the second fleet fires first so one FBB on second fleet to turn cancel one enemy drastically minimizes the damage intake.
- A minimum of 350 fighter power is necessary to ensure AS throughout the map (with the help of LBAS). This is easily achieved with 3 carriers while ensuring two-attack-slot policy on all CV(L)s.
- While torpedo CI are not required in the first phase, it is recommended that strong torpedo CI ships from Shigure and above to be deployed in E4 due to extremely high second phase boss's armor.
- Land base setup (prefinal)
| Base 1 | Min range | Target 1 | Target 2 |
|---|---|---|---|
| Bomber | 3 | C | C |
| Bomber | |||
| Bomber | |||
| Bomber |
- Land base setup (final)
| Base 1 | Min range | Target 1 | Target 2 |
|---|---|---|---|
| Fighter | 3 | I (boss) | I (boss) |
| Fighter | |||
| Fighter | |||
| Fighter |
- Sample fleet
Script error: No such module "EventComp". Script error: No such module "EventComp".
Phase 2
- D-G-H-J-K-M-Boss
- 3(F)BB(V) 1CV(L) 2CA(V)/DD -- 1FBB/CLT 2CA 1CL 2DD (3 European ships required)
- 2(F)BB(V) 2CVL 2CA(V)/DD -- 1FBB/CLT 2CA 1CL 2DD (3 European ships required)
- 1(F)BB(V) 2CVL 3CA(V)/DD -- 1FBB 2CA 1CL 3DD
- 2(F)BB(V) 2CVL 2CA(V)/DD -- 2CA 1CL 3DD
- 2(F)BB(V) 1CV(B) 3CA(V)/DD -- 2CA 1CL 3DD
- Fleet arrangement (Primary)
The fleet below is a surface task force
| Secondary boss killer slot | |
| Secondary boss killer slot | |
| Air team slot | |
| Air team slot | |
| Escort killer slot | |
| AACI / Anti-submarine slot | Anti-imp slot |
- Fleet arrangement (Escort)
| Primary boss killer slot | Support slot |
| Secondary boss killer slot | |
| Secondary boss killer slot | Support slot |
| Primary boss killer slot | Anti-imp slot |
| Primary boss killer slot | Anti-imp slot |
| Primary boss killer slot | |
- Information
- Due to the high armor of LD's boss (270), only a few ships in the game capable of inflicting fatal damage against boss and they are "Primary boss killers".
- All ships listed above are assumed to be at highest remodel. When in doubt, any ship stronger than Shigure Kai Ni (greater than 150 torp + firepower stat) will do.
- 220 fighter power (260 in LD) is required to maintain AS on all nodes with the help of LBAS.
- Boss support shelling expedition is necessary in LD.
- There exists a fleet-wide firepower bonus in daytime at boss node. It is unknown whether this comes from Warspite or Eugen or both of them but this firepower bonus allows Nagato-class and Yamato-class to inflict massive damage against boss in daytime shelling, enabling sumo-super-heavy fleet as a viable option for those who lack strong CI ships.
- Anti-imp and first fleet support slot strategy
- The most effective combo to deal with PT Imp Pack is HA gun and AA gun
 .
. - Torpedo CI can be achieved with two torpedoes , leaving each DD one free slot for one HA gun. The AA gun can be stored in Reinforcement Expansion slot, allowing DDs to perform both torpedo CI (boss killer role) and anti-imp duties.
Script error: No such module "EventComp".
- Akizuki-class can perform both AACI and anti-imp with AA guns in their extra slots. Putting them on first fleet allows them to take full advantage of first fleet's high AA multiplier, negate their low torpedo stat weakness.
- Meanwhile, if Reinforcement Expansion cannot be used. Up to two dedicated anti-imp / anti-sub DDs using HA gun + Sonar + AA gun can be used on first fleet instead of CAs. With two shelling phases, these DDs provide sufficient firepower to wreck havoc in node D (submarine) and node J (imp packs), protecting second fleet from closing torps in these nodes. However, losing daytime shelling power of the CAs might prove problematic in node M (mixed heavy-imp) and node N (boss).
- Dive bombing airstrike and opening torpedoes are also effective against PT Imp Pack
- Land base setup
| Base 1 | Min range | Target 1 | Target 2 |
|---|---|---|---|
| Fighter | 6 | N (boss) | N (boss) |
| Fighter | |||
| Fighter | |||
| Fighter |
- Sample fleet
Script error: No such module "EventComp".
Script error: No such module "EventComp".
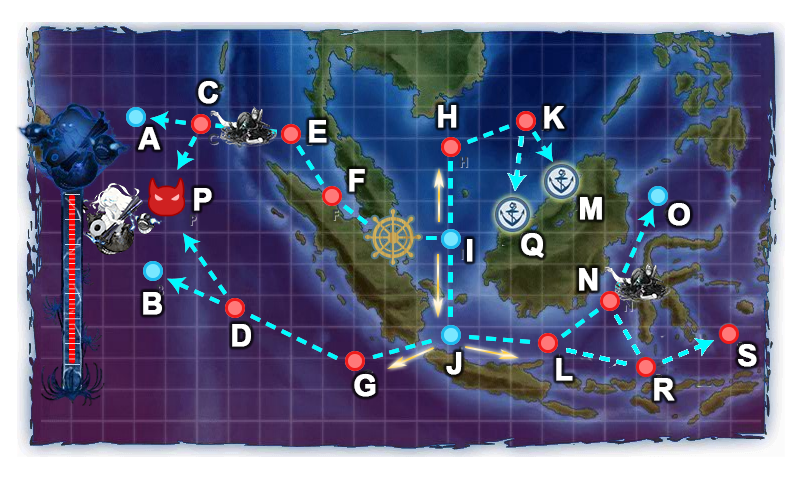
E5
Dubbed "Scratch world" or "Death by a thousand cuts", this map is designed to bleed the player's fleet dry on the way to boss. This map features long, six-battle path to boss ridden with deadly So-class flagship (node A), PTSD imps mixed with Wa-class wall (node D), and a crazy number of Abyssal bombers (up to 510 bombers! after fighter combat) in all flavors; "Revenge Kai", "Hell Dive", "Patrolling Hawk" and "Liberation Ace"; concentrated in a single node that hurts like a Death Star (node F).
While it is very difficult to reach boss, once reached, boss fleet can be destroyed utterly and easily with the help of debuff and LBAS. Though, since it is the player's single fleet versus the Abyssal combined fleet, losing any of the primary combatants preboss (which happens all the darn time) can prove tricky.
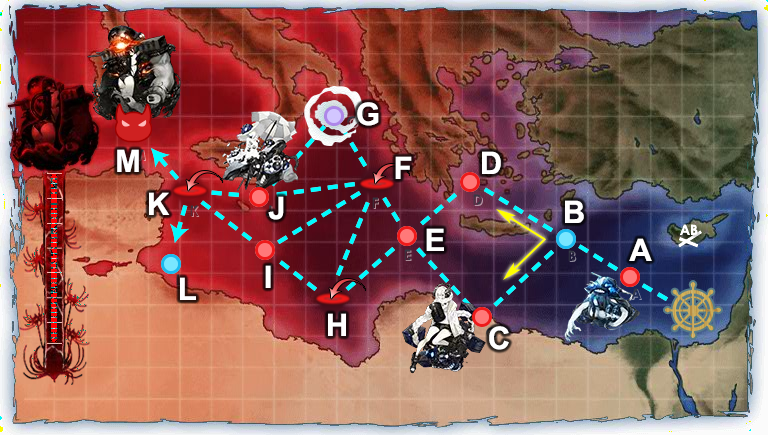
- A-B-D-E-F-I-K-Boss
- A-B-C-E-F-I-K-Boss
- 2FBB 2CV(L/B) 2DD (3 European ships required)
- 3FBB 1CV(L/B) 2DD (3 European ships required)
- Fleet arrangement
| Primary boss killer slot | Air team |
| Primary boss killer | |
| AACI slot | Anti-imp slot |
| Primary boss killer | |
| Anti-sub / Primary boss killer slot | |
| Air team | |
- Information
- Similar to E4, Akizuki-class with an AA gun in Reinforcement Expansion slot can perform both AACI and Anti-imp duties as well as limited "escort killer" role in yasen.
- Depending on the quality of the boss killers, the second DD can be either dedicated to anti-sub or boss killer with torpedo CI. If weak BBs or CVs were chosen as "primary boss killers", it might be desirable to sacrifice some preboss support for an extra torpedo CI at boss.
- Only Bismarck has the firepower in yasen to finish off BB-hime in chuuha state. For all other European BBs, once chuuha, they are no longer boss killers.
- 380 fighter power is required to secure AS on all nodes. There is little air defense in this map so it is safe to use bombers on small slots of 8 planes and above.
- Due to the extreme fighter power required, it is recommended to use the two CV composition with the weaker CV(L) as fighter mule and the stronger CV(B) as support air wing and primary boss killer. If the strong CV is not armored, she should be in flagship position to increase survival chance.
- There exists a debuff of unknown effect in this map. S-ranking node C and node D will trigger the debuff. Please note that node C is an installation boss and should be taken care of in a separate sortie.
- Once LD hit, all nodes in this map will change to their worst variations. Sacrificing a DD for opening anti-sub operation drastically improves boss encounter rate.
- One wave of LBAS bombers can be directed to node D to help clear out mixed imp node. Alternatively, node support can be used in LBAS place.
- Boss support shelling expedition is required on LD.
- Sparkle and pray. This is ultimately the only way.
- Land base setup
| Base 1 | Min range | Target 1 | Target 2 |
|---|---|---|---|
| Bomber | 8 | D | M (boss) |
| Bomber | |||
| Bomber | |||
| Bomber |
- Sample fleet