(add E4H phase 1) Tag: sourceedit |
m (note carrier task force E4) Tag: sourceedit |
||
| Line 421: | Line 421: | ||
==Phase 1== |
==Phase 1== |
||
;<span style="color:red">A</span>-<span style="color:red">B</span>-<span style="color:red">C</span>-G-H-<span style="color:red">Boss</span> |
;<span style="color:red">A</span>-<span style="color:red">B</span>-<span style="color:red">C</span>-G-H-<span style="color:red">Boss</span> |
||
| − | : |
+ | :1(F)BB(V), 3CV(L), 2CA -- 2CA, 1FBB, 1CL, 2DD |
;Fleet arrangement (Primary) |
;Fleet arrangement (Primary) |
||
| + | The fleet below is a carrier task force |
||
{| style="border:none;width:400px;text-align:center" |
{| style="border:none;width:400px;text-align:center" |
||
|style="background:#a6cce3;height:50px;width:50%" |Secondary boss killer slot |
|style="background:#a6cce3;height:50px;width:50%" |Secondary boss killer slot |
||
Revision as of 13:15, 15 August 2017
This blog contains strategies and compositions used in Summer 2017 Event. This road map will be updated as I progress further into the event.
All maps are cleared on Hard mode without support expedition unless stated otherwise.
E1
There is no complicated strategy here. Depending on how opening anti-sub strikes one has at his disposal, the first slot can be tuned for easier preboss in exchange for a slightly tougher boss fight. Weak/Dupe CLTs can be deployed here. No other map will require opening anti-sub so go crazy.
- I-J-G-D-Boss
- 1CL(T), 1CVL, 1(F)BB(V), 2DD, 1CL
- Fleet arrangement
| Anti-submarine slot | Secondary surface killer slot |
| Air team slot | |
| Primary surface killer slot | |
| Anti-submarine slot | |
| Anti-submarine slot | |
| Anti-submarine slot | |
- Information
- DE can be used instead of DD but their low armor will prove to be problematic preboss.
- New depth charge combo (Sonar + old DC projector + new DC) has unknown damage bonus and might in fact be weaker than traditional Sonar + old DC projector setup. Use it at your own discretion.
- Saiun is absolutely necessary for LoS check.
- The main surface threat at boss is the CVL, a strong surface killer should be placed before or in the 4th slot. The arrangement of all other slots are flexible, though it is wise to let ships with weak anti-sub capability (CVL, surface CLT, etc.) strike first for some scratch damage.
- Sample fleet
E2
Shortcut is recommended but not required. It is possible to defeat E2H boss without taking the shortcut.

- A-C-F-J-L-Boss
- 1FBB, 1CV, 1fCVL, 2DD, 1CL
- A-C-F-J-L-K-Boss
- 1FBB, 1CV, 1fCVL, 2DD, 1CA(V)
- 1FBB, 1CV, 1fCVL, 2DD, 1CLT
- Fleet arrangement
| Primary boss killer slot | |
| Secondary boss killer slot | Air team slot |
| Escort killer slot | Air team slot |
| Secondary boss killer slot | |
| AACI slot | |
| Primary boss killer slot | |
- Information
- First slot is recommended to be the FBB as this should be the only ship in your fleet that can disable Ne-class, Nu-class, Tsu-class reliably during day battle, without sacrificing first turn advantage of night battle.
- A minimum of 260 fighter power is necessary for Hard mode. If an Italian CA is committed to this map, seaplane fighter can be deployed in tandem with Saiun to negate T-red at boss (albeit it is trivial to S-rank boss even under T-red).
- Akizuki-class can be used for AACI in both E-2 and E-3. Don't hesitate to use them.
- One sonar will be sufficient against node C as there are only three subs there. This is an optional equipment for the non-Akizuki-class DD.
- Sample fleet
For last dance, consider replacing CL with CA for more firepower and survivability (longer route)
Script error: No such module "EventComp".
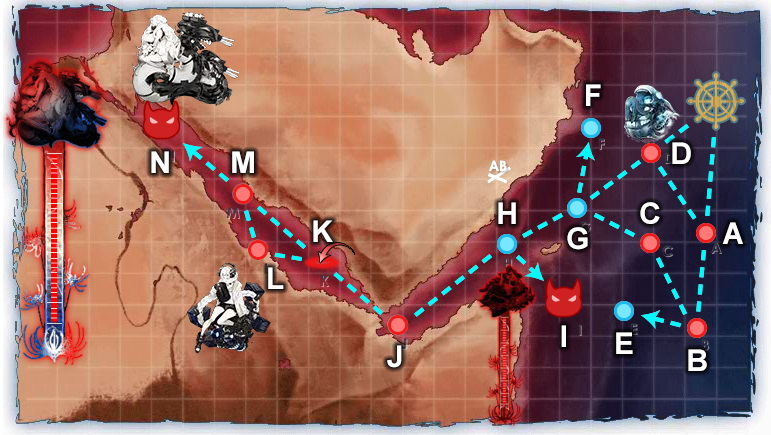
E3
This map has two phases and shares the same ship lock with E2.

TP phase
- A-C-D-E-F-I-K-Boss
- 2CAV, 4DD -- 1CL, 2CA, 3DD
- Fleet arrangement (Primary)
| Air team slot | |
| Air team slot | |
| AACI slot | |
| Drum carrier | |
| Drum carrier | |
| Drum carrier |
- Fleet arrangement (Escort)
| Mandatory light cruiser slot | |
| Primary boss killer slot | |
| Primary boss killer slot | |
| Secondary boss killer slot | |
| Secondary boss killer slot | |
| Primary boss killer slot |
- Information
- For Hard mode 160-170 fighter power is required to maintain Air Parity preboss. This means turning one of the CAVs into seaplane fighter mule for this purpose. Air Parity greatly reduces airstrike damage and greatly increases the fleet's survival. Fast AV (Chitose-class) can be used as seaplane mule instead of CAV for this purpose.
- If Air Parity cannot be achieved (not enough seaplane fighters), one might op for Air Denial (around 80 fighter power) and bring more AA equipment to compensate.
- DDs using HA guns provide significantly more air defense than torpedoes though it might be desirable to use maximize torp damage in last dance or when facing hell balls Na-class.
- Sample fleet
Script error: No such module "EventComp". Script error: No such module "EventComp".
HP phase
The fleet below is a carrier task force.
- A-C-D-E-H-N-Boss
- A-C-D-E-H-M-Boss
- 1FBB, Souryuu, Hiryuu, 2CA(V), 1DD -- 1CLT, 2CA, 1CL, 2DD
- Kongou-class, 2CV, 2CA(V), 1DD -- 1CLT, 2CA, 1CL, 2DD
- Fleet arrangement (Primary)
| Primary boss killer slot | |
| Secondary boss killer slot | Air team slot |
| Secondary boss killer slot | Air team slot |
| Escort killer slot | Air team slot |
| Supp slot | Air team slot |
| AACI slot | |
- Fleet arrangement (Escort)
| Primary boss killer slot | |
| Secondary boss killer slot | |
| Secondary boss killer slot | |
| Primary boss killer slot | |
| Primary boss killer slot | |
| Support slot |
- Information
- There are up to four heavy targets at boss and it is necessary to bring at least five boss killers. Please note that CAs using DA setup cannot kill CA-hime reliably in yasen and thus they are considered "Secondary boss killer" for this battle. This also holds true for Kiso's and all CL's DA. Only torpedo CI ships and Ooi/KTKM using DA setup can be considered "Primary boss killer".
- While Hiryuu and Souryuu enjoys bonus shelling damage versus boss in this map. They are extremely vulnerable and can rarely do anything. Consider having one of them in flagship slot to increase her survival chance.
- At least 350 fighter power is necessary to maintain AS throughout the map on Hard mode. One CAV from first fleet can be sacrificed as seaplane mule in order to bring Saiun while maintaining two-attack-slot policy for carriers.
- Use boss support on LD, those hell balls are evil.
- Sample fleet
Script error: No such module "EventComp".
Script error: No such module "EventComp".
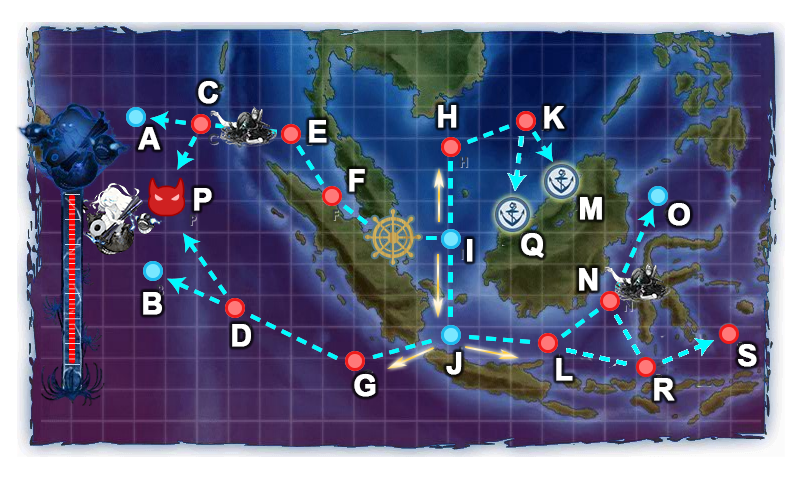
E4
This map has two bosses and extremely high armor final boss.
Phase 1
- A-B-C-G-H-Boss
- 1(F)BB(V), 3CV(L), 2CA -- 2CA, 1FBB, 1CL, 2DD
- Fleet arrangement (Primary)
The fleet below is a carrier task force
| Secondary boss killer slot | Air team slot |
| Primary boss killer slot | |
| Escort killer slot | Air team slot |
| Escort killer slot | Air team slot |
| Escort killer slot | |
| Escort killer slot | |
- Fleet arrangement (Escort)
| Primary boss killer slot | |
| Secondary boss killer slot | |
| Secondary boss killer slot | |
| Primary boss killer slot | |
| Primary boss killer slot | |
| Primary boss killer slot |
- Information
- With CTF, the second fleet fires first so one FBB on second fleet to turn cancel one enemy drastically minimizes the damage intake.
- A minimum of 350 fighter power is necessary to ensure AS throughout the map (with the help of LBAS). This is easily achieved with 3 carriers while ensuring two-attack-slot policy on all CV(L)s.
- While torpedo CI are not required in the first phase, it is recommended that strong torpedo CI ships from Shigure and above to be deployed in E4 due to extremely high second phase boss's armor.
- Land base setup (prefinal)
| Base 1 | Min range | Target 1 | Target 2 |
|---|---|---|---|
| Bomber | 3 | C | C |
| Bomber | |||
| Bomber | |||
| Bomber |
- Land base setup (final)
| Base 1 | Min range | Target 1 | Target 2 |
|---|---|---|---|
| Fighter | 6 | I (boss) | I (boss) |
| Fighter | |||
| Fighter | |||
| Fighter |
- Sample fleet
Script error: No such module "EventComp". Script error: No such module "EventComp".