m (Added Choukai to E4 Node H drops) |
(→E-5) |
||
| Line 373: | Line 373: | ||
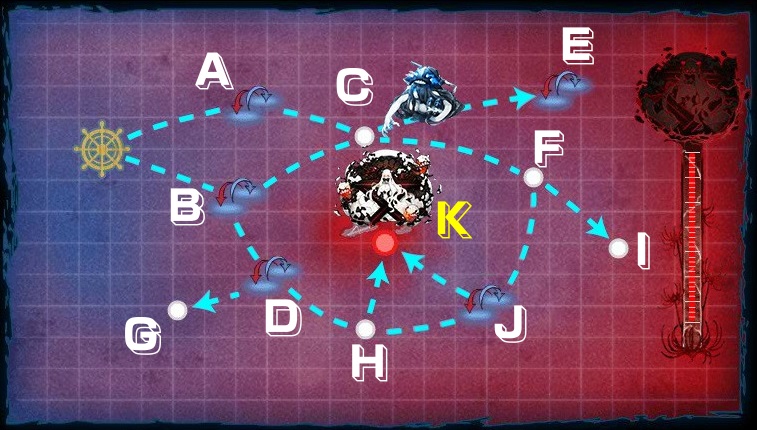
* <strike>LoS appears to be less important than previous maps, certain routes do not check it at all (No seaplane).</strike> Branching seems random, but G->L & I->L does have a seaplane animation. |
* <strike>LoS appears to be less important than previous maps, certain routes do not check it at all (No seaplane).</strike> Branching seems random, but G->L & I->L does have a seaplane animation. |
||
*<strike>Unconfirmed Large Scale - Oddly enough if you start the map with 2 ships of your 1st fleet (the fleet with the CVs) in yellow and the rest of your ships in your first and second fleets in green you will go to B node every single time. (Health based branching may be being used on MI1-3)</strike> |
*<strike>Unconfirmed Large Scale - Oddly enough if you start the map with 2 ships of your 1st fleet (the fleet with the CVs) in yellow and the rest of your ships in your first and second fleets in green you will go to B node every single time. (Health based branching may be being used on MI1-3)</strike> |
||
| + | *Having 4DD in second fleet will go A to C. |
||
|tips =* The boss node formation changes for the final battle, the two [[Light Carrier Nu-Class|Light Carrier Nu-Class Flagship]] will be replaced by two [[Standard Carrier Wo-Class|Standard Carrier Wo-Class Flagship II]] if your level is ≥105, those who are ≤104 will only have one replaced. |
|tips =* The boss node formation changes for the final battle, the two [[Light Carrier Nu-Class|Light Carrier Nu-Class Flagship]] will be replaced by two [[Standard Carrier Wo-Class|Standard Carrier Wo-Class Flagship II]] if your level is ≥105, those who are ≤104 will only have one replaced. |
||
* The recommended composition for the first fleet is 2 BB, 4 CV. |
* The recommended composition for the first fleet is 2 BB, 4 CV. |
||
Revision as of 19:05, 26 August 2014

The Summer 2014 event has started on August 8th and is scheduled to end on August 29th.
Map Details
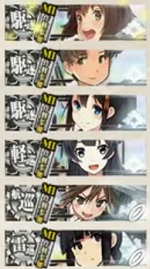
Ships with AL badge
Ships with MI badge
Introduction
- AL is designed to be completable by newer players.
- Level scaling makes it so that lower level admirals engage easier enemy fleet comps. The number of times required to sink boss remains the same.
- This event is "two-front war". Ships that were sent on AL-operation area (E-1 and E-2), cannot join sorties on MI-operation area (E-3 to E-5).
- Ships who have participated in AL cannot participate in MI, and vice versa.
- Ships who have participated in AL or MI cannot participate in E-6.
- Ships who have participated in AL or MI cannot participate in support expeditions.
- SHIPS THAT PARTICIPATE IN AL SUPPORT EXPEDITION CAN GO TO MI, THEY ARE NOT LOCKED.
- Equipment can be shared across ships.
- Ships who have participated in AL cannot participate in MI, and vice versa.
- In order to send fleets to the event, you must have 5 free ship spaces and 20 free equipment spaces.
- All maps have bosses that are HP-based. When you damage a boss, even when not killing it, the gauge will decrease accordingly.
- The boss ship must be sunk in the end of the gauge to clear the map. Damaging it to zero gauge but not sinking the boss (top ship of enemy fleet) will not clear it yet.
- There is no boss gauge health regeneration.
Line of Sight
- Effective LoS = Recon LoS×2 + Radar LoS + √(Fleet total LoS - Recon LoS - Radar LoS). This is the formula used since Spring 2014, 2-5 boss node and any node with the seaplane-searching animation.
- ONLY Recon planes' (yellow & light green planes WITHOUT A LOGO, see this) LOS values are doubled. LOS from attack planes (red & blue) are not doubled, but in fact square rooted. Do not double your attack planes' LOS value when making LOS calculation.
- You know you fulfilled the LoS requirement if you see a short animation with a seaplane flying to the node and back to your ship icon, plus the flagship's image appearing on-screen. Otherwise, you will be diverted off-course without the animation playing.
5:06-5:11 of this video here for how the animation looks like: http://www.youtube.com/watch?v=J-x1tNuCeSE
- You can have a high total LoS and still FAIL the LoS requirement. Do not use the total LoS as a guide.
- If you have trouble reaching LoS requirements, take a look at other players' reports (link is underneath every event map as <Report your results Here> heading on this page) and adjust your equipment accordingly.
- There are many player reports where players of similar HQ levels have differing effective LoS requirements. This hints to a possibility that effective LoS scales to level. Do not be surprised if you level up or reach the next HQ bracket (e.g. HQ lvl 60-99) and fail to reach boss node when you just reached boss node the previous sortie.
Combined Fleet Mechanics
- In Midway, you need to sortie two fleets at the same time.
- The first (main) fleet is your typical fleet with the number 1. You need to put in a minimum of 2 CV(up to a maximum of 4) and is allowed to put in a maximum of 2 Heavy Ships. The last 2 slots can be either Light Ships or CVs only.
- The second (escort) fleet is your fleet number 2 and needs 1 CL. You can add up to 2 CA/CAVs and from 3 to 5 DD.u cant use 2 CL but 1 CL/1CLT is ok

Fleet combine mechanic.
- For combined fleet battles (those nodes with a blue and red arrow), there is NO shelling phase. Instead, air combat occurs.
If BB is present, 2 air combat phases occur. - In boss battles, air combat occurs as normal, then 2nd Fleet does a single shelling phase (regardless of enemy BB), then torpedo phase. After that, 1st fleet does two shelling phases (if BB present on your side), then torpedo phase. If you choose night battle, the 2nd fleet enters night battle, but the 1st fleet will not.
- To combine fleets, go to fleet management window, then go to 2nd fleet and drag the flag over the 1st fleet's flag.
.jpg)
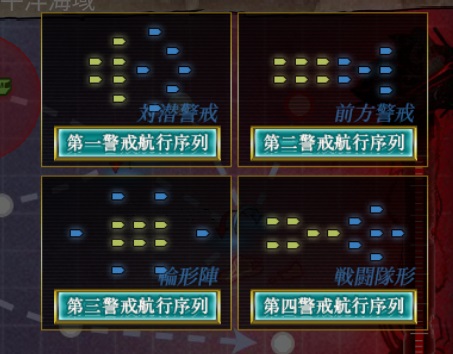
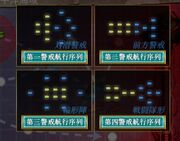
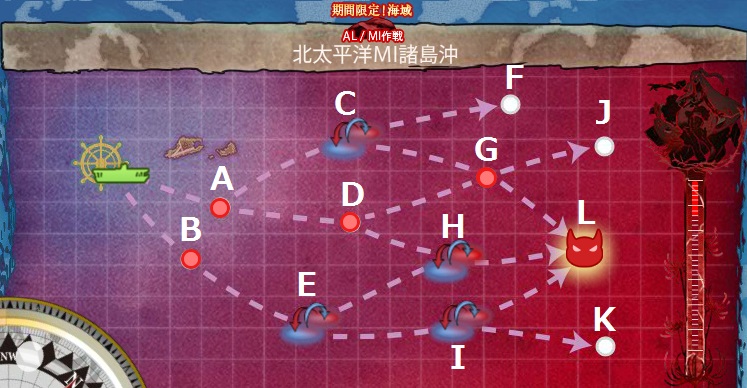
MI formations
- Special formations quick explanation:
- (Anti-Submarine Formation) Top left is an ASW formation. Use this formation in submarine nodes.
- (Front Alert Formation) Top right (Alert) appears to increase evasion and shelling power of the second fleet.
- (Wheel Formation) Bottom left (Diamond) increases Anti-Air defense. Use this formation in standard air battle nodes.
- (Battle Formation) Bottom right greatly increases the evasion and torpedo accuracy of your second fleet while preserving the shelling accuracy of the first fleet. Recommended for bosses.
- In night battle node, you will select from normal formations because 1st fleet will not enter night battle.
- Warning: You are allowed to continue the sortie even if the first ship of the second fleet was heavily damaged in the previous battle. Whether this intentional or not, it is strongly advisable to end the sortie if such an event occurs.
Patch Notes
- Summer 2014 Event
- Based on AL/MI (Aleutian Islands Campaign and Battle of Midway)
- New Ships
- Unryuu (雲龍), Unryuu-class Standard Carrier (Kai at Level 50,
 1000 750, Needs blueprint)
 - Ooyodo (大淀), Ooyodo-class Light Cruiser (Kai at Level 35, 320 400)
- Harusame (春雨), Shiratsuyu-class Destroyer (Kai at Level 30, 120 110)
- Tokitsukaze (時津風), Kagerou-class Destroyer (Kai at Level 30, 110 120)
- Hayashimo (早霜), Yuugumo-class Destroyer (Kai at Level 30, 140 110)
- Kiyoshimo (清霜), Yuugumo-class Destroyer (Kai at Level 30, 140 110)
- Isokaze (磯風), Kagerou-class Destroyer (Kai at Level 45, 160 140)
- Unryuu (雲龍), Unryuu-class Standard Carrier (Kai at Level 50,
- New Equipment
- New Enemy Vessels
- Aircraft Carrier Princess (空母棲姫)
- Submarine So-Class Flagship (潜水ソ級)
- Destroyer I-Class Late Model (駆逐イ級後期型)
- Destroyer Ro-Class Late Model (駆逐ロ級後期型)
- Destroyer Ha-Class Late Model (駆逐ハ級後期型)
- Destroyer Ni-Class Late Model (駆逐ニ級後期型)
- Standard Carrier Wo-Class Flagship II (空母ヲ級)
- Northern Princess (北方棲姫) - two types
- Midway Princess (中間棲姫) - two types
- Aircraft Carrier Demon (空母棲鬼)
- Enemy Equipment
- Abyssal Hellcat Fighter (深海猫艦戦)
- +10 +1
- Abyssal Hell Diver (深海地獄艦爆)
- +11 +4 +3 +3
- Abyssal Avenger Torpedo bomber (深海復讐艦攻)
- +13 +4 +5 +2 +5
- Abyssal Hellcat Fighter (深海猫艦戦)
- Other Updates
- New Quest [A41]: Have Unryuu in your fleet as flagship
- Tone Kai2 and Chikuma Kai2 get additional voice clips
- Akagi and Kaga gets event-limited voice clips
Event World
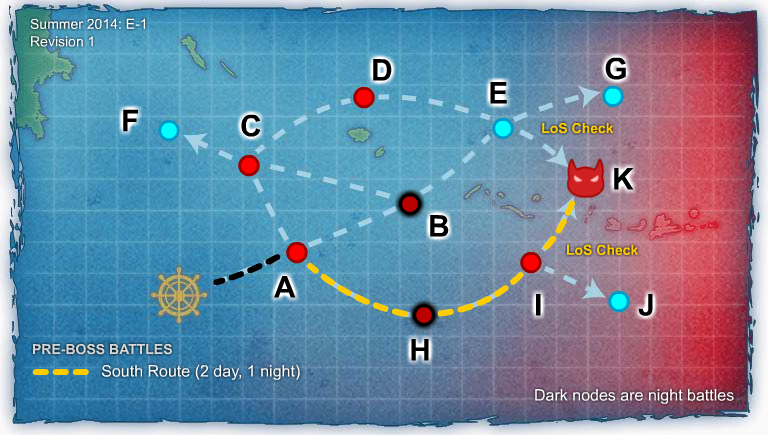
E-1
Information
Rewards |
| ||||||||||||||
| |||||||||||||||
|
Branching rules All posted branching rules, as of posting, are VERY tentative. Use at your own risk. ( 2 CVL required(not true, many people have gotten to boss even with one or no CVLs), northern route requires CV(?), no more than 2 Fast BB)
| |||||||||||||||
|
Tips
| |||||||||||||||
|
Drops
| |||||||||||||||
E-2
Information
Reward
|
| ||||||||||||||
| |||||||||||||||
|
Branching rules
| |||||||||||||||
|
Tips
| |||||||||||||||
|
Drops
| |||||||||||||||
E-3
Information
Reward |
| ||||||

| |||||||
|
Branching rules
| |||||||
|
Tips
| |||||||
|
Drops
| |||||||
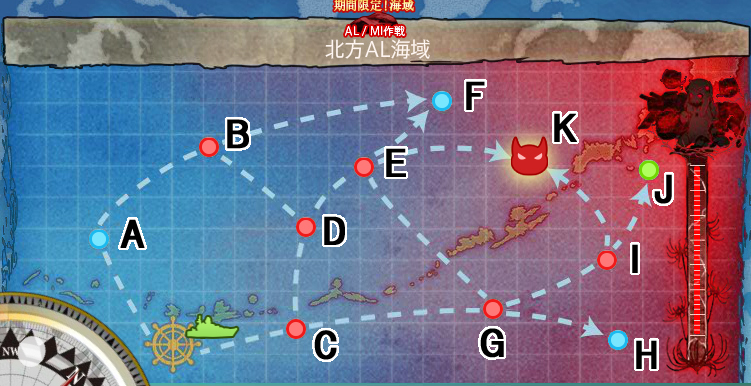
E-4
Information
Reward
|
| ||||||||||||
| |||||||||||||
|
Branching rules
| |||||||||||||
|
Tips
| |||||||||||||
|
Drops
| |||||||||||||
E-5
Information
Rewards
|
| ||||||||
| |||||||||
|
Branching rules
| |||||||||
|
Tips
| |||||||||
|
Drops
| |||||||||
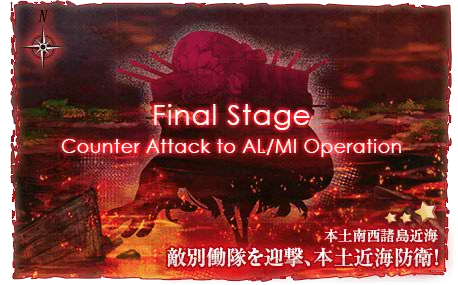
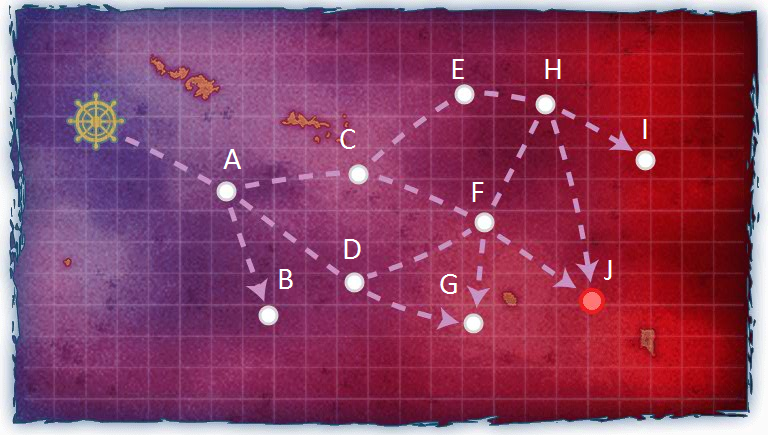
E-6
Information
Rewards
|
| ||||||||
  | |||||||||
|
Branching rules
| |||||||||
|
Tips
| |||||||||
|
Drops
| |||||||||
See also
- JP wiki article for the Summer 2014 Event
- Wikipedia entry for Operations at Aleutian Islands
- Wikipedia entry for Operations at Midway
Gallery
")
")
")