Tags: Visual edit apiedit |
Tag: sourceedit |
||
| Line 182: | Line 182: | ||
|4080 |
|4080 |
||
|5400 |
|5400 |
||
| + | |5950 |
||
| − | | |
||
|} |
|} |
||
Revision as of 11:22, 24 May 2016
Participation requirements
Common during most events
Check if you fulfilled these requirements if not you can't sortie event maps!
- Must have a 75% sortie win ratio
- Must have 5 empty ship slots for new ships
- Must have 20 free equipment slots
Special for this event
Special Mechanics
Transport Loadoff
Difficulty Selection
Starting from Winter 2015 Event, players can choose from the difficulty they want to play on each event map among three available difficulties: Easy (丙), Medium (乙), and Hard (甲).
You need to have a HQ level of 35 for Medium and 80 for hard. Different difficulties yield different rewards with harder ones either giving more items or a better version of the same item. However, ship rewards are always given regardless of difficulty. Drops also differ with some ships available only on medium to hard maps, and drop rates for some ships are statistically better. Enemy compositions also differ with bosses and their escorts are usually weaker on easier difficulties. To finish the next map on Hard, you will need to finish the previous map on Medium or Hard.
Clearing the last map on Hard (甲) mode will reward a First Class Medal. It is not required to clear all maps on hard but to gain access to last map's hard difficulty, you'll need to clear the pre-final map with Medium or above.
Map HP/TP dependent on HQ level
The amount of HP (or TP) required to clear a map usually varies depending on an Admiral's HQ Level. The higher the HQ Level is, the more kills (or TP) may be required to complete a map.
| Easy | E1 | E2 | E3 | E4 | E5 | E6 | E7 |
|---|---|---|---|---|---|---|---|
| (1 -> 34) | 380 | ||||||
| (35 -> 79) | 440 | 1335 | 290 | 1800 | 3400 | 2400 | |
| (80 -> 89) | 1370 | 300 | 1900 | 3600 | 2500 | ||
| (90 -> 99) | 2000 | 3700 | 2600 | 3600 | |||
| (100 -> 109) | 2100? | 3770 | 2700 | 3700 | |||
| (110 -> 120) | 310 | 2100 | 3840 | 2800 | |||
| Medium | E1 | E2 | E3 | E4 | E5 | E6 | E7 |
| (35 -> 79) | |||||||
| (80 -> 89) | 450 | 4300 | |||||
| (90 -> 99) | |||||||
| (100 -> 109) | 1420 | 2100? | 3900? | 4500 | |||
| (110 -> 120) | 420 | 2100 | 3960 | 4800 | |||
| Hard | E1 | E2 | E3 | E4 | E5 | E6 | E7 |
| (80 -> 89) | |||||||
| (90 -> 99) | |||||||
| (100 -> 109) | 450 | 1500 | 550 | 2100 | 4000 | 5200 | |
| (110 -> 120) | 4080 | 5400 | 5950 |
Land-based Aerial Squadron Support


Phases are triggered in the following order:
- Scouting phase
- Land-based airstrike
- Carrier-based airstrike
- Support expedition
- Initial torpedo strike
- Shelling phase, etc.
Multiple Branching Map
Starting from Winter 2016 Event, the event maps may have multiple starting points which leads to different routes, or even a completely separate routing altogether, and these fleets may encounter entirely different enemies on the way. The starting point of the fleet are dependent on type and composition of the fleet chosen to enter the maps.
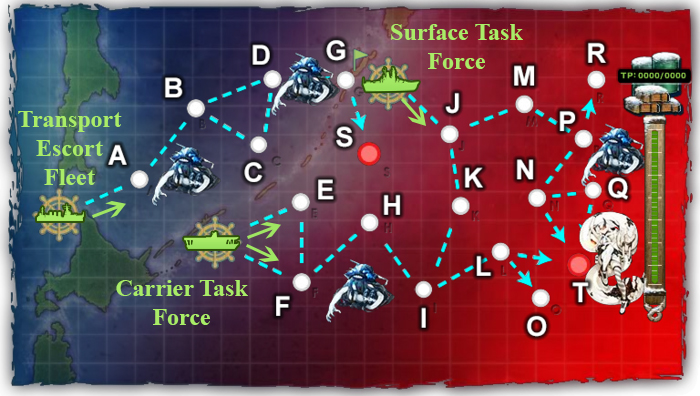
As you see in the image, there are 3 starting points and 2 ending nodes in E-3 map. The first part is to deplete TP gauge by using a Transport Escort Fleet which starts with node A and ends at node S. And after that the players have the option to use either Surface Task Force (starts with node J) or Carrier Task Force (starts with node E or F) to make their way to the final boss (node T).