
Introduction[]
Date for the Spring 2015 Event was 28th of April and ended on the morning of May 18th.
Patch Notes[]
- Event Details
- Named "Order! 11th Battle Operation"[1]
Planned duration of 20 days[2]- Will end on May 18th (Official tweet)
- Difficulty settings, like in Winter 2015 Event. See special mechanics section on this article.
- A well-trained aircraft carrier-centric Carrier Task Force is going to be important[3]
- Fleet locking restrictions confirmed for E-3, E-4 and E-5 for Medium and Hard difficulties, no fleet locking restrictions on Easy difficulty. [4] No fleet locking restriction on E-6 for all difficulties. [5]
- The admiral can choose branching in some places. [6]
- E-2, E-4, and E-6 use combined fleet.
- Possibly related to the Indian Ocean Raid (Easter Sunday Raid)[citation needed]
- New Ships
- Katsuragi CV (E-2 Clear Reward)
- Littorio FBB (Remodel: Italia) (E-4 Clear Reward)
- Akitsushima AV (E-6 Clear Reward)
- Takanami DD (E-3 & E-4 Mainly Boss Drop)
- Roma FBB (E-6 Multi Node Drop)
- New Equipment
- New Enemy Vessels
Mechanics[]
Participation requirements[]
- Must have a 75% sortie win ratio
- Must have 5 empty ship slots for new ships
- Must have 20 free equipment slots
- Must have formed a Combined Fleet to sortie in E-2, E-4 and E-6, and no combined fleet for E-1, E-3, E-5.
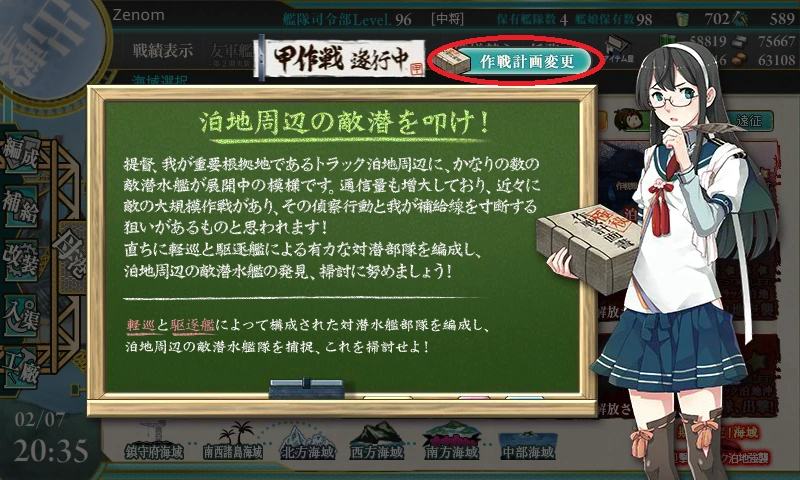
Click that option circled in Red.
Un-highlighted: Current Difficulty
Special Mechanics[]
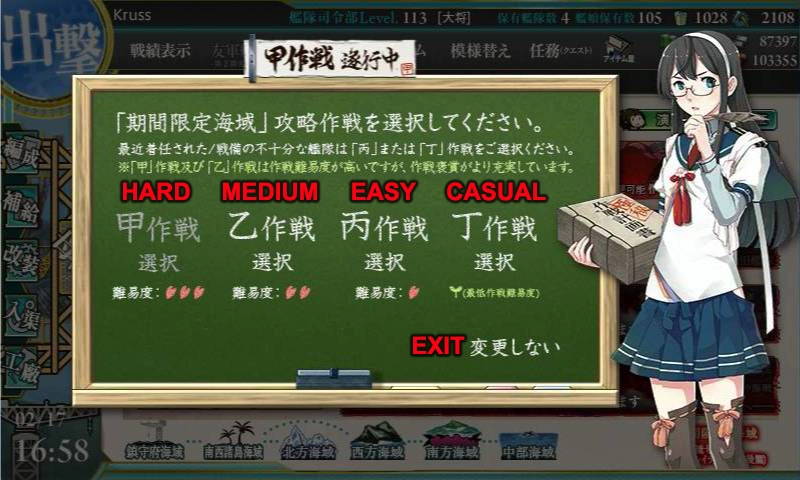
- Selectable and changeable difficulty
- This event has 3 ranks: easy (丙), medium (乙), hard (甲).
- HQ Level 35 unlocks medium, HQ Level 80 unlocks hard.
- You can choose the difficulty in each map separately.
- However, this time around, you will not be able to jump from Easy -> Hard after a map. To be able to use "Hard" setting, you must clear the previous map either on Medium or Hard itself. Only jumping up two difficulty levels is not allowed, other combinations stick to the old rules.
- 【BAD】Easy > Easy > Hard (not possible because easy jumped to hard)
- 【OK】Easy > Medium > Hard
- 【OK】Medium > Easy > Medium
- 【OK】Medium > Medium > Hard
- 【OK】Hard > Hard > Easy
- 【OK】Hard > Hard > Medium
- However, this time around, you will not be able to jump from Easy -> Hard after a map. To be able to use "Hard" setting, you must clear the previous map either on Medium or Hard itself. Only jumping up two difficulty levels is not allowed, other combinations stick to the old rules.
- When the difficulty is changed, the boss's health bar will be reset.
- Once the map is cleared (boss HP bar is depleted and killed), you CANNOT change the difficulty anymore, but can still farm the map on the difficulty used to clear it
- Different difficulties give different medals, equipment and materials when clearing the maps.
- Combined Fleet in E-2, E-4 and E-6
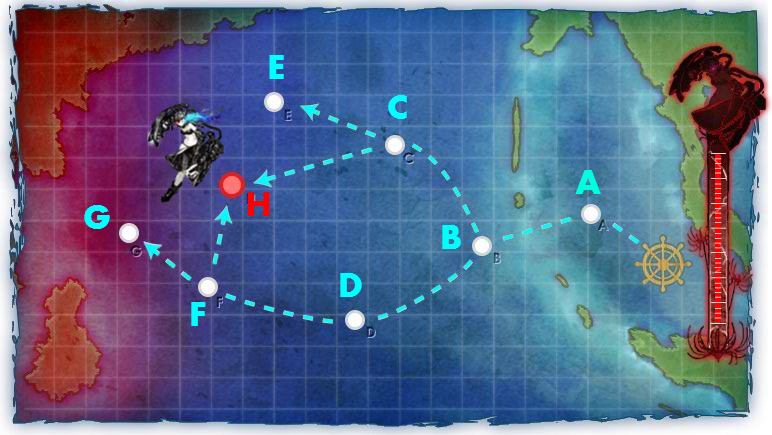
- Manual Selection - As seen in many maps, you can manually select the path that you want to go instead of relying on RNG or branching rules to bring you there.
- Aerial Combat - In some map, you'll notice that there's only Air combat, which takes place twice instead of the usual shelling. This is an Aerial Combat node where only your CV/CVL or other ships with launch-able planes will be taking part in combat.
| E-1 | Main Operations | Preparing for the 11th operation! | Normal (Torpedo Squadron) |
Only can use Light Cruisers (CL) and Destroyers (DD) on this map | Unrestricted difficulty selection |
|---|---|---|---|---|---|
| E-2 | 2nd Curry Sea Operation | Combined Fleet | Any ship can be used | Starting from E-2, you must clear the previous map with medium or above to choose hard on the next map. This involves any admirals who are going to medium or above starting from E-2. | |
| E-3 | Disruption of the Bay of Bagel trade route | Normal (No slow BB or CV allowed) |
Ship locking: Easy mode is an exception (Please see below)
EASY MODE EXCEPTIONAL CASE:
Ships that are not used, but with the same name can still be used in other ship-locking maps. | ||
| E-4 | Decisive battle! Ri Lanka Capture Operation! | Combined Fleet | |||
| E-5 | Extra Operations | Raid on Apricot Atoll Anchorage | Normal | ||
| E-6 | Through Operation! Across the Stebian Sea | Combined fleet | Any ship can be used |
Event Maps[]
See Enemy Encounter Reporting threads for detailed formation on each node.
Special Note: In this event, after clearing a map, the boss' pattern will revert to their original form, unlike previous events.
[]
| E-1 | Begin preparation, operation no.11! 発動準備、第十一号作戦!
|
|||||||||||||||||||||||||||||||||||||||||||||||||||||||||
| ||||||||||||||||||||||||||||||||||||||||||||||||||||||||||
| ||||||||||||||||||||||||||||||||||||||||||||||||||||||||||
| ||||||||||||||||||||||||||||||||||||||||||||||||||||||||||


[]

[]
| E-3 | Disruption of the Bay of Bagel trade route ベーグル湾通商破壊戦
|
|||||||||||||||||||||||||||||||||||||||||||||||||||||||||
| ||||||||||||||||||||||||||||||||||||||||||||||||||||||||||
| ||||||||||||||||||||||||||||||||||||||||||||||||||||||||||
| ||||||||||||||||||||||||||||||||||||||||||||||||||||||||||


[]
| E-4 | Decisive battle! Ri-Ranka Island Tactical Operation 決戦!リランカ島攻略作戦
|
|||||||||||||||||||||||||||||||||||||||||||||||||||||||||
| ||||||||||||||||||||||||||||||||||||||||||||||||||||||||||
| ||||||||||||||||||||||||||||||||||||||||||||||||||||||||||
| ||||||||||||||||||||||||||||||||||||||||||||||||||||||||||

[]
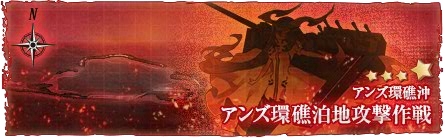
| E-5 | Raid on Apricot Atoll Anchorage アンズ環礁泊地攻撃作戦
|
|||||||||||||||||||||||||||||||||||||||||||||||||||||||||
| ||||||||||||||||||||||||||||||||||||||||||||||||||||||||||
| ||||||||||||||||||||||||||||||||||||||||||||||||||||||||||
| ||||||||||||||||||||||||||||||||||||||||||||||||||||||||||

[]
| E-6 | Through Operation! Across the Stebian Sea 打通作戦!ステビア海を越えて
|
|||||||||||||||||||||||||||||||||||||||||||||||||||||||||||||||
| ||||||||||||||||||||||||||||||||||||||||||||||||||||||||||||||||
| ||||||||||||||||||||||||||||||||||||||||||||||||||||||||||||||||
| ||||||||||||||||||||||||||||||||||||||||||||||||||||||||||||||||


Event-specific FAQ[]
- Is there any Akizuki or Prinz Eugen drop in the event?
- There are no trustworthy reports on it so far.
- Should I reset the gauge to farm for drops?
- Starting from this event, boss pattern will no longer stay in final form after clearing the event. Instead they will revert to original pattern, so there's no need to reset if you were just concerned about the pattern. However, because it is impossible to change the difficulty after clearing a map, if you wish to clear a map on a different difficulty from the difficulty you are farming in, it would be wise to constantly reset the gauge by changing the difficulty back and forth to avoid accidentally clearing a map at an unintended difficulty level.
- Can I get all new ships, including the drop-only Roma and Takanami in all difficulties, including Easy?
- Yes. For further details about where you can obtain these drops, read the tables above. If you don't understand what those representations mean, then read the explanations under section heading. But do note that the drop rates in easier difficulties are likely to be lower than hard.
- What is this
 that appears on my ships?
 - They are tags that mark your girls if they sortied to certain event maps, and can no longer be sortied to other restricted maps on Medium or Hard.
- In this event, blue text means the ship has been used in E-3, and can no longer be used on E-4 or E-5's medium or hard.
- Green text means the ship has been used in E-4, and can no longer be used on E-3 or E-5's medium or hard.
- Brown text means the ship has been used in E-5, and can no longer be used on E-3 or E-4's medium or hard.
- My ships are these ships with these levels and I have these equipments, what difficulty should I choose?
- Compare rewards across difficulties, check what difficulty that ship you want will drop at by looking at tables above, check your resources and buckets count, read enemy formations at different difficulties and then make your choice. If you still can't decide, do a trial run on the highest difficulty and see if you can handle it. If not, then decrease the difficulty.
See Also[]
References[]
Tools[]
- KanColle English AS Calculator by ofi123 (original: http://aircalc.net/)
- Air Superiority Calculator (in Japanese)
- Effective LoS Calculator (in Japanese)
Discussions[]
- Resource Comparison and Medals
- [E-1] Fleet Composition + Enemy Encounters
- [E-2] Fleet Composition + Enemy Encounters
- [E-3] Fleet Composition + Enemy Encounters
- [E-4] Fleet Composition + Enemy Encounters
- [E-5] Fleet Composition + Enemy Encounters
- [E-6] Fleet Composition + Enemy Encounters
Player Playlists[]
- Shinhwalee/Death Usagi's Spring 2015 Event Playthrough (E-1 to E-6 Hard Difficulty)
- FinnOtaku's Playthrough (Features at least the first and the last attempt of every map. Event cleared on Medium.)
- Arialypse - Kantai Collection Event : Spring 2015
- Soly21 Event Spring 2015 (E1 to E6 Hard)
- Kasidid Spring 2015 Event Hard mode
- Shadowseer XII's Spring 2015 Event (E-1 to E-6 Hard/Medium, I'm willing to help any portuguese players there too.)
- Kihaa Hardmode clear - E1-E6 full clear. Run time jumps in description.
- WongTheThief - Kancolle Spring 2015 Event (E4-6 Hard mode final kill)
- iTaSou - Kancolle Spring 2015 Event (Hard difficulty, Features E-1 to E-6 with first and final attempt)
Event Preparation Guide[]
Citation[]
Drop Reports[]
- Kancolle db. Try access the html page directly if you can't click into event maps
- wikiwiki
- MyFleetGirls database
- Twitter (Not so reliable)
- Chinese Forum aemedia
- Comments below (aware of trolls)