Several new gameplay mechanics are implemented in each new Event, some of which are Event-exclusive. These mechanics may change gameplay drastically, and the event-exclusive ones are described here.
Event-Exclusive Mechanics[]
Combined Fleet[]

See main article: Combined Fleet
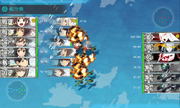
The Combined Fleet system was first introduced during the Summer 2014 Event, and has been present since as an event-exclusive mechanic. In a Combined Fleet, you'll have to organize and sortie the first two fleets together, allowing for up to 12 ships (instead of the usual 6) to be sortied out at once. Combined fleets can only be sortied to maps that require it.
Ship Locking[]
Introduced in the Summer 2014 Event, this mechanic locks ships that were sortied out to specific event maps, making them unable to participate in other ship-locked maps.
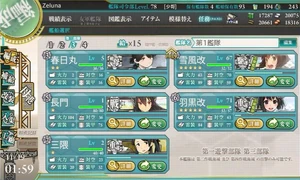
Example image from Winter 2019 Event
A ship girl will receive her ship lock as soon as she sorties to an event map with shiplocks. Afterwards, it's impossible to remove the lock until the end of the event. Remodeling or marrying a ship will NOT remove the shiplock, so be careful with who you sortie to event maps. However, locks are applied on a ship ID basis, meaning that duplicates of the same ship will not have the lock applied to them.
It is important to note that while shiplocks are applied regardless of the difficulty one chooses, they are generally only enforced on Medium and Hard difficulty. Outside of some event-specific branching rules, players on Casual and Easy difficulty are free to sortie ships with shiplock tags to any event map, regardless of the lock a map requires. However, as said before, ships will always be given a shiplock tag upon sortieing to an event map, and said tag cannot be overriden or removed via any means, so sortieing to event maps on lower difficulties will still lock ships out of event maps on higher difficulties. Always be careful about who is sortied to an event map.
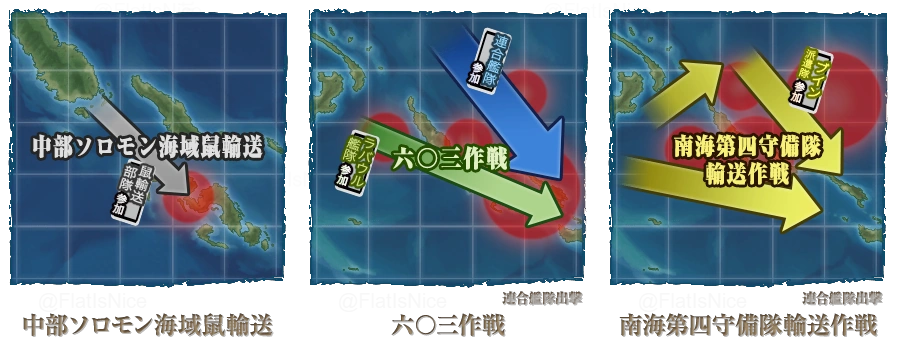
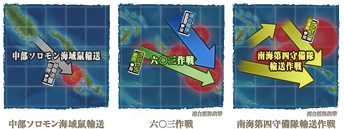
Here's a shiplocking example using the Winter 2019 Event:
- Sortieing Murasame Kai Ni to E-1 will give her a grey shiplock tag. She is now only able to sortie to E-1 and no other event maps.
- Sortieing Sendai Kai Ni to E-2 in a single fleet will give her a green shiplock tag. She is now only able to sortie to E-2, and only in a single fleet composed of untagged or other green-tagged ships.
- Sortieing Jintsuu Kai Ni to E-2 in a combined fleet will give her a blue shiplock tag. She is now only able to sortie to E-2, and only in a combined fleet composed of untagged or other blue-tagged ships.
- Sortieing Isokaze B Kai to E-3 will give her a yellow shiplock tag. She is now only able to sortie to E-3 and no other event maps. Although you can use both a single and combined fleet in E-3, unlike in E-2 they both use the same yellow shiplock tag, so you can sortie Isokaze in either a single or combined fleet with no issues.


The number and scope of shiplocks varies from event to event, so checking the current event page for lock information before starting is always a good idea. This is also a reason to keep multiple ships per ship-type prepared. If you lack in certain ship-types, you may not be able to fulfill branching routes on later maps, or may be forced to use a sub-optimal composition.
Support expeditions do not check for ship locks, with the exception of the Summer 2014 Event.
Difficulty Selection[]
Each map in this event has four (4) difficulty levels (a.k.a. operation ranks) the player can choose from:


- Casual (丁) (Unlocks at HQ level 1)
- Easy (丙) (Unlocks at HQ level 1)
- Medium/Normal (乙) (Unlocks at HQ level 35)
- Hard (甲) (Unlocks at HQ level 80)
The operation rank affects enemy patterns, boss health and strength, the number of times the player has to sink the boss in order to clear the map and the drop rates of ships. Different ranks reward different medals, pieces of equipment and/or materials upon clearing a map. The higher the operation rank, the better the reward.
However, new ship rewards are available on all difficulty levels, and you only have to clear the final event map on Hard to get the exclusive First-class medal.

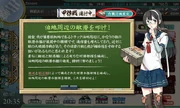
Click that option circled in as shown in red to change difficulty
You can choose the difficulty level for each individual map separately. However, you will NOT be able to select Hard for a map if you cleared the previous map on Casual/Easy. You must clear the previous map at least on Medium/Normal.
- 【NOT POSSIBLE】Casual/Easy > Hard
- 【POSSIBLE】(Medium/Normal)/Hard > Hard
- 【POSSIBLE】Casual/Easy/(Medium/Normal)/Hard > (Medium/Normal)
- 【POSSIBLE】Casual/Easy/(Medium/Normal)/Hard > Casual/Easy

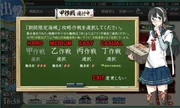
Un-highlighted words indicate Current Difficulty
It is also possible to change the difficulty level afterwards, however:
- If you drop to a lower difficulty (e.g. from Hard to Normal/Easy), the current HP/TP bar value (the one you have the moment you drop down) will increase by 25% of the new maximum and you will retain ALL unlocking/phases done on the previous difficulty level.
- However, if you change to a higher difficulty (e.g. from Easy to Hard), the boss's HP/TP bar will be reset upon doing so and ALL unlocking/debuffs/phases will be reset as well. In short, you will lose your entire map progress!
Once the map is cleared (boss HP bar is depleted, boss is defeated, and the HP bar is no longer visible in the map):
- You CAN NO LONGER re-adjust the difficulty level, but can still farm the map on the difficulty you have chosen to clear the map with.
- The enemy patterns revert back to pre-final patterns.
Map-specific Mechanics[]


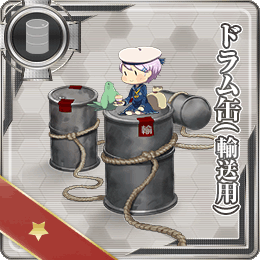
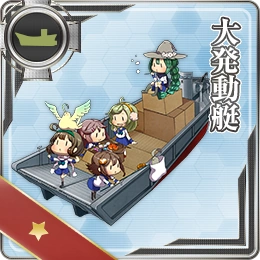
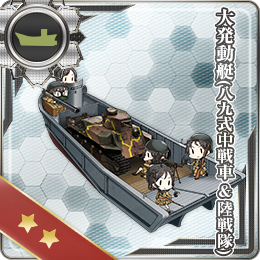
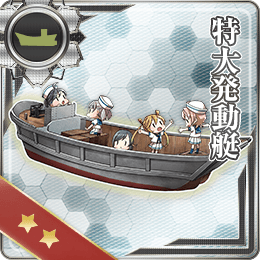
First introduced in the Fall 2015 Event, this map mechanic requires that players deplete a gauge known as Transport Load-Off gauge by reaching a drop-off point, then attaining at least an A-rank victory at the boss to secure said point. Ships are able to equip Drum Canister, Daihatsu Landing Craft, and other related equipment to increase the amount of gauge depleted with each victory. Depending on the map, players may be allowed to set up a type of Combined Fleet known as Transport Escort Fleet (輸送護衛部隊 yusou goei butai) to perform this role.
The player's fleet is required to visit a node indicated with a flag. From there, the game will note how many Drum Canister & Landing Crafts the player's fleet has carried to that node. The player's fleet is then required to get an A rank or higher at the boss node in order to deplete points off the Transport Load-Off gauge. (揚陸成功した輸送物資量? youriku seikou-shita yusou busshiryou)
In the case of the Fall 2015 Event, E-2 utilized the Transport Load-Off gauge, but was designed for a single fleet. Fall 2015 Event's E-3 used a Combined Fleet, with the Transport Escort Fleet (輸送護衛部隊 yusou goei butai) option enabled. Fall 2015 Event's E-5 had a dual gauge system, where after depleting the TP gauge, the HP gauge would be revealed and would have to be depleted again to truly clear the map.
Difficulty selection applies to this mechanic the same way it does to HP gauges.
| Transport Load-Off | |
|---|---|
| Ship/Equip Type | S Rank |
| TP added per ship in fleet | |
| DD? | 5 |
| CL? | 2 |
| CT? | 6 |
| CAV? | 4 |
| BBV? | 7 |
| AV? | 9 |
| LHA? | 12 |
| AO? | 15 |
| AS? | 7 |
| Other | 0 |
| TP added per equipment in fleet | |
|
5 |
|
8 |
|
8 |
|
8 |
|
8 |
|
8 |
|
2 |
|
1 |
|
1 |
| Different values may apply for each event | |
Some of the currently known information about the Transport Load-Off gauge mechanism: TP Calculation, according to data obtained from nga178 forum (Chinese), wikiwiki calculation, and a TP Calculator based on the NGA's method (Chinese)
- TP calculation is not affected on a per-Map basis.
- According to a source from the Japanese wikiwiki, TP point calculation has been changed since the Fall 2015 Event.
- In a S Rank victory, after TP calculation, the total is rounded down.
- In an A Rank victory, after TP calculation, the total is rounded down, multiplied by 0.7, and then rounded down again.
- The TP Gauge won't change if the boss battle results in a B-Rank or lower.
- Each Combat Ration grants approximately 1 extra TP. No data for Underway Replenishment yet.
- How Combat Ration consumption affects the TP value is still unknown.
- Ships that reach the flag node in taiha (大破) status, or were retreated (撤退 via Fleet Command Facility) are not counted in the node, and neither are their equipment.
- Popups will appear when reaching the flag node, displaying the number of Drum Canister/Daihatsu Landing Crafts brought.
- Improving Daihatsu won't give extra TP[1]
Also known as Boss Debilitation Mechanism
First introduced in the Summer 2015 Event, this mechanism allows the player's fleet to increase the damage dealt to the boss by fulfilling specific requirements on the event map. The exact mechanism varies depending on the map, but it has been present for Extra Operation maps from Summer 2015 onwards with the exception of the Winter 2016 Event & the Fall 2017 Event.
In Summer 2015 Event, this mechanic was only applicable for the Air Defense Princess at E-7. Initial testing indicated that the debilitation nodes were X and Y. However, a source that appeared after the event indicated that node C was also another debilitation node. It was also revealed that the debilitation from node C was triggered by the destruction of Wa-class transport enemies. It is not clear if any Wa-classes or only those from E-7-C were valid. In this event, this mechanic increased all ships' critical damage multipliers and possibly critical hit rates at the boss node.
This mechanic reset at 0000 JST daily.
![]()
![]()
![]()
The Fall 2015 Event version of the mechanic is applicable for the Submarine Princess at E-4 and the Destroyer Water Demon at E-5, allowing the player to weaken the bosses by fulfilling certain conditions. Unlike the other events which lacked any visible indicators, enemy bosses now have separate CGs and lines to indicate their weakened version.
This mechanic reset at 0500 JST daily.


- The Fall 2015 Event E-4 boss, Submarine Princess, could be debilitated by defeating the Anchorage Water Demon at Node M and Harbour Princess at node J at least once. While the debilitation is in effect, the gleaming eye will glow with cyan instead of purple, and a green goo would appear to leak out from her body.
![]()
![]()


- The Fall 2015 Event E-5 boss, Destroyer Water Demon could be debilitated by sinking at least 30 PT Imp Packs during the TP-Bar Stage, or 15 PT Imp Pack during Boss HP Bar Stage. While the debilitation was in effect, the Destroyer Water Demon would lose her helmet.
During Spring 2016 Event, the Central Princess at Map E-6 can be weakened by scoring an S-rank in the following nodes at least once. The debilitation will take effect when at least two of the nodes are successfully cleared with S-rank, and will be in full effect upon successful clearing of all the designated debilitation nodes, which will be indicated when the word "Masaka" is appended to her introduction line.
Unlike the previous events, this mechanic does not reset throughout the event.

![]()
![]()
![]()
It has been speculated that E5 also contains a debilitation node for the Central Princess at E-6 until Node I has been confirmed on 10th May 2016 Twitter as the debilitation node.
![]()


The name may change depending on which part of the map is unlocked by the mechanic (i.e. it can be Unlockable Starting point or Unlockable Nodes)
Also known as Hidden Routes.
Starting from Fall 2016 Event, certain maps may have starting point, nodes or pathways that may be hidden at the beginning, which will be opened after certain conditions are met. The conditions for unlocking the nodes varies from depending on the map, but in most these conditions involves reaching certain part of the map and earn an A or S-rank at the specific nodes.
Starting from Spring 2017 Event, map nodes and the path to them can be unlocked at certain maps. The additional routes are always necessary to fully clear the map.Striking Force Fleet[]

First implemented with the Fall 2017 Event, a Striking Force allows admirals to, when enabled, use the 3rd Fleet, to sortie a 7-ship fleet. Currently, this mechanic has been exclusive to the Leyte Gulf events (Fall 2017 Event and Winter 2018 Event).
- The Striking Force can only be accessed from the 3rd fleet.
- When it is available, text reading 第三部隊 will appear above the "3rd fleet" icon.
- You may view and change the 7th ship in a Striking Force by pressing the "NEXT" arrow present at the bottom of the fleet assembly screen.
- Fleet presets will not save the 7th ship in a striking force; only the first 6 will be saved.
- This 7th ship slot can be exploited when using Mamiya and Irako, as the items will adjust morale on all 7 ships in the fleet; this allows for further value to be derived from the item, as normally they can only be applied to 6 ships in a normal fleet.
- While the 3rd fleet is on sortie, the 1st fleet will be idle at base unable to do anything.
- Thus far, all maps which have allowed the use of a Striking Force have also allowed players to sortie a standard single fleet to the map. This means that one can accidently sortie the 1st fleet when they, in reality, intend to sortie the 3rd fleet. As such, caution is advised when sortieing fleets to Striking Force maps.
- One way to block the 1st fleet from sortieing involves sending any ship in the first fleet to Repair dock, since the game does not allow players to sortie ships under repair to any map.
- Another way to block the first fleet from sortieing would be to set a ship who is taiha as the flagship of the first fleet, as the game also does not allow the sortieing of fleets with flagships that are taiha.
- Thus far, all maps which have allowed the use of a Striking Force have also allowed players to sortie a standard single fleet to the map. This means that one can accidently sortie the 1st fleet when they, in reality, intend to sortie the 3rd fleet. As such, caution is advised when sortieing fleets to Striking Force maps.
- The combat mechanics of a Striking Force work the same as a standard Single Fleet, save for the fact that an additional player ship is present to shell the enemy.
- When equipped on the flagship of a Striking Force, the Striking Force Fleet Command Facility
 can be used to retreat any 1 taiha ship after the completion of a battle.
 - It works identically to the Fleet Command Facility, except that it does not require that the retreated ship be escorted by any other ships.
- Players can obtain 1 copy of this item by completing quest F64.
- This item can only be used in a Striking Force - it cannot be used in a standard Single Fleet, nor can it be used in a Combined Fleet as a replacement for the Fleet Command Facility.

When a Striking Force is being sortied, the appearance of formations available for selection will change slightly to the following:
| Formation name | |
|---|---|
|
Line Ahead |
|
Line Abreast |
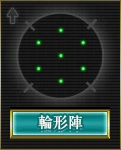
|
Diamond |
|
Echelon |
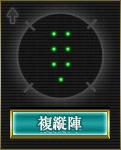
|
Double Line |

|
Vanguard |
| Fall 2017 Event |
|
|---|---|
| Winter 2018 Event |
|
Vanguard Formation (警戒陣) - Event Exclusive[]


Introduced in Fall 2017 Event for the first time along with the Strike Force mechanic, the vanguard is a defensive formation which affects the ships based on how they are positioned in the fleet.
- Vanguard Formation is available only during event period. However, it is usable on all maps during that period.
| Fleet Halves | Damage Modifier | Evasion Bonus? | Aggro? | ||||
|---|---|---|---|---|---|---|---|
| Accuracy Modifier | |||||||
| Shelling | Torpedo | ASW | Night | Aerial | |||
| Top half | 50% | 100% | 100% | 50% | 100% | ✓ | ✘ |
| 80% | ??? | ??? | ??? | ??? | |||
| Bottom half | 100% | 100% | 60% | 100% | 100% | ✓ | ✓ |
| 125% | ??? | ??? | ??? | ??? | |||
As shown above, vanguard formation has two modifier values divided between the Top half and the Bottom half which split differently depending on the number of ships.
- For 4 (or 5 ships)
- Top half: Position #1-2
- Bottom half: Position #3-4 (and 5)
- For 6 (or 7 ships)
- Top half: Position #1-3
- Bottom half: Position #4-6 (and 7)
Vanguard and Support Expedition
Note that in the scenario that a Shelling Support is used, the Shelling Support will receive a 50% firepower modifier as well when Vanguard is selected.
- This is applied to the whole support fleet, so placing weaker ships at the top will not solve this problem. Therefore, using support expedition when you rely majorly on vanguard formation to survive will not be as efficient however still usable.
When the Vanguard formation is selected, all your ships in the fleet will obtain a post-cap evasion bonus [1]. While everyone in the fleet will gain an evasion bonus, the amount of evasion you gain is based on 2 things:
- Is the ship a DD?
- Is the ship part of the top or the bottom half?
The rough estimates of the evasion bonus are as followed:
- Top half (including the 4th ship)
- Non-DD: +5% Evasion
- DD: +20% Evasion
- Bottom half (excluding the 4th ship)
- Non-DD: +20% Evasion
- DD: +40% Evasion
A test has been done albeit roughly regarding Vanguard Formation's effect on Air Raid nodes. A conclusion was reached as followed [2]:
| Ship Slots | Evasion Bonus? | Aggro? |
|---|---|---|
| First half | ✘ | ✘ |
| Second half | ✘ | ✓ |
While the aggro effect is still there, you do not gain any evasion bonus against airstrikes. In other words, your evasion will be the same as in Diamond formation, except with a worse AA modifier of 110% instead of 160%.
- Your bottom half will suffer the most from airstrikes and you do not have evasion bonuses to compensate for it this time.
Some Utilization Examples:
- Night Battle modifier is not a 100% all-around (Top: 50%, Bottom: 100%) which is unique.
- For nodes where you want to maximize your firepower such as boss nodes, vanguard is generally undesired.
- However, in some situations, using vanguard might be better such as at pre-boss night battle nodes.
- 5-3 Leveling, for example, Node I does not have tough enemies and your night battle power might be able to out-damages the modifier while increasing your evasion to improve survivability. This requires a lot of trial and error.
- Torpedo modifier remains 100% regardless of where the ship is placed in the fleet.
- Ships who rely highly on their torpedo stats such as CLT and especially SS can benefit greatly from this. For example, submarines with vanguard will still maintain the 100% modifier from Line Ahead while benefiting from increased evasion based on position. However, consider placing your higher evasion or armor at the bottom half as they will be targeted more.
- The ASW capable ships benefit the most from the top half while those who damage through shelling and night attacks benefit the most when placed in the bottom half.
Vanguard and Pre-setup
Vanguard Formation is position-sensitive. As such, learning how to position is the key in utilizing the formation to its greatest extent but also its greatest weakness. Once you setup your fleet to benefit the most from vanguard, you can and most likely disorder your fleet's shelling depending on what you want to utilize.
Consider this situation:
- A fleet of 3 low-level ship: 1 CL and 2 DDs; plus 3 high-level ships: 1 BB and 2 CV
| Ship Type | Level | Ship | Evasion Bonus | Aggro? | Shelling Modifier | ASW Modifier | Night Battle |
|---|---|---|---|---|---|---|---|
| 3 | DD | +20% | ✘ | 50% | 100% | 50% | |
| 21 | DD | +20% | ✘ | 50% | 100% | 50% | |
| 26 | CL | +5% | ✘ | 50% | 100% | 50% | |
| 175 | CV | +20% | ✓ | 100% | 60% | 100% | |
| 170 | BB | +20% | ✓ | 100% | 60% | 100% | |
| 162 | BB | +20% | ✓ | 100% | 60% | 100% |
- Note: Please see previous tabs to understand the evasion bonuses. Torpedo and Aerial modifier stay constant and therefore not shown.
- Disregarding equipment setup, what is the current situation of the fleet?
- As low-level DDs have horrible evasion, it won't benefit as much from evasion bonus and therefore would be safe to position them in #1-3
- This allows position #4-6 to be occupied by your high-level ships that can both tank, draw aggro, benefit slightly from evasion bonus, and display 100% shelling damage all at once in exchange for getting targeted more.
- In maps with submarines, those DDs can also be equipped with ASW gears to sink submarine from position #1-3 which gives them 100% ASW benefit.
Friend Fleet[]
See main article: Friend Fleet
Implemented in the Winter 2018 Event, a Friend Fleet is a NPC support fleet that appears during the Night Battle phase of a boss battle in certain event maps to support player fleets. Currently, all fleets implemented are specified by the game developers, but the system is said to be a trial version of a future system which will involve other player's fleets.
Other Common Mechanics[]
LoS Check[]
See main article: Line of Sight
Starting from the Spring 2014 Event, LoS (![]() )-based checks have been implemented throughout various maps, which require players to exceed a given LoS threshold in order to proceed to a given node.
)-based checks have been implemented throughout various maps, which require players to exceed a given LoS threshold in order to proceed to a given node.
Support Expedition[]
See main article: Support Expedition
Land Base Aerial Support (LBAS)[]
See main article: Land Base Aerial Support
Node-specific Details[]

Also known as: Air Raid Battle (空襲戦)
First introduced in Winter 2016 Event.
Unlike Aerial Battle nodes, Air Raid Battle nodes are strictly defensive air battles against an onslaught of Abyssal aircraft, where you try to shoot down as many bombers as possible before they attempt to damage your ships.
There are a few key differences with an Air Raid Battle versus regular battles:
- Abyssal aircraft will attempt to bomb your fleet (Note that there will be no "plane launching" animation for the abyssal side). Your fleet will launch any aircraft capable of participating in the Aerial Combat phase to intercept them. As such, the only means of directly damaging the enemy at these nodes is through the use of bombers sent to the node via Land Base Aerial Support.
- Given that it is an air-defense node, it is advised to use diamond (for single fleet/striking force) or ring (for combined fleet) formation in these nodes.
- These nodes calculate ranks solely based on the damage you take during the air raid:
- As of the Fall 2017 Event, these nodes consume 6% fuel and 4% ammo. This behavior was extended to regular world maps with the Phase 2 [Block-1] Update.
- Generally enemies are in the diamond formation, but the formation graphic may look different or not appear due to diamond normally being unselectable with fewer than 5 ships.
- You cannot choose to pursue the enemy for night battle, as you are not fighting with an enemy fleet, but instead defending yourself from an enemy air raid.
As of the Fall 2017 Event, nodes containing only submarines consume 8% fuel (rounded down, but 1 unit at minimum). This behavior was extended to regular world maps with the Phase 2 [Block-1] Update.
As of the Fall 2017 Event, nodes containing only PT Imp Packs consume 4% fuel and 8% ammo (rounded down, but 1 unit at minimum).
As of the Fall 2017 Event, these now consume 10% fuel and 10% ammo (rounded down, but at least 1 unit at minimum). This behavior was extended to regular world maps with the Phase 2 [Block-1] Update. There is one exception to this rule - yasen nodes containing only PT Imps consume only 4% fuel and 8% ammo.
Events may feature nodes marked as night-to-day battle nodes, which involve a night battle where your fleet fights an enemy combined fleet, followed by a day battle against the enemy main fleet. Proceeding from night to day only occurs when certain requirements are met. When they are met, the transition happens automatically - unlike going from day to night battle, you do not have any control over whether this happens.


Also known as Manual Node Selection
Introduced in Spring 2015 Event, certain nodes allow you click on a node to specify which route you want to take. You may only choose nodes that are connected directly to the node you are currently at.
Introduced in Winter 2016 Event, maps with multiple starting points were introduced. These maps may have multiple starting or/and ending nodes. The starting node depends on the ships, or combined fleet type that was used to sortie on the map.
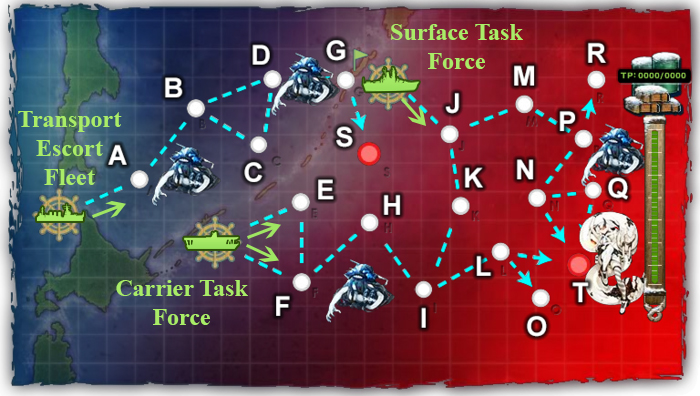
As shown in the image, there were multiple start and end nodes in 2016 Winter event E-3. The first part was to deplete TP gauge, using a Transport Escort Fleet which started at node A and ends at node S. After which, players had the option of using either a Surface Task Force (Starts at node J) or Carrier Task Force (Starts at node E or F) to make their way to the final boss (node T).

Introduced in Winter 2019 Event, Ambush nodes are nodes where battle occurs with an abyssal enemy fleet, but the player fleet is unable to attack. Although the displayed background is nighttime, the battle will follow day battle rules, wherein the enemy fleet is granted air superiority and will proc artillery spotting accordingly.
Ambush nodes automatically select the formation and starts the battle immediately for the player once the fleet arrives on the node. (Line Ahead for Single Fleet, Formation 4 for Combined, or Formation 2 if not possible) Ships can be sunk in this node as per normal sinking rules (Continuing sortie while below <25% HP) so closing the game, or refreshing has to be done before the ship reaches the ambush node in question.
As the player fleet does not attack, only 4% fuel and 0% ammo is consumed.