InformationEdit
|
Northern Salmon Sea Area サーモン海域北方 | |
|
| |
 | |
| Information | |
| Special Mechanics | LoS Check |
| Experience | HQ: 240 non-boss, 3480 boss |
| Kills required | 5? |
| Rewards | |
 Ranking Points: 200
| |
| In-game description | |
| Operation | 第二次サーモン海戦 Second Battle of the Salmon Sea |
| Task | 南方海域に敵の有力な機動部隊の接近が確認された。空母機動部隊を以て、これを迎撃せよ! The approach of a powerful enemy task force has been confirmed in southern waters. Form a carrier task force and intercept it! |
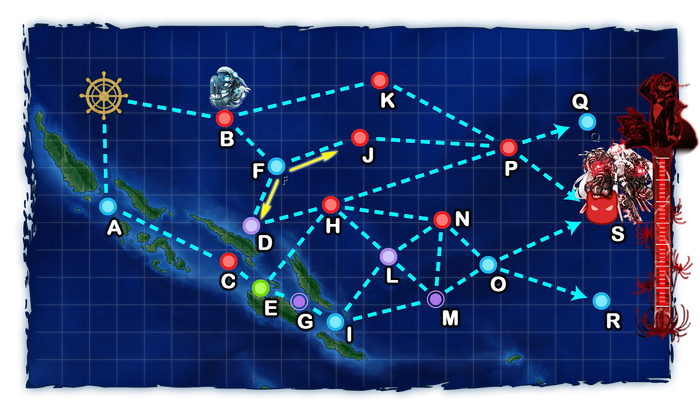
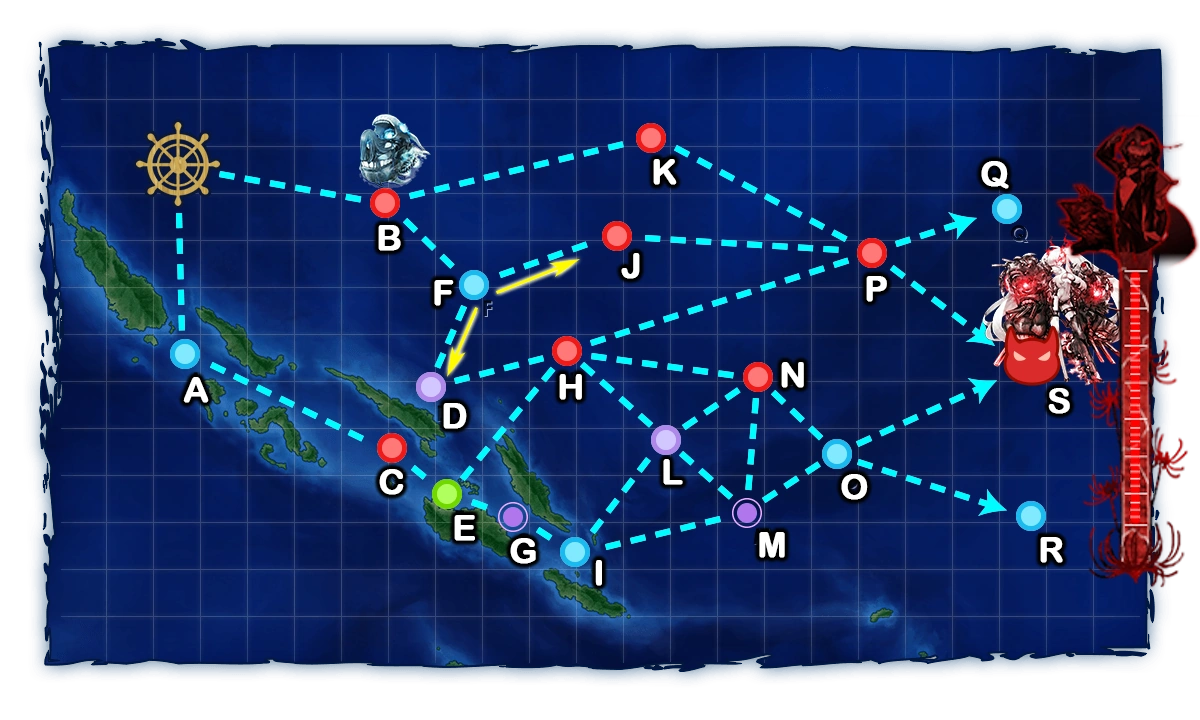
| Branching Rules | ||
|---|---|---|
| Nodes | Rules | |
| Start | A |
|
B | ||
B |
F |
|
K | ||
E |
G |
|
H | ||
H |
L |
|
N | ||
P | ||
I |
L |
|
M | ||
L |
N |
|
M |
L |
|
O | ||
N |
M |
|
O | ||
O |
R |
|
S | ||
P |
Q |
|
S | ||
Tips[]
- You must sink the flagship at the Boss node 5 times to clear the map.
- Clearing this map rewards 1 Medal and 200 ranking points. The boss HP bar is reset at the beginning of each month, allowing the rewards to be obtained again.
- As with all World 5 maps, support expeditions 33 and 34 are applicable on this map
- Node B is a submarine node.
- Nodes G and M are Night Battle nodes.
- A certain LoS is required to reach the boss node:
- The boss node formation appears to be randomly chosen from 4 different fleets, even during the last kill.
- 2 formations have the Southern War Princess as flagship escorted by 2 Battleship Re-Class Elite in either line ahead or double line formations, and are considered to be the harder available formations.
- The other 2 formations have a Wo-Class Kai as flagship, escorted by the Southern War Princess and up to 1 other Wo-Class Kai. These are generally considered to be the easier formations available.
- Due to the large gap in difficulty between these two "classes" of available formations, rolling an easier enemy composition can be the difference between an easy kill and complete annihilation.
- 3 of these formations contain one Submarine Yo-Class. Keep in mind that the sub can be ignored, but must be killed if one wants their asw-capable ships to attack surface ships during night battle and/or if you wish to S-rank the boss node.
- The submarine was originally in elite form, but it was nerfed after the January 22nd 2019 update.
- The boss node formations become weaker after the map is cleared, which can make obtaining a S-rank for some 5-5 quests (particularly ones where destroyers must be brought to the map) far easier.
- Submarine Yo-Class Elite is present in every postclear composition, so a dedicated OASW ship must be brought if one wishes to secure a S-rank.
- Following the Winter 2019 Event, Southern War Princess has become much stronger through an armor buff, making the boss node slightly harder to beat or S-rank while doing quests.
- Regardless of which comp you are using, consider the use of the special attack (Touch mechanic) of Nelson Kai, Nagato Kai Ni and Mutsu Kai Ni if you want to make clear out enemies at the boss node easier


North Route[]
B K P S
- For fleets containing more than 4 (BB + CV) (e.g. 3 BB 3 CV), there is a random chance to be off-routed to Node Q regardless of fleet LoS.
- Node P can contain one Battleship Re-Class Elite in Double Line or Line Ahead. She may also sometimes show up in normal form instead of the Elite variant.
Suggested Fleets[]
- 6 (F)BB(V)/CV(B)
- Strongest composition that allows you to brute force the map like with classic 5-5, but there is 35% off-route chance before the boss node.
- 4 (F)BB(V)/CV(B) 2 CA(V)
- Assuming one passes the LoS check from Node P -> Node S, this comp has a 100% chance of routing to the boss.
- Slow BBs such as Musashi Kai Ni can be considered to maintain enough power for the boss fight and have better armor to tank Re Elite's opening torpedo at Node P.
- Alternatively, Saratoga Mk.II can also be brought for her Night CVCI (i.e TBM-3D
 + F6F-3N), allowing her to deal massive damage during night battle alongside your battleships.


Alternate North Route[]
B F J P S
- Requires 2 destroyers.
- The second battle is an enemy carrier fleet filled with Wo Kai, so AACI is recommended.
- Node P can contain one Battleship Re-Class Elite in Double Line or Line Ahead.
- Support is recommended for an easier time in pre-boss nodes.
Suggested Fleets[]
- 4 (F)BB(V)/CV(B) 2 DD
- Allows sufficient air power for air superiority at all nodes and offers fairly high firepower at the boss node, but requires that you escort 2 destroyers through Node P and Re Elite's opening torpedo.
Middle Route[]
B F D H N O S
- Requires 2 DDs and maximum 2 (F)BB(V)+CVL.
- An AO will allow you to bring 3 (F)BB(V)+CV(B/L).
- Easier pre-boss, but will struggle against the double Re Elite boss node formations.
- LOS≥ 67 F33 Cn2 is required to guarantee routing.
- Support is recommended.
Suggested Fleets[]
- 2 (F)BB(V) 0~2 CAV 0~1 CLT 2 DD
- 3 (F)BB(V)+CV(B) 1 AO 2 DD
South Route[]
A C E G I M O S
- Requires 2 destroyers and 1 Drum Canister (Transport Use) on 4 different ships -OR- 4 destroyers.
- The first battle is a relatively easy enemy torpedo squadron, but the next two battles are fairly dangerous night battles.
- Pre-boss support shelling expeditions can help stabilize the night battles significantly.
- Fleets that take this route will struggle significantly against the double Re Elite boss node formations.
- Generally lower bauxite consumption when compared to other routes.
Suggested Fleets[]
- Saratoga Mk.II 1 CV(B) 4 DD
- Offers some night battle power with Saratoga's night launch capabilities, but struggles on the pre-boss route. High LoS from equipping carrier-based scouts can free up space for night battle equipment on destroyers.
- 2 (F)BB(V) 4 DD
- Offers more stable pre-boss battles and high night battle firepower. With two 7 AA seaplane fighters in the largest slots of BBV or slow BB such as Musashi Kai Ni, Air Denial can be achieved against all boss compositions.
- Saratoga Mk.II, Ise Kai Ni, Tashkent Kai, 2 CAV, 1 DD
- Offers just enough air power potential to achieve air superiority at the boss, which CAVs and Ise can take advantage of with double attack setups. Having equipment space taken up by drums makes Tashkent Kai preferable to other DDs