Information
|
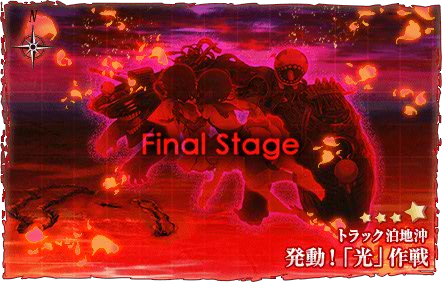
Commence! Operation 'Hikari'
発動!「光」作戦 | |
 | |
 | |
| Information | |
| Special Mechanics | Unlockable Starting Point Combined Fleet Abyssal Combined Fleet Ship Locking Boss Debilitation |
| Boss gauge (HQ 120) |
Easy: 3100 HP Medium: 4000 HP Hard: 4800 HP |
| Rewards | |
All:
Casual:
Easy:
 1 1Medium:
 52 52 1 1Hard:
821 | |
| E-3 Transport Phase | ||
|---|---|---|
| Nodes | Rules | |
C |
A |
|
D |
| |
A |
B |
|
D |
| |
F |
G |
|
H |
| |
I |
| |
| E-3 Boss Phase | ||
|---|---|---|
| Nodes | Rules | |
| Start | S |
|
T |
| |
S |
V |
|
W | ||
L |
M |
|
O |
| |
N |
| |
M |
P |
|
U |
| |
O |
N |
|
Q |
| |
N |
Q |
|
Q |
R |
|
U |
| |
User Submitted Fleet compositions
Transport Phase
- C A D E F I
- 6 SS(V)
- This fleet requires F33 LoS at 5.5 or higher to reach Node I. If the fleet was not carrying Saiun (Disassembled for Transport), they will be redirected to Node H from F instead.
- 1CL 3DD 2CAV (EASY MODE ONLY)
- The CAV will be the ship who will be carrying the Saiun (Disassembled for Transport) for this stage.
- It is recommended that you bring 2 CAVs, equipped with multiple Seaplane Bombers/Seaplane Fighters to avoid getting Air Denial (AD)/Air Incapability (AI), and gain Air Parity (AP) instead so that the enemy doesn't gain the ability to use Artillery Spotting attacks against your fleet, especially in node D and node I.
- It is recommended to use both Pre-boss and Boss node support expeditions for safety. Please remember to especially have the Pre-boss support expedition fleet members to be all sparkled for high trigger rate.
- 6 SS(V)
Boss Phase
- Surface Task Force
- S W L M U
- Main: 4 FBB, 2 CVL. Escort: 1 CL, 2 CLT, 1 CA, 2 DD
- Main: 4 FBB, 2 CVL. Escort: 1 CL, 1 CLT, 2 CA, 2 DD
- These compositions can also be used for debuffing due to node S being a route selection node, allowing it to take the fleet to Node J if desired.
- For Easy and Medium mode, you are allowed to use Slow Ships in your fleet to go node L to M. However in Hard mode using Slow Ships will cause you to go L to O instead.
- S W L M U
- Carrier Task Force
- Carrier Task Force fleets are currently not highly recommended due to the longer route to reach the boss node.
Notes
- After clearing the transport gauge, Node E becomes an ammo resource node.
- Single fleets start at the 1st starting point, while Combined Fleets start at the 2nd starting point.
- Node S is a route selection node.
- Nodes I, J and U contain Abyssal Combined Fleets
- LBAS range requirements: 3 to I, 4 to J, 6 to U (full map).
- There are no enemy strikes on the player's land bases in this map.
- After clearing the map, the boss reverts to the pre-final form.
Transport Phase
E-3 has a transport gauge that needs to be depleted before players can proceed against the map's true boss. The mechanics of this transport gauge however is different from previous transport missions:
1. Upon selecting a difficulty level, a new crafting quest will become available. This crafting quest will involve having a certain number of Development Material and a required aircraft in the player's inventory, and then scrapping a Type 0 Reconnaissance Seaplane, which will consume both the aircraft and the development materials to create a Saiun (Disassembled for Transport) item. The exact requirements of the quest differ depending on the chosen difficulty level.
Easy difficulty:
| ID | Requirements | Rewards | Note | ||||||||
| KO01 | 【丙】作戦「彩雲」調達&輸送分解 Disassemble and Transport "Saiun" | ||||||||||
Scrap a Type 0 Reconnaissance Seaplane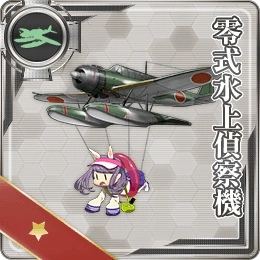 and have 10 development materials as well as a Type 97 Torpedo Bomber and have 10 development materials as well as a Type 97 Torpedo Bomber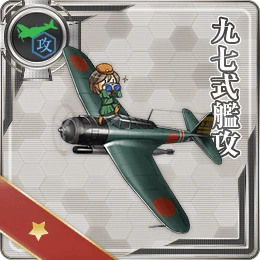 in inventory. in inventory.
|
0 / 0 / 0 / 0 | Saiun (Disassembled for Transport)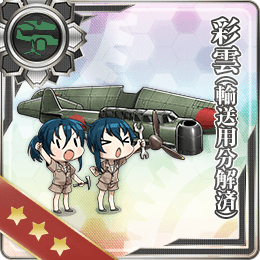 x1 x1
|
The development materials and the Type 97 are consumed upon completion of the Quest.
| ||||||||
Medium and Hard difficulty:
| ID | Requirements | Rewards | Note | ||||||||
| KO02 | 「彩雲」輸送分解 Disassemble and Transport "Saiun" | ||||||||||
Scrap a Type 0 Reconnaissance Seaplane and have 20 development materials as well as a Saiun in inventory. in inventory.
|
0 / 0 / 0 / 0 | Saiun (Disassembled for Transport) x1
|
The development materials and the Saiun are consumed upon completion of the Quest.
| ||||||||
The quest can only be performed twice before it disappears, however it will reappear if the player loses a disassembled Saiun.
2. The disassembled Saiuns must then be equipped on any of the following ship types:
- Aircraft-carrying Submarines (SSV)
- Light Aircraft Carriers (CVL)
- Fleet Carriers (CV)
- Seaplane Tenders (AV)
- Amphibious Assault Ship (LHA)
- Repair Ship (AR)
- Aviation Cruiser (CAV)
3. Once the fleet sorties to E-3 they must reach Node E, the designated transport drop-off point, where any disassembled Saiuns being carried will be consumed.
4. The fleet must then attain at least an A-Rank victory against the Heavy Cruiser Princess boss node at Node I, which if successful will deplete the TP gauge. If a victory against the boss is not secured, the player retreats, or the fleet is routed to a dead-end, the TP gauge will remain untouched and the disassembled Saiuns will be wasted.

Note that the disassembled Saiuns are not consumed if the fleet retreats before reaching Node E. Also, while players can still sortie to E-3 without carrying any disassembled Saiuns, they will be unable to clear the TP gauge while doing so. Finally, any disassembled Saiuns will be deleted if players change their difficulty level.
Once two disassembled Saiuns have been delivered, the transport gauge is removed and replaced with a boss health gauge, along with a secondary starting point appearing and and two airbases for Land Base Aerial Support becoming available for use.
Boss HP Phase
There are five special boss mechanisms on this map.
Boss Hidden Debuff

【KanColle】 Winter 2017 Event E-3 Secret Debuff-0
- This may be performed after the TP gauge has been cleared.
- Obtain 1 S rank at J node and 1 S rank at I node, Scoring A rank will not work for either node.
- J node contains installations, which are weak to Type 3 Shells, WG42 and/or AP Shells.
- The mission completion sound will play upon returning to base after the requirements have been met.
- Currently effects of this mechanic are unconfirmed and is being investigated. Lowering of the boss's escort Aircraft Carrier Princesses' armor is suspected.
- The map can feasibly be cleared without activating this debuff.
Final Phase Regeneration
- The map cannot be cleared by sinking Abyssal Twin Princesses in their regular form, only in their damaged form.
- These apply to all difficulties:
- When the gauge is first depleted to under the hp of the damaged form of Abyssal Twin Princesses (660), the boss formation will change to the final form on the next encounter.
- If they are sunk then the map will be cleared.
- However, if the boss is not sunk in that encounter, in the next encounter they will revert to the pre-final form.
- Then, they will have to be sunk in their pre-final form in order to re-unlock the final form on the subsequent encounter.
- This mechanic can be circumvented by doing the Final Phase Mission below, which will fix the boss in the damaged form after completion until the map is cleared.
Final Phase Mission Debuff
Once the last kill phase (the bosses' health gauge has dropped to or below the bosses' individual health) has been reached, a new mission will appear which can be completed to initiate a debuff on Abyssal Twin Princesses.
| ID | Requirements | Rewards | Note | ||||||||
| KO03 | 敵大規模泊地の後方兵站線を分断せよ! Break down the rear logistic line of enemy large scale anchorage! | ||||||||||
| Using a Surface Task Force Combined Fleet, obtain A or higher Rank Victory in Node J twice. |
650 / 650 / 0 / 0 | ||||||||||

Winter 2017 Event E-3 Boss Debuff Quest
- The mission completion sound will play upon returning to the home port screen after finishing the mission (i.e. after accepting the mission clear rewards).
- Completing this quest will put the Abyssal Twin Princesses at the Boss Node U in their debuffed final form until the map is cleared.
- The debuff lowers Abyssal Twin Princesses' defense power (not to be confused with armor) by 23 [1].
Anti-Submarine Equipment Special Damage Modifier
- ASW (anti-submarine) equipment Type 3 Active Sonar, Type 4 Passive Sonar, Type 3 Depth Charge Projector, Type 93 Passive Sonar and Type 94 Depth Charge Projector have been shown to give a damage multiplier against all enemies at the boss node. [1]
- Equipping one or more gives that ship a flat 1.15x post-cap damage modifier in shelling and night battle.
- SONAR do not stack with depth charges to give a higher modifier.[2]
- Type 0 Passive Sonar seems to have no special effect at all.
Seiran Special Damage Modifier
- Prototype Seiran grants the equipped ship a post-cap damage modifier of about 1.24x against all enemies at the boss during shelling and night battle.[3]
- This does not apply for Zuiun, Zuiun (634 Air Group), and likely any other non-Seiran seaplane.
- The bonus damage still applies even if there are zero planes left in the Seiran slot.
- This effect appears to stack with the ASW equipment special modifier.[4]
Tips
Transport Phase
- Both required disassembled Saiuns can be carried at once, making it possible to clear the TP gauge in a single run.
- An all-submarine fleet is not only inexpensive to run, but also offers the best chance of success at clearing the transport gauge due to only one or two nodes en route being capable of attacking submarines (Node A and some formations on D), thus allowing them to pass through mostly intact.
- If using an all-submarine fleet to clear the transport gauge, using Boss Support Expedition might be necessary to attain the A-Rank to deplete the gauge.
Boss HP Phase
- In order to S-rank I node for the hidden debuff, sending boss shelling support expeditions and land-based airstrikes to support a fleet of submarines is recommended.
- Equip torpedo cut-in setups to high luck submarines, while having lowest luck submarines carry scouting equipment to meet the LoS requirement.
- The boss Abyssal Twin Princesses has high HP and high armor (800, 221 pre-final on hard respectively) and is escorted by up to two Aircraft Carrier Princesses, so a heavy focus on night battle damage in the escort fleet is recommended.
- While the boss's stats are high, using a Surface Task Force composition will enable fleets to reach the boss node with over 50% fuel and ammo, resulting in high evasion and damage output. Carrier task forces can reach the boss with no ammo penalty, but will incur higher fuel penalties.
- For the final kill, bringing in multiple torpedo cut-in ships is recommended to deal with the high armor.
- Consider taking advantage of the special ASW equipment post-cap damage modifier by equipping a Torpedo-Torpedo-SONAR setup to a DD or CL with high Firepower and high Luck (e.g. Ayanami Kai Ni, Yukikaze Kai, Kasumi Kai Ni, Shigure Kai Ni).
- Sending both land bases to strike the boss node is recommended.
- As with previous instances, LBAS bombing deals bonus damage to Aircraft Carrier Princess. Bringing one to medium damage in a single hit is not uncommon.
- LBAS can also help to obtain air superiority at the boss node, especially with the carrier-light surface task forces.
- However, the AA of the boss fleet is relatively high, so plane slots being depleted is fairly common. Including 1 fighter in each base will help reduce losses by achieving Air Denial.
- Air Parity is achievable with more fighters, but damage output is heavily sacrificed as a result. For clearing it's not advised, but it can be an option for farming the boss.


Submarine Leveling
- Repeatedly sortieing to node C is a quick and efficient way to level submarines, because the node automatically ends with no damage taken and a S rank.
- For leveling submarines in preparation for the transport phase, Hard difficulty gives the most exp with no increase in risk compared to Medium or Easy.
- Sortieing two (or more) fast speed submarines will take the route CDEF, which will result in a net gain of ammo if the transport phase is already done. However, the exp rate is lower than the above method.
- On Hard, the Nu-class flagships that sometimes appear on D can deal minor damage to submarines. However, reaching taiha on maximum armor submarines is uncommon.
- The remaining two battles are air raid nodes, which are automatic S ranks.
Land-based Attack Aircraft leveling
- D node is a decent place for gaining ranks on land base planes.
- 2+ Fast SS(V), fast fleet, routes C→D
- Due to the Nu-class light carriers on D node, some fighters are needed to keep losses low.
- If you are uncomfortable with ranking up aircraft in E-3, methods are available to do so in E-2, World 6-4, and World 6-5 instead.
Enemy patterns

Lua error in package.lua at line 80: module 'Module:Collection/EnemyShips' not found. Lua error in package.lua at line 80: module 'Module:Collection/EnemyShips' not found. Lua error in package.lua at line 80: module 'Module:Collection/EnemyShips' not found. Lua error in package.lua at line 80: module 'Module:Collection/EnemyShips' not found. Lua error in package.lua at line 80: module 'Module:Collection/EnemyShips' not found. Lua error in package.lua at line 80: module 'Module:Collection/EnemyShips' not found. Lua error in package.lua at line 80: module 'Module:Collection/EnemyShips' not found. Lua error in package.lua at line 80: module 'Module:Collection/EnemyShips' not found. Lua error in package.lua at line 80: module 'Module:Collection/EnemyShips' not found. Lua error in package.lua at line 80: module 'Module:Collection/EnemyShips' not found. Lua error in package.lua at line 80: module 'Module:Collection/EnemyShips' not found. Lua error in package.lua at line 80: module 'Module:Collection/EnemyShips' not found. Lua error in package.lua at line 80: module 'Module:Collection/EnemyShips' not found. Lua error in package.lua at line 80: module 'Module:Collection/EnemyShips' not found. Lua error in package.lua at line 80: module 'Module:Collection/EnemyShips' not found. Lua error in package.lua at line 80: module 'Module:Collection/EnemyShips' not found. Lua error in package.lua at line 80: module 'Module:Collection/EnemyShips' not found. Lua error in package.lua at line 80: module 'Module:Collection/EnemyShips' not found. Lua error in package.lua at line 80: module 'Module:Collection/EnemyShips' not found.
Lua error in package.lua at line 80: module 'Module:Collection/EnemyShips' not found. Lua error in package.lua at line 80: module 'Module:Collection/EnemyShips' not found. Lua error in package.lua at line 80: module 'Module:Collection/EnemyShips' not found. Lua error in package.lua at line 80: module 'Module:Collection/EnemyShips' not found. Lua error in package.lua at line 80: module 'Module:Collection/EnemyShips' not found. Lua error in package.lua at line 80: module 'Module:Collection/EnemyShips' not found. Lua error in package.lua at line 80: module 'Module:Collection/EnemyShips' not found. Lua error in package.lua at line 80: module 'Module:Collection/EnemyShips' not found. Lua error in package.lua at line 80: module 'Module:Collection/EnemyShips' not found. Lua error in package.lua at line 80: module 'Module:Collection/EnemyShips' not found. Lua error in package.lua at line 80: module 'Module:Collection/EnemyShips' not found. Lua error in package.lua at line 80: module 'Module:Collection/EnemyShips' not found. Lua error in package.lua at line 80: module 'Module:Collection/EnemyShips' not found. Lua error in package.lua at line 80: module 'Module:Collection/EnemyShips' not found. Lua error in package.lua at line 80: module 'Module:Collection/EnemyShips' not found. Lua error in package.lua at line 80: module 'Module:Collection/EnemyShips' not found. Lua error in package.lua at line 80: module 'Module:Collection/EnemyShips' not found. Lua error in package.lua at line 80: module 'Module:Collection/EnemyShips' not found. Lua error in package.lua at line 80: module 'Module:Collection/EnemyShips' not found.
Lua error in package.lua at line 80: module 'Module:Collection/EnemyShips' not found. Lua error in package.lua at line 80: module 'Module:Collection/EnemyShips' not found. Lua error in package.lua at line 80: module 'Module:Collection/EnemyShips' not found. Lua error in package.lua at line 80: module 'Module:Collection/EnemyShips' not found. Lua error in package.lua at line 80: module 'Module:Collection/EnemyShips' not found. Lua error in package.lua at line 80: module 'Module:Collection/EnemyShips' not found. Lua error in package.lua at line 80: module 'Module:Collection/EnemyShips' not found. Lua error in package.lua at line 80: module 'Module:Collection/EnemyShips' not found. Lua error in package.lua at line 80: module 'Module:Collection/EnemyShips' not found. Lua error in package.lua at line 80: module 'Module:Collection/EnemyShips' not found. Lua error in package.lua at line 80: module 'Module:Collection/EnemyShips' not found. Lua error in package.lua at line 80: module 'Module:Collection/EnemyShips' not found. Lua error in package.lua at line 80: module 'Module:Collection/EnemyShips' not found. Lua error in package.lua at line 80: module 'Module:Collection/EnemyShips' not found. Lua error in package.lua at line 80: module 'Module:Collection/EnemyShips' not found. Lua error in package.lua at line 80: module 'Module:Collection/EnemyShips' not found. Lua error in package.lua at line 80: module 'Module:Collection/EnemyShips' not found. Lua error in package.lua at line 80: module 'Module:Collection/EnemyShips' not found. Lua error in package.lua at line 80: module 'Module:Collection/EnemyShips' not found.