mNo edit summary |
|||
| (14 intermediate revisions by 8 users not shown) | |||
| Line 44: | Line 44: | ||
|id = 46-4 |
|id = 46-4 |
||
| − | |0 -> |
+ | |0 -> 2 = |
* Transport Combined Fleet |
* Transport Combined Fleet |
||
* Surface Task Force |
* Surface Task Force |
||
| − | |0 -> |
+ | |0 -> 1 = |
| − | * |
+ | * Single Fleet |
* Carrier Task Force |
* Carrier Task Force |
||
| Line 60: | Line 60: | ||
** Amount of (F)BB(V)+CV(L/B) ≤ 3 |
** Amount of (F)BB(V)+CV(L/B) ≤ 3 |
||
|A/empty -> Q = |
|A/empty -> Q = |
||
| − | * Meet ''' |
+ | * Meet '''ALL''' of the following requirements: |
| − | ** Node Q |
+ | ** Node Q is unlocked |
| − | ** |
+ | ** Single Fleet |
| − | ** Fast+ Fleet |
||
|B -> C = * ??? |
|B -> C = * ??? |
||
| Line 69: | Line 68: | ||
|C -> E = * Carrier Task Force |
|C -> E = * Carrier Task Force |
||
| − | |C -> G = * |
+ | |C -> G = * Single Fleet |
|E -> G = * Fleet contains either {{ShipLink|Akashi Kai}} or {{ShipLink|Akitsushima Kai}} |
|E -> G = * Fleet contains either {{ShipLink|Akashi Kai}} or {{ShipLink|Akitsushima Kai}} |
||
| Line 80: | Line 79: | ||
** Amount of CVL+LHA ≤ 2 |
** Amount of CVL+LHA ≤ 2 |
||
|G -> J/empty = |
|G -> J/empty = |
||
| − | * Use a |
+ | * Use a Single Fleet. |
* Alternatively, meet '''ALL''' of the following requirements: |
* Alternatively, meet '''ALL''' of the following requirements: |
||
| − | ** |
+ | ** No (F)BB(V) |
| − | ** Amount of CVL+LHA ≤ |
+ | ** Amount of CVL+LHA ≤ 1 |
|G -> K = * Do not meet any of the requirements to go to either I, J or L. |
|G -> K = * Do not meet any of the requirements to go to either I, J or L. |
||
|G -> L = |
|G -> L = |
||
| Line 93: | Line 92: | ||
|N/resource -> P = * Pass the LoS check, but do not meet the requirements to go to R. |
|N/resource -> P = * Pass the LoS check, but do not meet the requirements to go to R. |
||
|N/resource -> R = |
|N/resource -> R = |
||
| − | * Meet '''ALL''' of the |
+ | * Meet '''ALL''' of the following requirements: |
| + | ** Phase 2 is unlocked |
||
** Pass the LoS check. |
** Pass the LoS check. |
||
** Fleet is '''NOT''' a Transport Combined Fleet. |
** Fleet is '''NOT''' a Transport Combined Fleet. |
||
| Line 111: | Line 111: | ||
|spacing=small|bordercolor=transparent|captionalign=center|hideaddbutton=true|widths=200}} |
|spacing=small|bordercolor=transparent|captionalign=center|hideaddbutton=true|widths=200}} |
||
===Map Bonuses=== |
===Map Bonuses=== |
||
| + | {|class="wikitable" style="text-align: center; vertical-align: middle;" |
||
| − | '''Entire Map''' |
||
| + | |- |
||
| − | * '''1.2x''' |
||
| + | !colspan="3"|Ship |
||
| − | **'''CA(V):''' {{ShipLink|Mogami}}, {{ShipLink|Mikuma}} |
||
| + | !colspan="2"|Damage Bonus |
||
| − | **'''DD:''' {{ShipLink|Fubuki}}, {{ShipLink|Shikinami}} |
||
| + | |- |
||
| − | * '''1.1x''' |
||
| + | !colspan="3"| Landings on Java Island |
||
| − | **'''LHA:''' {{ShipLink|Akitsu Maru}} |
||
| + | !colspan="2"| Mapwide |
||
| − | **'''CL:''' {{ShipLink|Yura}}, {{ShipLink|Natori}} |
||
| + | |- |
||
| − | **'''DD:''' {{ShipLink|Asakaze}}, {{ShipLink|Minazuki}}, {{ShipLink|Fumizuki}}, {{ShipLink|Shirayuki}}, {{ShipLink|Hatsuyuki}}, {{ShipLink|Murakumo}}, {{ShipLink|Akatsuki}}, {{ShipLink|Verniy}}, {{ShipLink|Satsuki}}, {{ShipLink|Harukaze}}, {{ShipLink|Hatakaze}}, {{ShipLink|Nagatsuki}} |
||
| + | !{{ShipBattleCardKai|Mogami/Kai}} |
||
| − | '''Boss Nodes Only ''after'' Phase 1 Clear''' |
||
| + | !{{ShipBattleCardKai|Mikuma/Kai}} |
||
| − | *All Above Ships receive a further '''1.2x''' multiplicative bonus. ('''1.15x''' for Yura and '''1.1x''' for Natori) |
||
| + | ! |
||
| − | * '''1.25x''' |
||
| + | |colspan="2" rowspan="2"|1.2x |
||
| − | **'''FBB:''' {{ShipLink|Kongou}}, {{ShipLink|Haruna}} |
||
| + | |- |
||
| − | **'''CV(L):''' {{ShipLink|Ryuujou}} |
||
| + | !{{ShipBattleCardKai|Fubuki/Kai Ni}} |
||
| − | **'''CA(V):''' {{ShipLink|Atago}}, {{ShipLink|Takao}} |
||
| + | !{{ShipBattleCardKai|Shikinami/Kai}} |
||
| ⚫ | |||
| + | ! |
||
| − | * '''1.15x''' |
||
| + | |- |
||
| − | **Multiplicative with other bonuses; Only applies against Batavia Princess herself. |
||
| + | ! colspan="5"| |
||
| − | **Applies to all ships. |
||
| + | |- |
||
| + | !{{ShipBattleCardKai|Akitsumaru/Kai}} |
||
| + | !{{ShipBattleCardKai|Yura/Kai Ni}} |
||
| + | !{{ShipBattleCardKai|Natori/Kai}} |
||
| + | |colspan="2" rowspan="5"|1.1x |
||
| + | |- |
||
| + | !{{ShipBattleCardKai|Nagatsuki/Kai}} |
||
| + | !{{ShipBattleCardKai|Minazuki/Kai}} |
||
| + | !{{ShipBattleCardKai|Fumizuki/Kai Ni}} |
||
| + | |- |
||
| + | !{{ShipBattleCardKai|Satsuki/Kai Ni}} |
||
| + | !{{ShipBattleCardKai|Shirayuki/Kai}} |
||
| + | !{{ShipBattleCardKai|Hatsuyuki/Kai}} |
||
| + | |- |
||
| + | !{{ShipBattleCardKai|Murakumo/Kai Ni}} |
||
| + | !{{ShipBattleCardKai|Akatsuki/Kai Ni}} |
||
| + | !{{ShipBattleCardKai|Verniy}} |
||
| + | |- |
||
| + | !{{ShipBattleCardKai|Asakaze/Kai}} |
||
| + | !{{ShipBattleCardKai|Harukaze/Kai}} |
||
| + | !{{ShipBattleCardKai|Hatakaze/Kai}} |
||
| + | |- |
||
| + | !colspan="5"|After clearing Phase 1 (Multiplicative with above) |
||
| + | |- |
||
| + | !colspan="3"| {{ShipLink|Natori/Kai|text=Natori}} |
||
| + | |colspan="2"| 1.1x |
||
| + | |- |
||
| + | !colspan="3"| {{ShipLink|Yura/Kai Ni|text=Yura}} |
||
| + | |colspan="2"| 1.15x |
||
| + | |- |
||
| + | !colspan="3"| Everyone else above |
||
| + | |colspan="2"| 1.2x |
||
| + | |- |
||
| + | !colspan="5"| |
||
| + | |- |
||
| + | !{{ShipBattleCardKai|Kongou/Kai Ni C}} |
||
| + | !{{ShipBattleCardKai|Haruna/Kai Ni}} |
||
| + | !{{ShipBattleCardKai|Ryuujou/Kai Ni}} |
||
| + | |colspan="2" rowspan="2"|1.25x |
||
| + | |- |
||
| + | !{{ShipBattleCardKai|Atago/Kai}} |
||
| + | !{{ShipBattleCardKai|Takao/Kai}} |
||
| + | ! |
||
| + | |- |
||
| + | !colspan="5"|{{Event/Route|S|Red}} Last Dance Debuff |
||
| + | |- |
||
| + | !colspan="3"|Against Batavia Princess only |
||
| + | |colspan="2"|1.15x |
||
| + | |} |
||
| ⚫ | |||
| + | *{{ShipLink|Verniy|text=Hibiki}} has a historical bonus in E5 |
||
| + | *{{ShipLink|Akatsuki/Kai Ni|text=Akatsuki}} has a larger bonus in E6. |
||
===Phase 1: Transport Operation=== |
===Phase 1: Transport Operation=== |
||
*As this is a Transport Operation, you are recommended to bring as many as possible {{Drum}} {{EquipmentLink|Drum Canister (Transport Use)|text=Drum Canisters}} and/or {{LandingCraft}} {{EquipmentLink|Daihatsu Landing Craft}}. |
*As this is a Transport Operation, you are recommended to bring as many as possible {{Drum}} {{EquipmentLink|Drum Canister (Transport Use)|text=Drum Canisters}} and/or {{LandingCraft}} {{EquipmentLink|Daihatsu Landing Craft}}. |
||
| + | *Surface Task Force<sup>[https://bbs.nga.cn/read.php?tid=19427682&rand=726]</sup> |
||
| + | **Route: {{Event/Route|F|Red}}{{Event/Route|G|Red}}{{Event/Route|I|Blue}}{{Event/Route|J|Blue}}{{Event/Route|M|Red}}{{Event/Route|N|Green}}{{Event/Route|P|Red}} |
||
| + | **Formation: 1FBB 2CVL 3CA(V) + 1 Akashi 1CL 4DD |
||
| + | **This Formation no longer routes to P after Phase 1, and will Route to R instead |
||
| + | **LBAS: 1 Base of ASW bombers to Node {{Event/Route|F|Red}} , another base of all bombers to Boss Node {{Event/Route|P|Red}} |
||
*Transport Combined Fleet |
*Transport Combined Fleet |
||
**Route: {{Event/Route|K|Red|L|Red|M|Red|N|Green|P|Red}} |
**Route: {{Event/Route|K|Red|L|Red|M|Red|N|Green|P|Red}} |
||
| Line 137: | Line 194: | ||
** Or 2 CAV 4 DD + 1 CL 3 DD 2 CA(V) |
** Or 2 CAV 4 DD + 1 CL 3 DD 2 CA(V) |
||
** Or 1 CAV 5 DD + 1 CL 4 DD 1 CAV |
** Or 1 CAV 5 DD + 1 CL 4 DD 1 CAV |
||
| − | **Your escort fleet should contain combat load |
+ | **Your escort fleet should contain combat load-outs for dealing damage to enemies on the preboss and boss nodes. |
**Bringing at least 1 OASW unit to deal with the submarines at Node {{Event/Route|K|Red}} is advised. |
**Bringing at least 1 OASW unit to deal with the submarines at Node {{Event/Route|K|Red}} is advised. |
||
**{{EquipmentLink|Fleet Command Facility}} can be used to retreat heavily damaged ships before the boss if necessary. |
**{{EquipmentLink|Fleet Command Facility}} can be used to retreat heavily damaged ships before the boss if necessary. |
||
| − | *LBAS: 2 Bases of all bombers (Range of 5+) to Boss Node {{Event/Route|P|Red}}. If necessary, send some bombers to assist on route. |
+ | **LBAS: 2 Bases of all bombers (Range of 5+) to Boss Node {{Event/Route|P|Red}}. If necessary, send some bombers to assist on route. |
===Phase 2: Defeating the {{ShipLink|Batavia Princess|text=Batavia Princess!}}=== |
===Phase 2: Defeating the {{ShipLink|Batavia Princess|text=Batavia Princess!}}=== |
||
| Line 161: | Line 218: | ||
{{Ambox/Disclaimer| This is the current information available to unlock the debuff for each respective difficulty, and is subject to revisions as more data is gathered. All information about the Debuffs reflect on User Submitted Reports.}} |
{{Ambox/Disclaimer| This is the current information available to unlock the debuff for each respective difficulty, and is subject to revisions as more data is gathered. All information about the Debuffs reflect on User Submitted Reports.}} |
||
*In order to Debuff the Batavia Princess, you must meet the following requirements: |
*In order to Debuff the Batavia Princess, you must meet the following requirements: |
||
| + | {|class="wikitable" style="width:100%; text-align: center; vertical-align: middle;" |
||
| + | |- |
||
| + | ! style="width: 100%;" colspan="8" | Unlock Requirements |
||
| + | |- |
||
| + | ! style="width: 25%;" | Difficulty |
||
| + | ! {{Event/Route|P|Red}} |
||
| + | ! {{Event/Route|E|Red}} |
||
| + | ! LBAS Defense |
||
| + | |- |
||
| + | ! Hard |
||
| + | | A+ x2 |
||
| + | | S |
||
| + | | AS |
||
| + | |- |
||
| + | ! Medium |
||
| + | | A+ |
||
| + | | A+ |
||
| + | | AS |
||
| + | |- |
||
| + | ! Easy |
||
| + | | A+ |
||
| + | ! - |
||
| + | ! - |
||
| + | |- |
||
| + | ! Casual |
||
| + | | A+ |
||
| + | ! - |
||
| + | ! - |
||
| + | |} |
||
**You must be on Last Dance against Batavia Princess in order for the Debuff to take effect. All listed requirements below must be done '''DURING''' Last Dance, not before. |
**You must be on Last Dance against Batavia Princess in order for the Debuff to take effect. All listed requirements below must be done '''DURING''' Last Dance, not before. |
||
**'''Hard Mode''' |
**'''Hard Mode''' |
||
| Line 178: | Line 264: | ||
**Formation: 2 CVL 4 (CAV + CA + CL) + CL 3 DD 2 (CAV + CA + CLT) |
**Formation: 2 CVL 4 (CAV + CA + CL) + CL 3 DD 2 (CAV + CA + CLT) |
||
*LBAS: 2 Bases to Node {{Event/Route|E|Red}} (Range: 4), Or Node {{Event/Route|C|Red}} (Range: 3). You may also set both bases to Air Defense to obtain AS during Air Defense. If you decide to do this, fill your land bases with the best fighters and interceptors. |
*LBAS: 2 Bases to Node {{Event/Route|E|Red}} (Range: 4), Or Node {{Event/Route|C|Red}} (Range: 3). You may also set both bases to Air Defense to obtain AS during Air Defense. If you decide to do this, fill your land bases with the best fighters and interceptors. |
||
| + | |||
| + | ===[[Friend Fleet]]s=== |
||
| + | [[File:Friend Fleet Usage.png|thumb]] |
||
| + | |||
| + | '''NOTE:''' friend fleets are disabled by default! Please toggle it on before proceeding! |
||
| + | |||
| + | Friend fleet must be manually toggled from the Home port (see the image) in order for it to appear at the boss node. You can request for a stronger friend fleet at the price of 6 flamethrowers. |
||
| + | {{Fleets|friend=Fall 2019 Event|node=E-4 S}} |
||
===LBAS Flight Range=== |
===LBAS Flight Range=== |
||
Latest revision as of 17:20, 10 January 2020
InformationEdit
|
Battle of Batavia
バタビア沖海戦 | |
 | |
 | |
| Information | |
| Boss gauge (HQ 120) |
Easy: 300TP + 4140 HP Medium: 350TP + 4140 HP Hard: 400TP + 4740 HP |
| Rewards | |
All:
Casual:
Easy:
Medium:
 ★+21 ★+21Hard:
★+41 ★+41 ★+41 | |
| E-4 Branching Rules | ||
|---|---|---|
| Nodes | Rules | |
| Start | 1 |
|
2 |
| |
2 |
F |
|
K |
| |
A |
B |
|
C |
| |
Q |
| |
B |
C |
|
D |
| |
C |
E |
|
G |
| |
E |
G |
|
H |
| |
G |
I |
|
J |
| |
K |
| |
L |
| |
N |
O |
|
P |
| |
R |
| |


Map Guide[]
- This is both a Single Fleet and Combined Fleet map.
- This map has 2 starting points. Single Fleet or Carrier Task Force starts at point 1, while Transport Combined Fleet and Surface Task Force starts at point 2.
- The map has 1 TP bar and 1 HP bar that must be depleted in order to complete the map.
- Phase 1: Deplete the TP bar against Heavy Cruiser Ne-Class Kai and her escorts by securing multiple A or S ranks at Node P.
- Phase 2: Deplete the HP bar by damaging (then sinking) the Batavia Princess at Node S.
- 2 LBAS is available for you to sortie in E-4.
- A Debuff is available in Phase 2 on Last Dance.


Map Progression[]
")
")
Map Bonuses[]
| Ship | Damage Bonus | |||
|---|---|---|---|---|
| Landings on Java Island | Mapwide | |||
| 1.2x | ||||
| File:Akitsumaru Kai Banner.png | 1.1x | |||
| After clearing Phase 1 (Multiplicative with above) | ||||
| Natori | 1.1x | |||
| Yura | 1.15x | |||
| Everyone else above | 1.2x | |||
| 1.25x | ||||
| S Last Dance Debuff | ||||
| Against Batavia Princess only | 1.15x | |||


- Last Dance Debuff applies to all ships.
- Hibiki has a historical bonus in E5
- Akatsuki has a larger bonus in E6.


Phase 1: Transport Operation[]
- As this is a Transport Operation, you are recommended to bring as many as possible
 Drum Canisters and/or Daihatsu Landing Craft.
 - Surface Task Force[1]
- Route: FGIJMNP
- Formation: 1FBB 2CVL 3CA(V) + 1 Akashi 1CL 4DD
- This Formation no longer routes to P after Phase 1, and will Route to R instead
- LBAS: 1 Base of ASW bombers to Node F , another base of all bombers to Boss Node P
- Transport Combined Fleet
- Route: K L M N P
- Formation: 1 CAV 1 CL 4 DD + 1 CL 3 DD 1 CA 1 CAV
- Or 2 CAV 4 DD + 1 CL 3 DD 2 CA(V)
- Or 1 CAV 5 DD + 1 CL 4 DD 1 CAV
- Your escort fleet should contain combat load-outs for dealing damage to enemies on the preboss and boss nodes.
- Bringing at least 1 OASW unit to deal with the submarines at Node K is advised.
- Fleet Command Facility can be used to retreat heavily damaged ships before the boss if necessary.
- LBAS: 2 Bases of all bombers (Range of 5+) to Boss Node P. If necessary, send some bombers to assist on route.

Phase 2: Defeating the Batavia Princess![]
- CV(B) cannot sortie to this map, so you'll have to use CVL instead to provide aerial cover. Take any available historical units with you!
- Surface Task Force: Standard Composition
- Route: F G J M N R S
- 1 CVL 1 CAV 2 CA 2 CL + 1 CL 3 DD 1CAV 1 CAV/CLT
- Or 1 CVL 4 CA 1 CL + 1 CL 3 DD 1 CAV 1 CAV/CLT
- Or 1CVL 1CAV 3CA 1CL + 1CL 2DD 2CLT 1CAV
- Or 2 CAV 1 CA 1 CL 2 DD + 1 CL 3 DD 1 CAV 1 CAV/CLT
- TCI and AACI are recommended. For chipping, consider bringing 1-2 OASW for dealing with Node F.
- Surface Task Force: Akitsukashi Composition
- Route: F G I J M N R S
- Akashi Kai OR Akitsushima Kai 1 (F)BB(V) 2 CVL 2 CA(V) + 1 CL 2DD 3 (CA(V) + CLT)
- This composition takes advantage of Emergency Repair node routing to allow for a heavier composition to take the shortest possible route.
- Advice from the Standard Composition still applies here, this is just a heavier variant of it.
- LBAS: Assist on route if needed, otherwise send whatever waves you can to the Boss at Node S (Range 7). Make sure to obtain the necessary air state with LBAS for your actual fleet to achieve AS or better.
Phase 3: Debuff Batavia Princess! (Last Dance)[]
Template:Ambox/Disclaimer
- In order to Debuff the Batavia Princess, you must meet the following requirements:
| Unlock Requirements | |||||||
|---|---|---|---|---|---|---|---|
| Difficulty | P | E | LBAS Defense | ||||
| Hard | A+ x2 | S | AS | ||||
| Medium | A+ | A+ | AS | ||||
| Easy | A+ | - | - | ||||
| Casual | A+ | - | - | ||||
- You must be on Last Dance against Batavia Princess in order for the Debuff to take effect. All listed requirements below must be done DURING Last Dance, not before.
- Hard Mode
- S-Rank Node E Once.
- A+ rank Node P Twice.
- Obtain AS during Air Defense.
- Normal Mode
- A+ Rank Node E Once, or A+ Rank Node P Once.
- Current Information about which node to A+ Rank on Normal mode is conflicting, which requires more testing to confirm which nodes you need to complete.
- Obtain AS during Air Defense.
- Easy Mode
- A+ Rank Node P Once.
- Casual Mode
- A+ Rank Node P Once.
- Carrier Task Force
- Route: A C E H
- Formation: 2 CVL 4 (CAV + CA + CL) + CL 3 DD 2 (CAV + CA + CLT)
- LBAS: 2 Bases to Node E (Range: 4), Or Node C (Range: 3). You may also set both bases to Air Defense to obtain AS during Air Defense. If you decide to do this, fill your land bases with the best fighters and interceptors.
Friend Fleets[]
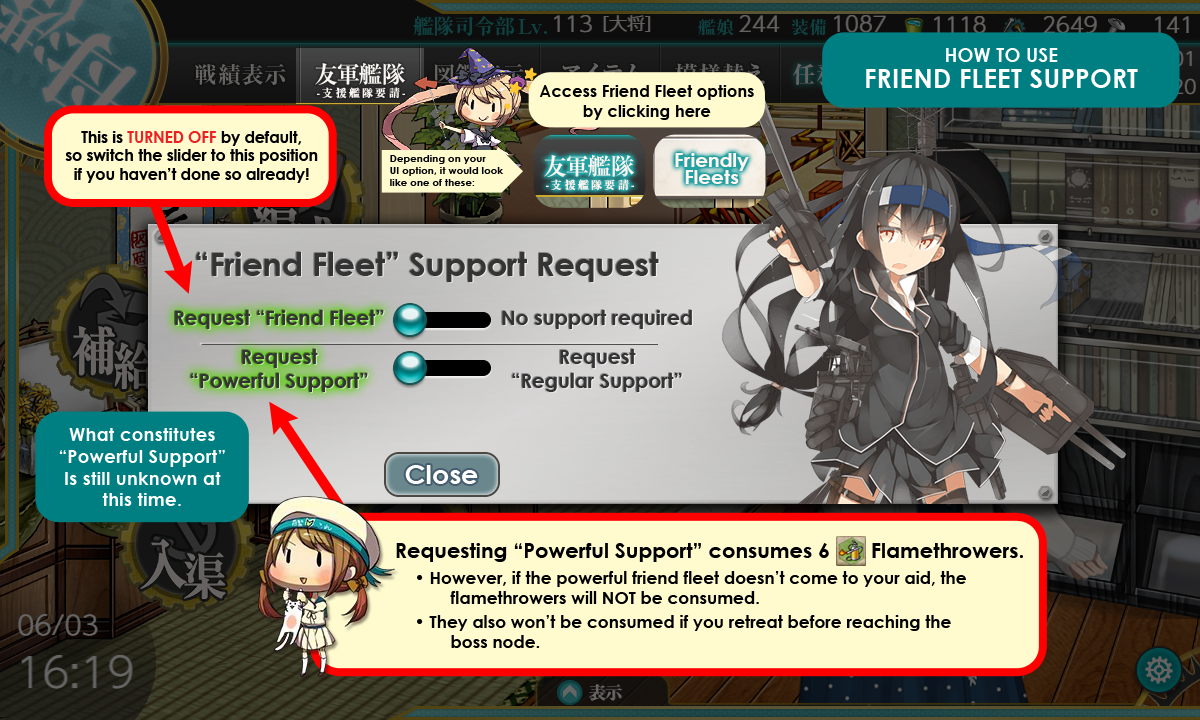

NOTE: friend fleets are disabled by default! Please toggle it on before proceeding!
Friend fleet must be manually toggled from the Home port (see the image) in order for it to appear at the boss node. You can request for a stronger friend fleet at the price of 6 flamethrowers.
E-4 S, Regular, Powerful
| Ship | Lv. | Equipment | |||||
|---|---|---|---|---|---|---|---|
| 91 |    |
81 | 96 | 0 | 92 | 93 | |
| 81 |   |
43 | 69 | 86 | 59 | 59 | |
| 82 |    |
30 | 49 | 79 | 49 | 49 | |
| 81 | |
30 | 49 | 79 | 49 | 49 |
E-4 S, Regular, Powerful
| Ship | Lv. | Equipment | |||||
|---|---|---|---|---|---|---|---|
| 64 |   |
54 | 76 | 60 | 72 | 73 | |
| 63 |  |
45 | 72 | 64 | 70 | 65 |
E-4 S, Powerful
| Ship | Lv. | Equipment | |||||
|---|---|---|---|---|---|---|---|
| 64 | |
54 | 76 | 60 | 72 | 73 | |
| 63 | |
45 | 72 | 64 | 70 | 65 | |
| 83 | |
31 | 59 | 88 | 78 | 50 | |
| 82 | |
30 | 49 | 79 | 49 | 49 | |
| 81 | |
30 | 49 | 79 | 49 | 49 |
E-4 S, Regular, Powerful
| Ship | Lv. | Equipment | |||||
|---|---|---|---|---|---|---|---|
| 64 | |
54 | 76 | 60 | 72 | 73 | |
| 63 | |
45 | 72 | 64 | 70 | 65 | |
| 79 | |
30 | 49 | 79 | 49 | 49 |


E-4 S, Regular, Powerful
| Ship | Lv. | Equipment | |||||
|---|---|---|---|---|---|---|---|
| 63 | |
45 | 72 | 64 | 70 | 65 | |
| 64 | |
54 | 76 | 60 | 72 | 73 |
E-4 S, Regular, Powerful
| Ship | Lv. | Equipment | |||||
|---|---|---|---|---|---|---|---|
| 63 | |
45 | 72 | 64 | 70 | 65 | |
| 64 | |
54 | 76 | 60 | 72 | 73 | |
| 76 |   |
50 | 73 | 69 | 64 | 71 | |
| 75 | |
50 | 76 | 69 | 59 | 71 |
E-4 S, Powerful
| Ship | Lv. | Equipment | |||||
|---|---|---|---|---|---|---|---|
| 63 | |
45 | 72 | 64 | 70 | 65 | |
| 64 | |
54 | 76 | 60 | 72 | 73 | |
| 76 | |
50 | 73 | 69 | 64 | 71 | |
| 75 | |
50 | 76 | 69 | 59 | 71 | |
| 79 | |
30 | 49 | 79 | 49 | 49 |
E-4 S, Regular, Powerful
| Ship | Lv. | Equipment | |||||
|---|---|---|---|---|---|---|---|
| 79 |  |
30 | 49 | 79 | 49 | 49 | |
| 82 |   |
32 | 74 | 88 | 52 | 54 | |
| 78 |  |
30 | 49 | 79 | 54 | 49 | |
| 78 | |
30 | 49 | 79 | 49 | 49 |
E-4 S, Powerful
| Ship | Lv. | Equipment | |||||
|---|---|---|---|---|---|---|---|
| 81 |   |
45 | 56 | 80 | 88 | 67 | |
| 80 |   |
24 | 39 | 69 | 39 | 39 | |
| 80 | |
24 | 39 | 69 | 39 | 39 | |
| 77 | |
31 | 62 | 87 | 59 | 50 | |
| 77 | |
30 | 49 | 78 | 49 | 49 |
LBAS Flight Range[]

If in doubt, use tooltips to check sample sizes.
Enemy patterns[]

Lua error in package.lua at line 80: module 'Module:Collection/EnemyShips' not found. Lua error in package.lua at line 80: module 'Module:Collection/EnemyShips' not found. Lua error in package.lua at line 80: module 'Module:Collection/EnemyShips' not found. Lua error in package.lua at line 80: module 'Module:Collection/EnemyShips' not found. Lua error in package.lua at line 80: module 'Module:Collection/EnemyShips' not found. Lua error in package.lua at line 80: module 'Module:Collection/EnemyShips' not found. Lua error in package.lua at line 80: module 'Module:Collection/EnemyShips' not found. Lua error in package.lua at line 80: module 'Module:Collection/EnemyShips' not found. Lua error in package.lua at line 80: module 'Module:Collection/EnemyShips' not found. Lua error in package.lua at line 80: module 'Module:Collection/EnemyShips' not found. Lua error in package.lua at line 80: module 'Module:Collection/EnemyShips' not found. Lua error in package.lua at line 80: module 'Module:Collection/EnemyShips' not found. Lua error in package.lua at line 80: module 'Module:Collection/EnemyShips' not found. Lua error in package.lua at line 80: module 'Module:Collection/EnemyShips' not found. Lua error in package.lua at line 80: module 'Module:Collection/EnemyShips' not found. Lua error in package.lua at line 80: module 'Module:Collection/EnemyShips' not found. Lua error in package.lua at line 80: module 'Module:Collection/EnemyShips' not found. Lua error in package.lua at line 80: module 'Module:Collection/EnemyShips' not found. Lua error in package.lua at line 80: module 'Module:Collection/EnemyShips' not found. Lua error in package.lua at line 80: module 'Module:Collection/EnemyShips' not found.
Lua error in package.lua at line 80: module 'Module:Collection/EnemyShips' not found. Lua error in package.lua at line 80: module 'Module:Collection/EnemyShips' not found. Lua error in package.lua at line 80: module 'Module:Collection/EnemyShips' not found. Lua error in package.lua at line 80: module 'Module:Collection/EnemyShips' not found. Lua error in package.lua at line 80: module 'Module:Collection/EnemyShips' not found. Lua error in package.lua at line 80: module 'Module:Collection/EnemyShips' not found. Lua error in package.lua at line 80: module 'Module:Collection/EnemyShips' not found. Lua error in package.lua at line 80: module 'Module:Collection/EnemyShips' not found. Lua error in package.lua at line 80: module 'Module:Collection/EnemyShips' not found. Lua error in package.lua at line 80: module 'Module:Collection/EnemyShips' not found. Lua error in package.lua at line 80: module 'Module:Collection/EnemyShips' not found. Lua error in package.lua at line 80: module 'Module:Collection/EnemyShips' not found. Lua error in package.lua at line 80: module 'Module:Collection/EnemyShips' not found. Lua error in package.lua at line 80: module 'Module:Collection/EnemyShips' not found. Lua error in package.lua at line 80: module 'Module:Collection/EnemyShips' not found. Lua error in package.lua at line 80: module 'Module:Collection/EnemyShips' not found. Lua error in package.lua at line 80: module 'Module:Collection/EnemyShips' not found. Lua error in package.lua at line 80: module 'Module:Collection/EnemyShips' not found. Lua error in package.lua at line 80: module 'Module:Collection/EnemyShips' not found. Lua error in package.lua at line 80: module 'Module:Collection/EnemyShips' not found.
Lua error in package.lua at line 80: module 'Module:Collection/EnemyShips' not found. Lua error in package.lua at line 80: module 'Module:Collection/EnemyShips' not found. Lua error in package.lua at line 80: module 'Module:Collection/EnemyShips' not found. Lua error in package.lua at line 80: module 'Module:Collection/EnemyShips' not found. Lua error in package.lua at line 80: module 'Module:Collection/EnemyShips' not found. Lua error in package.lua at line 80: module 'Module:Collection/EnemyShips' not found. Lua error in package.lua at line 80: module 'Module:Collection/EnemyShips' not found. Lua error in package.lua at line 80: module 'Module:Collection/EnemyShips' not found. Lua error in package.lua at line 80: module 'Module:Collection/EnemyShips' not found. Lua error in package.lua at line 80: module 'Module:Collection/EnemyShips' not found. Lua error in package.lua at line 80: module 'Module:Collection/EnemyShips' not found. Lua error in package.lua at line 80: module 'Module:Collection/EnemyShips' not found. Lua error in package.lua at line 80: module 'Module:Collection/EnemyShips' not found. Lua error in package.lua at line 80: module 'Module:Collection/EnemyShips' not found. Lua error in package.lua at line 80: module 'Module:Collection/EnemyShips' not found. Lua error in package.lua at line 80: module 'Module:Collection/EnemyShips' not found. Lua error in package.lua at line 80: module 'Module:Collection/EnemyShips' not found. Lua error in package.lua at line 80: module 'Module:Collection/EnemyShips' not found. Lua error in package.lua at line 80: module 'Module:Collection/EnemyShips' not found. Lua error in package.lua at line 80: module 'Module:Collection/EnemyShips' not found.
Lua error in package.lua at line 80: module 'Module:Collection/EnemyShips' not found. Lua error in package.lua at line 80: module 'Module:Collection/EnemyShips' not found. Lua error in package.lua at line 80: module 'Module:Collection/EnemyShips' not found. Lua error in package.lua at line 80: module 'Module:Collection/EnemyShips' not found. Lua error in package.lua at line 80: module 'Module:Collection/EnemyShips' not found. Lua error in package.lua at line 80: module 'Module:Collection/EnemyShips' not found. Lua error in package.lua at line 80: module 'Module:Collection/EnemyShips' not found. Lua error in package.lua at line 80: module 'Module:Collection/EnemyShips' not found. Lua error in package.lua at line 80: module 'Module:Collection/EnemyShips' not found. Lua error in package.lua at line 80: module 'Module:Collection/EnemyShips' not found. Lua error in package.lua at line 80: module 'Module:Collection/EnemyShips' not found. Lua error in package.lua at line 80: module 'Module:Collection/EnemyShips' not found. Lua error in package.lua at line 80: module 'Module:Collection/EnemyShips' not found. Lua error in package.lua at line 80: module 'Module:Collection/EnemyShips' not found. Lua error in package.lua at line 80: module 'Module:Collection/EnemyShips' not found. Lua error in package.lua at line 80: module 'Module:Collection/EnemyShips' not found. Lua error in package.lua at line 80: module 'Module:Collection/EnemyShips' not found. Lua error in package.lua at line 80: module 'Module:Collection/EnemyShips' not found. Lua error in package.lua at line 80: module 'Module:Collection/EnemyShips' not found. Lua error in package.lua at line 80: module 'Module:Collection/EnemyShips' not found.