(Confirmed 3 is needed for C9 Medium) |
がか (Message Wall | contribs) mNo edit summary |
||
| (21 intermediate revisions by 10 users not shown) | |||
| Line 123: | Line 123: | ||
* Or meet all of the following requirements: |
* Or meet all of the following requirements: |
||
** No CV(L/B) |
** No CV(L/B) |
||
| + | ** Amount of DD ≧ 2 |
||
** ??? |
** ??? |
||
** If '''Slow Fleet''': |
** If '''Slow Fleet''': |
||
| − | *** Amount of DD ≧ |
+ | *** Amount of DD ≧ 4 (Hard) |
| + | *** Amount of BB(V) ≦ 2 |
||
|Y/battle/empty -> Z7 = |
|Y/battle/empty -> Z7 = |
||
| Line 145: | Line 147: | ||
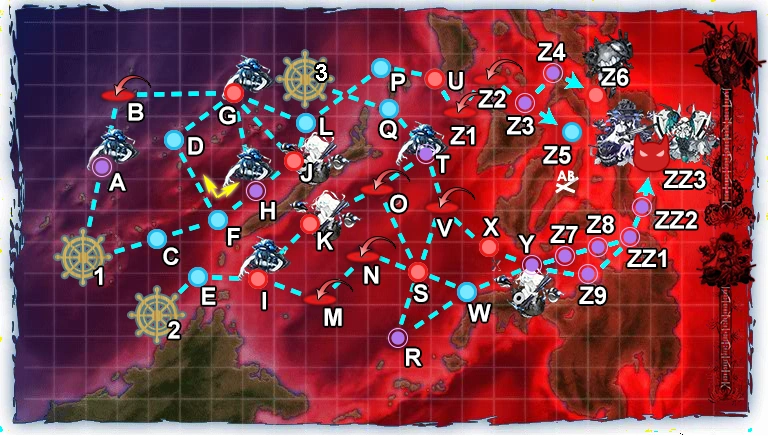
*'''Ship-locks and Starting Points''': This map allows all shiptags from previous maps, but your starting points are determined by the tags on your ships. Keep in mind that your 3rd fleet will always be recognized as a Strike Force when you sortie, whether it contains 7 ships or just 1. |
*'''Ship-locks and Starting Points''': This map allows all shiptags from previous maps, but your starting points are determined by the tags on your ships. Keep in mind that your 3rd fleet will always be recognized as a Strike Force when you sortie, whether it contains 7 ships or just 1. |
||
| − | **''Starting Point 1'': Combined Fleet. |
+ | **''Starting Point 1'': Combined Fleet. Ship tags are irrelevant. |
| − | **''Starting Point 2'': |
+ | **''Starting Point 2'': Any fleet (normal or striking force) formed in the '''third fleet''', unless they are all green tagged. |
| − | **''Starting Point 3'': |
+ | **''Starting Point 3'': Any fleet that consist of '''only green tagged''' ships (from E-1, E-2). Fleets sortied from the 1st, 2nd or 4th fleets will also start here. |
**Untagged ships will be given a yellow (Nishimura) tag if they start at point 2. |
**Untagged ships will be given a yellow (Nishimura) tag if they start at point 2. |
||
*'''Historical Ships''': Be advised that this map will require a certain number of [[Fall_2017_Event/E-4#Historical_Fleets:_Battle_of_Surigao_Strait_and_Shibuyan_Sea|historical ships.]] |
*'''Historical Ships''': Be advised that this map will require a certain number of [[Fall_2017_Event/E-4#Historical_Fleets:_Battle_of_Surigao_Strait_and_Shibuyan_Sea|historical ships.]] |
||
| − | **Members of the Nishimura Fleet will gain a post-cap damage bonus (approximately 1. |
+ | **Members of the Nishimura Fleet will gain a post-cap damage bonus (approximately 1.44x) at the boss node. Other post-cap modifiers also exist (see [[Fall_2017_Event/E-4#Historical Fleets: Battle of Surigao Strait and Sibuyan Sea|below]]<span style="font-weight:normal;">).</span> |
**On Hard, you are required to have at least 6 of the Nishimura Fleet members to reach node Z9. Failure to do so will effectively prevent you from clearing this map on Hard. |
**On Hard, you are required to have at least 6 of the Nishimura Fleet members to reach node Z9. Failure to do so will effectively prevent you from clearing this map on Hard. |
||
| Line 191: | Line 193: | ||
====The Southern Force (Nishimura Fleet)==== |
====The Southern Force (Nishimura Fleet)==== |
||
| − | The vanguard of the "Southern Force" during the Battle of Leyte Gulf led by Shōji Nishimura |
+ | The vanguard of the "Southern Force" during the Battle of Leyte Gulf led by Shōji Nishimura. |
| + | |||
| + | Members of the Nishimura Fleet will gain <span style="font-weight:normal;">post-cap modifers of 1.15x on Z9, </span><span style="font-weight:normal;">1.25x on node ZZ2, and </span>1.44x on node ZZ3 (boss). |
||
* BB(V): {{ShipLink|Yamashiro Kai Ni|text=Yamashiro}}, {{ShipLink|Fusou Kai Ni|text=Fusou}} |
* BB(V): {{ShipLink|Yamashiro Kai Ni|text=Yamashiro}}, {{ShipLink|Fusou Kai Ni|text=Fusou}} |
||
* CA(V): {{ShipLink|Mogami|Mogami Kai|text=Mogami}} |
* CA(V): {{ShipLink|Mogami|Mogami Kai|text=Mogami}} |
||
| Line 198: | Line 202: | ||
====The Second Striking Force (Shima Fleet)==== |
====The Second Striking Force (Shima Fleet)==== |
||
The rear of the "Southern Force" during the Battle of Leyte Gulf led by Kiyohide Shima. |
The rear of the "Southern Force" during the Battle of Leyte Gulf led by Kiyohide Shima. |
||
| + | |||
| + | Members of the Shima Fleet will gain post-cap modifiers of <span style="font-weight:normal;">~1.15x on node Y </span>and <span style="font-weight:normal;">~1.25x on node Z8</span>. |
||
* CA: {{ShipLink|Ashigara Kai Ni|text=Ashigara}}, {{ShipLink|Nachi Kai Ni|text=Nachi}} |
* CA: {{ShipLink|Ashigara Kai Ni|text=Ashigara}}, {{ShipLink|Nachi Kai Ni|text=Nachi}} |
||
* CL: {{ShipLink|Abukuma Kai Ni|text=Abukuma}} |
* CL: {{ShipLink|Abukuma Kai Ni|text=Abukuma}} |
||
| Line 223: | Line 229: | ||
*''Starting Point 3'' |
*''Starting Point 3'' |
||
*This can be done by using your First Fleet regardless of tags or a Striking Force composed of ships with green tags only; otherwise, you will start at Starting Point 2. |
*This can be done by using your First Fleet regardless of tags or a Striking Force composed of ships with green tags only; otherwise, you will start at Starting Point 2. |
||
| − | **Using any CV(L) will cause you to off-routed from V --> S |
+ | **Using any CV(L), more than 2 Battleships, and having less than 2 Destroyers will cause you to off-routed from V --> S |
| − | |||
{{Clear}} |
{{Clear}} |
||
| + | |||
===Obtain Air Superiority (AS) in node V and node N (Not required on EASY mode)=== |
===Obtain Air Superiority (AS) in node V and node N (Not required on EASY mode)=== |
||
*This can be easily done by sending your 2 LBAS available for Sortie full of Fighters to each respective nodes and/or bringing ships with Seaplane Fighters. |
*This can be easily done by sending your 2 LBAS available for Sortie full of Fighters to each respective nodes and/or bringing ships with Seaplane Fighters. |
||
| Line 281: | Line 287: | ||
*The path to this node is very difficult and Z6 itself is very hard to S-rank on harder difficulties. Use of Support Expedition and LBAS focused to this node is highly recommended. Keep in mind that Z6 is not a boss node, using a Boss Support will not work. |
*The path to this node is very difficult and Z6 itself is very hard to S-rank on harder difficulties. Use of Support Expedition and LBAS focused to this node is highly recommended. Keep in mind that Z6 is not a boss node, using a Boss Support will not work. |
||
**While it is possible to divide your LBAS in order to make node U more survivable, it will make node Z6 harder to S-rank. |
**While it is possible to divide your LBAS in order to make node U more survivable, it will make node Z6 harder to S-rank. |
||
| + | **LBAS on the Sub node can help a lot if your combat fleet is strong enough to clear Z6. |
||
*Possible Composition: |
*Possible Composition: |
||
**''Starting Point 1'' |
**''Starting Point 1'' |
||
| Line 290: | Line 297: | ||
***If you have access to {{ShipLink|Yamato Kai|text=Yamato}} or {{ShipLink|Musashi Kai|text=Musashi}}, you can use engine equipment to increase their speed to Fast and use them here without any routing penalties. |
***If you have access to {{ShipLink|Yamato Kai|text=Yamato}} or {{ShipLink|Musashi Kai|text=Musashi}}, you can use engine equipment to increase their speed to Fast and use them here without any routing penalties. |
||
***In case you are having trouble with your CVLs survival rate, using a single CV(B) will allow to bring an additional FBB for the fleet. Roma Kai and Italia with a Seaplane Fighter each are a good choice here in addition to 2 fast Kurita fleet BBs. However it will become harder to obtain AS at nodes Z1 and Z2 on the way to Z6. |
***In case you are having trouble with your CVLs survival rate, using a single CV(B) will allow to bring an additional FBB for the fleet. Roma Kai and Italia with a Seaplane Fighter each are a good choice here in addition to 2 fast Kurita fleet BBs. However it will become harder to obtain AS at nodes Z1 and Z2 on the way to Z6. |
||
| + | **Fast Carrier Task Force - 2FBB 3CV(B) 1 CAV + 1CL2DD 3XX |
||
| + | ***Route is the longer, going north to A, B before joining up back at G node {{Event/Route|A|orange|B|orange|G|red|L|blue|P|blue|U|red|Z1|orange|Z2|orange|Z3|purple|Z4|purple|Z6|red}} |
||
| + | ****Node A is a submarine night battle node; using the vanguard formation + sparkling escort fleet + enemy echelon formation means that there is little danger here |
||
| + | ***Using fighter bombers and putting torp bomber in smaller slots, it is possible to run 3 CVCI with only a CAV Seafighter mule, for 5 full powered attackers in fleet 1. Additional CAV with fighters in fleet 2 and LBAS can help with getting air superiority reliably even with 4 CV enemy composition. |
||
| + | ***Superior firing order in Combine fleet to combined fleet engagements means better outcomes at node U and Z6. |
||
| + | **Having a submarine to tank nodes Z3 and Z4 can help a lot. However, there may still be enemy heavy cruisers in Z4 which can damage your surface ships. |
||
{{Clear}} |
{{Clear}} |
||
| + | |||
===Obtain A-Rank or higher in node Z8=== |
===Obtain A-Rank or higher in node Z8=== |
||
*You may use your E-1/E-2 Green Tagged Fleet to go into Z8 from the North in Point#3. Again, it is possible to reach the destination from point 2, but it is not recommended. |
*You may use your E-1/E-2 Green Tagged Fleet to go into Z8 from the North in Point#3. Again, it is possible to reach the destination from point 2, but it is not recommended. |
||
| Line 334: | Line 348: | ||
*Use of the new 6th fleet formation, the 'Vanguard Formation', is highly recommended to use in all Pre-Boss Nodes, excluding nodes M, N and V which are air raid nodes. |
*Use of the new 6th fleet formation, the 'Vanguard Formation', is highly recommended to use in all Pre-Boss Nodes, excluding nodes M, N and V which are air raid nodes. |
||
*For Nodes X and S, it's up to the admirals' preferences of whether to choose Line Ahead or go with the Vanguard Formation. |
*For Nodes X and S, it's up to the admirals' preferences of whether to choose Line Ahead or go with the Vanguard Formation. |
||
| − | *Regardless of route, branching requirements limit fleets to 2 (F)BB |
+ | *Regardless of route, branching requirements limit fleets to 2 (F)BB(V), 0 CV(L) and require 2+ DD for shortest routing to the boss. |
*'''Nishimura route''' |
*'''Nishimura route''' |
||
*{{Event/Route|E|lightblue|I|red|M|orange|N|orange|S|red|W|lightblue|Y|blue|Z9|blue|ZZ1|blue|ZZ2|blue|ZZ3|purple}} |
*{{Event/Route|E|lightblue|I|red|M|orange|N|orange|S|red|W|lightblue|Y|blue|Z9|blue|ZZ1|blue|ZZ2|blue|ZZ3|purple}} |
||
| Line 340: | Line 354: | ||
**Nishimura Fleet Historical Members will be required, requirement being 2 (Easy) / 4 (Medium) / 6 (Hard) ships for each respective difficulties. |
**Nishimura Fleet Historical Members will be required, requirement being 2 (Easy) / 4 (Medium) / 6 (Hard) ships for each respective difficulties. |
||
**A maximum of 2 BB(V) and a minimum of 2 (Easy) / 3? (Medium) / 4 (Hard) DD are required to route from S to W. |
**A maximum of 2 BB(V) and a minimum of 2 (Easy) / 3? (Medium) / 4 (Hard) DD are required to route from S to W. |
||
| − | ***The 2 BB(V) restriction applies to all difficulties. |
+ | ***The 2 BB(V) restriction applies to all difficulties, otherwise off-route to R. |
**There is a LoS check at Y, failing it will result in Z7-Z8 routing instead of the shorter Z9. The requirement fairly high. Retreating ships before the branch at Y can often lead to off-routing. |
**There is a LoS check at Y, failing it will result in Z7-Z8 routing instead of the shorter Z9. The requirement fairly high. Retreating ships before the branch at Y can often lead to off-routing. |
||
***Bringing more Nishimura Fleet members seems to lower the requirement(?) |
***Bringing more Nishimura Fleet members seems to lower the requirement(?) |
||
| Line 364: | Line 378: | ||
===Nishimura Fleet Members' Equipment Setups=== |
===Nishimura Fleet Members' Equipment Setups=== |
||
| + | {| class="wikitable mw-collapsible mw-collapsed" style="text-align:center" |
||
| − | {{:Sandbox/E-4 Fleet Setup}} |
||
| + | |- |
||
| + | !colspan="6"|Press [Expand] to View Recommended Nishimura Fleet Equipment Setups |
||
| + | |- |
||
| + | !Ship |
||
| + | !Equipment #1 |
||
| + | !Equipment #2 |
||
| + | !Equipment #3 |
||
| + | !Equipment #4 |
||
| + | ![[Reinforcement Expansion]] |
||
| + | |- |
||
| + | |{{ShipBattleCard|Fusou/Kai Ni}}<br>{{ShipBattleCard|Yamashiro/Kai Ni}} |
||
| + | |{{RedGunHeavy}}<br>Main Gun |
||
| + | |{{RedGunHeavy}}<br>Main Gun |
||
| + | |{{RedAmmo}}<br>AP Shell |
||
| + | |{{Seaplane}}<br>[[List of Seaplanes by stats#Reconnaissance_Seaplanes|Recon Seaplane]]<br>or<br>[[List of Seaplanes by stats##Seaplane_Bombers|Seaplane Bomber]] |
||
| + | |style="background:gold"|{{ArmorEquipment}}<br>Bulge<br>OR<br>{{GreenGunMG}}<br>Anti-Air Gun |
||
| + | |- |
||
| + | |{{ShipBattleCard|Mogami/Kai}} |
||
| + | |{{RedGunMedium}}<br>Main Gun<br>OR<br>{{YellowGun}}<br>Secondary Gun |
||
| + | |{{Seaplane}}<br>{{EquipmentLink|Type 0 Reconnaissance Seaplane|text=Recon Seaplane}}/{{EquipmentLink|Zuiun|text=Bomber}}<br>OR<br>{{Seaplane Fighter}}<br>{{EquipmentLink|Type 2 Seaplane Fighter Kai|text=Seaplane Fighter}} |
||
| + | |{{RedGunMedium}}<br>Main Gun<br>OR<br>{{YellowGun}}<br>Secondary Gun |
||
| + | |{{Seaplane}}<br>{{EquipmentLink|Zuiun|text=Seaplane Bomber}}<br>OR<br>{{Seaplane Fighter}}<br>{{EquipmentLink|Type 2 Seaplane Fighter Kai|text=Seaplane Fighter}} |
||
| + | |style="background:gold"|{{ArmorEquipment}}<br>Bulge<br>OR<br>{{GreenGunMG}}<br>Anti-Air Gun |
||
| + | |- |
||
| + | |{{ShipBattleCard|Shigure/Kai Ni}}<br>{{ShipBattleCard|Michishio/Kai Ni}}<br>{{ShipBattleCard|Yamagumo/Kai}}<br>{{ShipBattleCard|Asagumo/Kai}} |
||
| + | |{{RedGunLight}}{{GreenGunDP}}<br>Main Gun |
||
| + | |{{RedGunLight}}{{GreenGunDP}}<br>Main Gun |
||
| + | |[[File:Ssp c.png]]<br>{{EquipmentLink|Skilled Lookouts}}<br>OR<br>{{Radar}}<br>Radar |
||
| + | |style="background:grey"| |
||
| + | !style="background:gold"|{{GreenGunMG}}<br>Anti-Air Gun<br>OR<br>{{Turbine}}<br>{{EquipmentLink|Improved Kanhon Type Turbine|text=Turbine}} |
||
| + | |} |
||
===Special Notes on Choice of Equipment=== |
===Special Notes on Choice of Equipment=== |
||
*At least 1-2 {{EquipmentLink|Type 2 Seaplane Fighter Kai|text=Seaplane Fighters}} are practically mandatory if you wish to obtain Air Superiority (AS) at Boss Node easily while using less to no Fighters on your [[Land Base Aerial Support|LBAS]]. |
*At least 1-2 {{EquipmentLink|Type 2 Seaplane Fighter Kai|text=Seaplane Fighters}} are practically mandatory if you wish to obtain Air Superiority (AS) at Boss Node easily while using less to no Fighters on your [[Land Base Aerial Support|LBAS]]. |
||
**If you lack or outright do not have any Seaplane Fighters in your possession, you will be required to bring multiple {{EquipmentLink|Zuiun|text=Seaplane Bombers}} on your Fusou/Yamashiro/Mogami and/or any CAV in the fleet instead, and have your LBAS equipped with [[List of Fighters by stats|Fighters]] equipped sent to the Boss node to decrease the [[Night Strait Princesses]]' Air Power to a value where you will be able to obtain Air Superiority (AS - <span style="color:green">航空優勢</span>) through Seaplane Bombers alone. Please note that this is hard to achieve if you do not have access to strong fighters or interceptors. |
**If you lack or outright do not have any Seaplane Fighters in your possession, you will be required to bring multiple {{EquipmentLink|Zuiun|text=Seaplane Bombers}} on your Fusou/Yamashiro/Mogami and/or any CAV in the fleet instead, and have your LBAS equipped with [[List of Fighters by stats|Fighters]] equipped sent to the Boss node to decrease the [[Night Strait Princesses]]' Air Power to a value where you will be able to obtain Air Superiority (AS - <span style="color:green">航空優勢</span>) through Seaplane Bombers alone. Please note that this is hard to achieve if you do not have access to strong fighters or interceptors. |
||
| + | **You may also swap out a DD for {{ShipLink|Akitsu Maru|text=Akitsu Maru}} loaded with fighters, Air Supremacy (AS+ <span style="color:green">'''制空権確保!'''</span>) can be achieved easily with this method. AS+ also increases the rate of [[Artillery Spotting]] in the day battle. |
||
*Please note that using {{EquipmentLink|Zuiun|text=Seaplane Bombers}} when against the [[Night Strait Princesses]] is fine in the prior phases, when you enter the Final Phase of facing against the [[Entombed Anti-Air Guardian Princess]], use of Seaplane Bombers on {{ShipLink|Yamashiro/Kai Ni|text=Yamashiro}}, {{ShipLink|Fusou/Kai Ni|text=Fusou}} makes it very likely that her Anti-Air will eradicate your bombers down to 0 with ease (It will still result in Air Superiority - <span style="color:green">航空優勢</span>, but if they have 0 Seaplanes remaining, they will not be able to utilize [[Artillery Spotting]] at all). |
*Please note that using {{EquipmentLink|Zuiun|text=Seaplane Bombers}} when against the [[Night Strait Princesses]] is fine in the prior phases, when you enter the Final Phase of facing against the [[Entombed Anti-Air Guardian Princess]], use of Seaplane Bombers on {{ShipLink|Yamashiro/Kai Ni|text=Yamashiro}}, {{ShipLink|Fusou/Kai Ni|text=Fusou}} makes it very likely that her Anti-Air will eradicate your bombers down to 0 with ease (It will still result in Air Superiority - <span style="color:green">航空優勢</span>, but if they have 0 Seaplanes remaining, they will not be able to utilize [[Artillery Spotting]] at all). |
||
**You are solely recommended to equip CAV with Seaplane Fighters and not use Seaplane Bombers to gain Air Superiority against the [[Entombed Anti-Air Guardian Princess]]. |
**You are solely recommended to equip CAV with Seaplane Fighters and not use Seaplane Bombers to gain Air Superiority against the [[Entombed Anti-Air Guardian Princess]]. |
||
| Line 410: | Line 456: | ||
*Bringing a [[List of submarines by upgraded maximum stats|Submarine]] as a wildcard can help you very much as she can force and tank all of Enemy Destroyers and {{ShipLink|PT Imp Pack}}'s attacks and disable them from attacking your ships. |
*Bringing a [[List of submarines by upgraded maximum stats|Submarine]] as a wildcard can help you very much as she can force and tank all of Enemy Destroyers and {{ShipLink|PT Imp Pack}}'s attacks and disable them from attacking your ships. |
||
**Please beware the enemies in node S can be fatal towards your Submarine, and there is a chance that Enemy Destroyers equipped with ASW Equipment or {{ShipLink|PT Imp Pack}} in Line Abreast or Echelon can damage your Submarine. Use of the Vanguard Formation in the nodes and Sparkling may help decrease the chance of such damages happening before you reach the Boss node. |
**Please beware the enemies in node S can be fatal towards your Submarine, and there is a chance that Enemy Destroyers equipped with ASW Equipment or {{ShipLink|PT Imp Pack}} in Line Abreast or Echelon can damage your Submarine. Use of the Vanguard Formation in the nodes and Sparkling may help decrease the chance of such damages happening before you reach the Boss node. |
||
| + | **For EASY mode, there are additional Ro-class late model DDs in nodes Z9 and ZZ2. Due to the nature of night battle and enemy formation, these DDs have a high chance to damage your Submarine. (Ironically, these do not appear in the higher difficulties.) Use of subcheesing tactic should be considered impractical in phase 3 unless you are prepared to use up to 2 damecons per run. |
||
*Please note that your {{ShipLink|Yamashiro/Kai Ni|text=Yamashiro}} and {{ShipLink|Fusou/Kai Ni|text=Fusou}} (or any other Battleship you bring as their replacement if you are doing Easy/Medium mode) are the key players in defeating the Boss. Therefore it is important they are in Light or Medium Damage minimum by the time your fleet reaches the Day Battle. If both Battleships are in Heavy Damage by the start of the Day Battle, unfortunately your chance of defeating the Boss in that Battle will be very small. |
*Please note that your {{ShipLink|Yamashiro/Kai Ni|text=Yamashiro}} and {{ShipLink|Fusou/Kai Ni|text=Fusou}} (or any other Battleship you bring as their replacement if you are doing Easy/Medium mode) are the key players in defeating the Boss. Therefore it is important they are in Light or Medium Damage minimum by the time your fleet reaches the Day Battle. If both Battleships are in Heavy Damage by the start of the Day Battle, unfortunately your chance of defeating the Boss in that Battle will be very small. |
||
====[[Night Strait Princesses]]==== |
====[[Night Strait Princesses]]==== |
||
| Line 450: | Line 497: | ||
====Hard Mode (甲)==== |
====Hard Mode (甲)==== |
||
*Hard Mode requires '''6 Nishimura Fleet Historical Members''' to be in the Fleet. |
*Hard Mode requires '''6 Nishimura Fleet Historical Members''' to be in the Fleet. |
||
| − | *Hard Mode requires your fleet to have 4 Destroyers present in the fleet. |
+ | *Hard Mode requires your fleet to have 4 Destroyers present in the fleet if you have a SLOW fleet. |
*Possible Fleet Compositions: |
*Possible Fleet Compositions: |
||
**{{ShipLink|Yamashiro/Kai Ni|text=Yamashiro}}, {{ShipLink|Fusou/Kai Ni|text=Fusou}}, {{ShipLink|Shigure/Kai Ni|text=Shigure}}, {{ShipLink|Michishio/Kai Ni|text=Michishio}}, {{ShipLink|Asagumo/Kai|text=Asagumo}}, {{ShipLink|Yamagumo/Kai|text=Yamagumo}} + 1 CA(V)/CL(T)/SS(V) |
**{{ShipLink|Yamashiro/Kai Ni|text=Yamashiro}}, {{ShipLink|Fusou/Kai Ni|text=Fusou}}, {{ShipLink|Shigure/Kai Ni|text=Shigure}}, {{ShipLink|Michishio/Kai Ni|text=Michishio}}, {{ShipLink|Asagumo/Kai|text=Asagumo}}, {{ShipLink|Yamagumo/Kai|text=Yamagumo}} + 1 CA(V)/CL(T)/SS(V) |
||
**{{ShipLink|Yamashiro/Kai Ni|text=Yamashiro}}, {{ShipLink|Fusou/Kai Ni|text=Fusou}}, {{ShipLink|Mogami/Kai|text=Mogami}}, 3 Nishimura Fleet Destroyers + 1 Destroyer of your Choice |
**{{ShipLink|Yamashiro/Kai Ni|text=Yamashiro}}, {{ShipLink|Fusou/Kai Ni|text=Fusou}}, {{ShipLink|Mogami/Kai|text=Mogami}}, 3 Nishimura Fleet Destroyers + 1 Destroyer of your Choice |
||
| + | *Possible Subcheese Composition: |
||
| + | **{{ShipLink|Yamashiro/Kai Ni|text=Yamashiro}}, {{ShipLink|Fusou/Kai Ni|text=Fusou}}, {{ShipLink|Mogami/Kai|text=Mogami}}, 3 Nishimura Fleet Destroyers + 1 SS(V) if Yamashiro, Fusou, and the SS(V) are FAST (through use of boilers+turbines) |
||
*The eLoS(F33) Value required for going Y -> Z9 is approximately above 24.0+ for Hard mode. (Exact value currently unknown) |
*The eLoS(F33) Value required for going Y -> Z9 is approximately above 24.0+ for Hard mode. (Exact value currently unknown) |
||
</tabber> |
</tabber> |
||
Latest revision as of 23:45, 21 April 2018
InformationEdit
|
Ahead of that Strait
あの海峡の先へ | |
  | |
 | |
| Information | |
| Special Mechanics | Striking Force Night Combined Fleet Point-Specific Ship Locking Unlockable Nodes Land Base Aerial Support |
| Boss gauge (HQ 120) |
Easy: 3200 HP + 2000 HP Medium: 3200 HP + 2000 HP Hard: 3400 HP + 2100 HP |
| Rewards | |
All:
Casual:
Easy:
 1 1Medium:
 82 82 1 1Hard:
10 221 221 1 1 | |
| E-4 Starting Points | ||
|---|---|---|
| Nodes | Rules | |
| Start | 1 |
|
2 |
| |
3 |
| |
| E-4 Branching Rules Northern Part | ||
|---|---|---|
| Nodes | Rules | |
1 |
A |
|
C |
| |
F |
D |
|
H | ||
G |
H |
|
J |
| |
L |
| |
Z3 |
Z4 |
|
Z5 |
| |
| E-4 Branching Rules Southern Part | ||
|---|---|---|
| Nodes | Rules | |
I |
K |
|
M |
| |
O |
S |
|
T |
| |
V |
S |
|
X |
| |
S |
R |
|
W |
| |
Y |
Z7 |
|
Z9 |
| |
Task Description:
敵上陸部隊が集結するレイテ湾に向けて、挟撃作戦を敢行する!第一遊撃部隊第三部隊出撃!スリガオ海峡へ向かえ!
We will launch a pincer attack towards Leyte Gulf where enemy's landing forces gather! Force C of First Strike Force, set sail! Set course for the Surigao Strait!
Introduction
- Three Phases. The map can be considered to be divided into three distinct phases.
- Ship-locks and Starting Points: This map allows all shiptags from previous maps, but your starting points are determined by the tags on your ships. Keep in mind that your 3rd fleet will always be recognized as a Strike Force when you sortie, whether it contains 7 ships or just 1.
- Starting Point 1: Combined Fleet. Ship tags are irrelevant.
- Starting Point 2: Any fleet (normal or striking force) formed in the third fleet, unless they are all green tagged.
- Starting Point 3: Any fleet that consist of only green tagged ships (from E-1, E-2). Fleets sortied from the 1st, 2nd or 4th fleets will also start here.
- Untagged ships will be given a yellow (Nishimura) tag if they start at point 2.
- Historical Ships: Be advised that this map will require a certain number of historical ships.
- Members of the Nishimura Fleet will gain a post-cap damage bonus (approximately 1.44x) at the boss node. Other post-cap modifiers also exist (see below).
- On Hard, you are required to have at least 6 of the Nishimura Fleet members to reach node Z9. Failure to do so will effectively prevent you from clearing this map on Hard.
- The Boss Node of this map is hidden. You will be required to go through Two Phases of fulfilling certain requirements to reveal the hidden boss node.
- This Map requires you to defeat two different Bosses. Night Strait Princesses as the initial boss, and Entombed Anti-Air Guardian Princess as the final boss.
- At the boss node, you will fight against the Abyssal Combined Fleet at night
- The battle has two night shelling phases
- The attack order is determined by range for both night shelling phases
- Your fleet can target any ship from either Abyssal main or escort fleet during both shelling phases
- In most cases, the battle will transition to a normal day battle afterwards against the enemy main fleet. (However, it is possible for the battle to end after night battle if you have defeated all the enemies during the night phase.)
- New Type of Night Battle nodes. The night battle nodes in E-4 are indicated by dark purple color.
- Some Night Battle nodes will require you to face the enemy fleet in Night Battle at the start, but then be dragged into fighting them in Day Battle after the Night Battle Phase is over. This is depicted by a node being dual colored. While this is not visible due to the boss icon, the boss node will also go through a night to day phase.
- Shelling support expeditions will now attack the enemy fleet before the night battle.
- LBAS will only attack when the night battle has transitioned to day battle.
- Aerial Combat will take place during the day after the LBAS phase. This means that any support expeditions you have activated can potentially contribute to lowering your enemy's fighter power.
- NOTE: Starting from this event, the 'Vanguard Formation' is available for all fleets with 4 or more ships in the fleet. While the formation's effect is still pending investigation, this formation is known to be defensive and is highly recommended for all the non-aerial nodes all the way up until the boss. Take into account that the first 3 ships in the fleet will suffer day shelling and night firepower penalties, to fully make use of this new formation.
- LBAS Defence. You will have access to 3 land bases, but only 2 may be used for attacking.
- Even in Easy mode, your LBAS will be attacked by Enemy Air Raids.
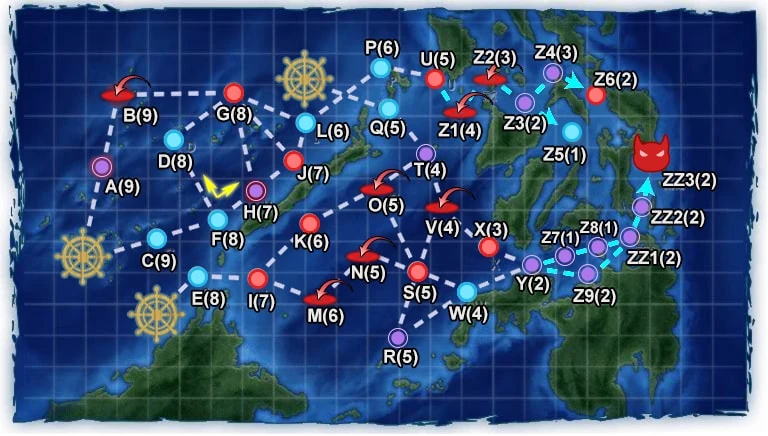
Map progression
")
")
")
Historical Fleets: Battle of Surigao Strait and Sibuyan Sea
The Center Force (Kurita Fleet)
The most powerful attacking force during the Battle of Leyte Gulf led by Takeo Kurita.
- (F)BB: Yamato, Musashi, Nagato, Kongou, Haruna
- CA(V): Atago, Takao, Maya, Choukai, Myoukou, Haguro, Kumano
, Suzuya
, Tone, Chikuma - CL: Noshiro, Yahagi
- DD: Shimakaze, Hayashimo, Okinami, Naganami, Nowaki, Kiyoshimo, Urakaze, Yukikaze, Hamakaze, Isokaze


The Southern Force (Nishimura Fleet)
The vanguard of the "Southern Force" during the Battle of Leyte Gulf led by Shōji Nishimura.
Members of the Nishimura Fleet will gain post-cap modifers of 1.15x on Z9, 1.25x on node ZZ2, and 1.44x on node ZZ3 (boss).

The Second Striking Force (Shima Fleet)
The rear of the "Southern Force" during the Battle of Leyte Gulf led by Kiyohide Shima.
Members of the Shima Fleet will gain post-cap modifiers of ~1.15x on node Y and ~1.25x on node Z8.


Phase 1: Opening the Z Nodes

NOTE: The order does not matter, but progress towards Phase 2 will not count if Phase 1 isn't done yet.
S-Rank node U
- Starting Point 1
- Must be Combined Fleet
- A certain number of Kurita Fleet Members are required to take the shortest and safer route.
- Easy: 2 / Medium: 4 / Hard: 7
- If you take any slow ships, you will be off-routed to node J, which contains New Submarine Princess.
- You may only take up to 5 [F]BB(V)+CV(L/B) combined (Ex. 3 FBB 2 CVL, 4 FBB 1 CV); otherwise, you will be off-routed to Node H from G.
- While Carrier Task Force is a possibility, you will always be forced to go through node A and B regardless of how many historical ships you bring. On Medium and Hard, you will also be forced to go through node J, which contains the New Submarine Princess.
- A certain number of Kurita Fleet Members are required to take the shortest and safer route.
- Possible Composition:
- Fast Surface Task Force - 3FBB CA(V) 2CVL + 1CL 2DD 3XX - C F D G L P U
- Must use the specified members of Kurita Fleet
- Fast Surface Task Force - 3FBB CA(V) 2CVL + 1CL 2DD 3XX - C F D G L P U

Reach node X
- Starting Point 3
- This can be done by using your First Fleet regardless of tags or a Striking Force composed of ships with green tags only; otherwise, you will start at Starting Point 2.
- Using any CV(L), more than 2 Battleships, and having less than 2 Destroyers will cause you to off-routed from V --> S
Obtain Air Superiority (AS) in node V and node N (Not required on EASY mode)
- This can be easily done by sending your 2 LBAS available for Sortie full of Fighters to each respective nodes and/or bringing ships with Seaplane Fighters.
- Node V can be reached using a fleet of E-1/E-2 Ship Lock Tagged Ships or your first fleet.
- Starting Point 3
- If you only wish to reach node V, use your First Fleet full of carriers and stack all of them with
 to easily achieve Air Superiority.
- Node N can be reached with a Strike Force which includes the Nishimura Fleet Members or by having a Fast Fleet that contains no carriers.
- Starting Point 2
- (Easy: 2 / Medium: 4 / Hard: 6) Nishimura Fleet Members.
- Using any CV(L) or Slow ships will cause you to off-route from node I to K unless you meet the specified number of Nishimura Fleet Members.
- In case you do meet the historical requirements, it is definitely possible to bring a carrier in order to make achieving Air Superiority on node N a breeze.
- Node V can be reached using a fleet of E-1/E-2 Ship Lock Tagged Ships or your first fleet.
Obtain a Perfect No-Damage Defense from Enemy Air Raid Attack on your LBAS (HARD only)
- This may be done by putting only Fighters and/or Interceptors on your LBAS and set to Air Defense mode.
- Recommended Composition:
- Sortie with 1 Submarine with Yellow tag (Nishimura Tag)
- Starting Point 2
- E I K O T V, which allows you to travel through 5 nodes without taking any damages while waiting for the Air Raid to happen. Air Raid can happen at any node so you just have to wait, but it usually appears in one of that 5 node.
- NOTE: You MUST sortie the sub from 3rd fleet. Surprisingly, sortie from 1st fleet will result in the sub starting from the north.
- For hard mode, doing this and the next requirement for the second route unlock back-to-back will reduce the number of times reequipping land bases is required.
- Sortie with 1 Submarine with Yellow tag (Nishimura Tag)
Obtain A or S-Rank in node Y
- For node Y, you can decide on yourself whether you want to approach it from point 2 or 3. Take note however, that going from point 3 is shorter and is recommended. While not necessary, you can use LBAS to bomb the node after the night phase has ended.
- Possible Composition:
- 7 Submarine Strike Force with all GREEN TAGs
- Q T V S R W Y
- Strike Force with all GREEN TAGs or First Fleet with (F)BB(V) ≦ 2, DD ≧ 2, No CV(L/B)
- Q T V X Y
- 7 Submarine Strike Force with all GREEN TAGs
Phase 2: Opening the ZZ Nodes

Obtain Air Superiority (AS) in node Z1 & Z2 (not required for Easy)
- Starting Point 1
- Refer to Possible Composition below for Z6 S-rank
- This node has Enemy carriers with very high Air Power. You are recommended to bring CVLs equipped with your best Fighters, CAVs equipped with Seaplane Fighter. On Hard, consider equipping both of your CVLs with a full load-out.
- It is recommended to send your LBAS to each node loaded with Fighters/Interceptors so that you may shred down the Enemy Air Power and gain Air Superiority easily.
Obtain A-Rank or higher in node Z4
- This can be done easily while on-route towards Z6.
Obtain S-Rank in node Z6
- The path to this node is very difficult and Z6 itself is very hard to S-rank on harder difficulties. Use of Support Expedition and LBAS focused to this node is highly recommended. Keep in mind that Z6 is not a boss node, using a Boss Support will not work.
- While it is possible to divide your LBAS in order to make node U more survivable, it will make node Z6 harder to S-rank.
- LBAS on the Sub node can help a lot if your combat fleet is strong enough to clear Z6.
- Possible Composition:
- Starting Point 1
- C F D G L P U Z1 Z2 Z3 Z4 Z6
- Must use the specified number of Kurita Fleet members
- Easy: 2 / Medium: 4 / Hard: 7
- Fast Surface Task Force - 3FBB CA(V) 2CVL + 1CL 2DD 3XX
- Fast Surface Task Force - 4FBB CA(V) CV(B) + 1CL 2DD 3XX
- If you have access to Yamato or Musashi, you can use engine equipment to increase their speed to Fast and use them here without any routing penalties.
- In case you are having trouble with your CVLs survival rate, using a single CV(B) will allow to bring an additional FBB for the fleet. Roma Kai and Italia with a Seaplane Fighter each are a good choice here in addition to 2 fast Kurita fleet BBs. However it will become harder to obtain AS at nodes Z1 and Z2 on the way to Z6.
- Fast Carrier Task Force - 2FBB 3CV(B) 1 CAV + 1CL2DD 3XX
- Route is the longer, going north to A, B before joining up back at G node A B G L P U Z1 Z2 Z3 Z4 Z6
- Node A is a submarine night battle node; using the vanguard formation + sparkling escort fleet + enemy echelon formation means that there is little danger here
- Using fighter bombers and putting torp bomber in smaller slots, it is possible to run 3 CVCI with only a CAV Seafighter mule, for 5 full powered attackers in fleet 1. Additional CAV with fighters in fleet 2 and LBAS can help with getting air superiority reliably even with 4 CV enemy composition.
- Superior firing order in Combine fleet to combined fleet engagements means better outcomes at node U and Z6.
- Route is the longer, going north to A, B before joining up back at G node A B G L P U Z1 Z2 Z3 Z4 Z6
- Having a submarine to tank nodes Z3 and Z4 can help a lot. However, there may still be enemy heavy cruisers in Z4 which can damage your surface ships.
Obtain A-Rank or higher in node Z8
- You may use your E-1/E-2 Green Tagged Fleet to go into Z8 from the North in Point#3. Again, it is possible to reach the destination from point 2, but it is not recommended.
- Possible Composition:
- Starting Point 3
- Striking Force composed of ships with green tags only OR by utilizing the First Fleet.
- (F)BB(V) ≦ 2, DD ≧ 2, CV(L/B) = 0
- Striking Force - 2CA 2CL 3DD
- Striking Force - 2 BBV 1 CAV 3 DD 1 SS
- Q T V X Y Z7 Z8
- Having a submarine to tank all the shots can help a lot, as it will effectively prevent them from using cut-in attacks on your surface fleets. However, this will do nothing against enemy heavy cruisers.
- This node will transpose to day after the night phase has ended, it is possible to use LBAS to attack this node.
S-Rank node Z9
- WARNING: Having Nishimura fleet members is mandatory to reach this node on harder difficulties. Those who do not have enough historical members will not be able to reach this node, effectively making it impossible to beat this map until you lower your difficulty.
- You may only enter through Z9 if you have started from point 2.
- You may not enter if the fleet contains a carrier.
- Possible Composition:
- Starting Point 2
- Striking Force composed of ships with mixed tags
- Striking Force - 2BB(V) 1CA(V) 4DD
- Vanguard Formation for all submarine/Night nodes before Z9 and Diamond on all aerial nodes. You can choose between Line Ahead or Vanguard on node S, but go for Line Ahead on Z9
- E I M N S W Y Z9
- NOTE: The LOS requirement for Y-->Z9 is estimated to be around ~25 Cn1.
- NOTE: For phase 2, node W is still a night battle node while node Y changes to a night battle node with subs.
Obtain Perfect LBAS Defense against Enemy Air Raid (MEDIUM & HARD MODE)
- Place all your LBAS into Air Defense Mode with your best Interceptors and Fighters.
- For hard mode, doing this and the previous requirement for the first route unlock back-to-back will reduce the number of times reequipping land bases is required.
- Refer to the previous requirement for the first route unlock for the Recommended Composition.
Final Showdown VS Night Strait Princesses & Entombed Anti-Air Guardian Princess
Route
- After opening up the ZZ nodes, the boss becomes accessible. There are no additional gimmicks known, so all that remains is to deplete the boss gauges.
- Use of the new 6th fleet formation, the 'Vanguard Formation', is highly recommended to use in all Pre-Boss Nodes, excluding nodes M, N and V which are air raid nodes.
- For Nodes X and S, it's up to the admirals' preferences of whether to choose Line Ahead or go with the Vanguard Formation.
- Regardless of route, branching requirements limit fleets to 2 (F)BB(V), 0 CV(L) and require 2+ DD for shortest routing to the boss.
- Nishimura route
- E I M N S W Y Z9 ZZ1 ZZ2 ZZ3
- Starts at the southern start point (2)
- Nishimura Fleet Historical Members will be required, requirement being 2 (Easy) / 4 (Medium) / 6 (Hard) ships for each respective difficulties.
- A maximum of 2 BB(V) and a minimum of 2 (Easy) / 3? (Medium) / 4 (Hard) DD are required to route from S to W.
- The 2 BB(V) restriction applies to all difficulties, otherwise off-route to R.
- There is a LoS check at Y, failing it will result in Z7-Z8 routing instead of the shorter Z9. The requirement fairly high. Retreating ships before the branch at Y can often lead to off-routing.
- Bringing more Nishimura Fleet members seems to lower the requirement(?)
- Ships taking this route arrive at the boss node with around 33% fuel, 45% ammo remaining.
- Using any CV(L) in the Fleet will cause off-routing from I to K, unless the Nishimura historical requirement is met. However, the branching rules on latter nodes makes the use of a carrier unpractical.
- Using a high armor SSV (i.e. I-14, I-13, I-401, I-400) can help reduce losses from enemy destroyers and PT Imp Packs. To maintain shortest routing, 4 DD 2 BBV 1 SSV is a common composition.
- Shima route
- Q T V X Y Z7 Z8 ZZ1 ZZ2 ZZ3
- Starts at the northern start point (3) & requires all 7 ships to have the green Shima Fleet tag from E-1 & E-2.
- Fights more battles than Nishimura route, but the LoS requirements are non-existent and the fleet composition does not require any Nishimura Fleet members. However, Nishimura fleet members are still useful due to their bonus post-cap damage modifiers.
- Ships taking this route arrive at the boss node with around 30% fuel, 40% ammo remaining.
- Using a high armor SSV (i.e. I-14, I-13, I-401, I-400) can help reduce losses from enemy destroyers and PT Imp Packs.
- Submarine Shima route
- Q T V S R W Y Z7 Z8 ZZ1 ZZ2 ZZ3
- 7 SS(V)
- Starts at the northern start point (3) & requires all 7 ships to have the green Shima Fleet tag from E-1 & E-2.
- This fleet takes a longer route to the boss, but have significant advantages over the shorter routes.
- 7 submarines are fairly cost effective for chipping the boss gauge, but will have an incredibly difficult time killing the boss completely.
- However, because submarines cannot equip the Striking Force Fleet Command Facility, pre-boss taiha is a concern.
- In non-PT nodes, Line Ahead formation is an option due to higher shelling support damage and higher damage from the first 3 submarines, but sacrifices the evasion from the Vanguard formation.
- SSVs I-14, I-13, I-401, I-400 are recommended due to their higher fuel capacity, which allows them to keep higher fuel levels than their 10 fuel SS/SSV counterparts on the way to the boss. (29% fuel at boss compared to 0%). Putting them in the 4th-7th slots will allow them to tank more enemy fire.
- Ships taking this route arrive at the boss with around 35% ammo remaining.
Nishimura Fleet Members' Equipment Setups
| Press [Expand] to View Recommended Nishimura Fleet Equipment Setups | |||||
|---|---|---|---|---|---|
| Ship | Equipment #1 | Equipment #2 | Equipment #3 | Equipment #4 | Reinforcement Expansion |
Main Gun |
Main Gun |
AP Shell |
Recon Seaplane or Seaplane Bomber |
Bulge OR Anti-Air Gun | |
Main Gun OR Secondary Gun |
Recon Seaplane  /Bomber /Bomber OR Seaplane Fighter 
|
Main Gun OR Secondary Gun |
Seaplane Bomber OR Seaplane Fighter
|
Bulge OR Anti-Air Gun | |
Main Gun |
Main Gun |
Skilled Lookouts  OR Radar |
Anti-Air Gun OR Turbine 
| ||
Special Notes on Choice of Equipment
- At least 1-2 Seaplane Fighters are practically mandatory if you wish to obtain Air Superiority (AS) at Boss Node easily while using less to no Fighters on your LBAS.
- If you lack or outright do not have any Seaplane Fighters in your possession, you will be required to bring multiple Seaplane Bombers on your Fusou/Yamashiro/Mogami and/or any CAV in the fleet instead, and have your LBAS equipped with Fighters equipped sent to the Boss node to decrease the Night Strait Princesses' Air Power to a value where you will be able to obtain Air Superiority (AS - 航空優勢) through Seaplane Bombers alone. Please note that this is hard to achieve if you do not have access to strong fighters or interceptors.
- You may also swap out a DD for Akitsu Maru loaded with fighters, Air Supremacy (AS+ 制空権確保!) can be achieved easily with this method. AS+ also increases the rate of Artillery Spotting in the day battle.
- If you lack or outright do not have any Seaplane Fighters in your possession, you will be required to bring multiple Seaplane Bombers
- Please note that using Seaplane Bombers when against the Night Strait Princesses is fine in the prior phases, when you enter the Final Phase of facing against the Entombed Anti-Air Guardian Princess, use of Seaplane Bombers on Yamashiro, Fusou makes it very likely that her Anti-Air will eradicate your bombers down to 0 with ease (It will still result in Air Superiority - 航空優勢, but if they have 0 Seaplanes remaining, they will not be able to utilize Artillery Spotting at all).
- You are solely recommended to equip CAV with Seaplane Fighters and not use Seaplane Bombers to gain Air Superiority against the Entombed Anti-Air Guardian Princess.
- Use of Secondary Guns on your CA(V)s may help them hit PT Imp Pack more.
- As your Battleships are your main Boss Killers during when the Day Battle hits after the Night Battle Phase, you are to make sure you have:
- Artillery Spotting enabled for them via obtaining minimum Air Superiority (AS - 航空優勢) at the Boss node
- Have them able to utilize AP Shell Cut-In or do a Double Attack while having it Equipped.
- All Destroyers are recommended to have 2 Main Guns or minimum, and Skilled Lookouts or Radars as the third Equipment.
- All Enemy Boss Escorts in the Boss Node will die easily from a Destroyer's Double Attack during Night Battle, and therefore do not need to use a Torpedo Cut-In Setup on any of your Ships.
- Due to the sheer number of the Enemy Boss Fleet, the chance that the Boss will actually be hit by any of your ships during Night Battle is actually quite low.
- All Enemy Boss Escorts in the Boss Node will die easily from a Destroyer's Double Attack during Night Battle, and therefore do not need to use a Torpedo Cut-In Setup on any of your Ships.
- Please note PT Imp Pack are weak against the following:
- Small-Caliber Main Guns
- Secondary Guns
- Anti-Air Guns
- Skilled Lookouts
- Use of Striking Force Fleet Command Facility during your Pre-Final (HP Chipping) Runs against the Boss is recommended.
- However, keep in mind that if it is used before Node S, you may be forced to off-route to node R during the run if you no longer meet the required number of Destroyers in your fleet.
- Also note that if used it in node Y or before it, it may result in failure to meet the required Fleet eLoS value which will cause you to off-route to Z7.
- Use of Night Battle Equipment are recommended to decrease the chance of enemy ships using Cut-In Attacks against your ships in the Night Battle nodes.
- Searchlight is optional and may not be preferred to use as a ship's chance of being targetted more during Night Battle will increase.
- Star Shell is recommended to be brought at least.
- Type 98 Reconnaissance Seaplane (Night Recon) is recommended to be brought if available.

Recommendations
General
- You are recommended to use the 'Vanguard Formation' in the Pre-Boss nodes.
- You are recommended to send both your Land Base Aerial Support in Sortie-Mode against the Boss Node.
- The Range from the LBAS to the Boss node is only 2 Range. Therefore practically any kinds of Aircrafts you use will be able to reach the Boss node without issue.
- If you have at least 2 or more Seaplane Fighters in your Fleet, you can choose to use a setup of:
- 3-4 Land-based Attack Aircrafts + 0-1 Fighter & 4 Land-based Attack Aircrafts.
- If you are lacking in Seaplane Fighters, you may try to do a setup of the following:
- 2 Land-based Attack Aircrafts + 2 Fighters & 2 Land-based Attack Aircrafts + 2 Fighter.
- 1 Land-based Attack Aircrafts + 3 Fighters & 2 Land-based Attack Aircrafts + 2 Fighter.
- If you are lacking in Land-based Attack Aircrafts, please use your best Torpedo Bombers together with some Fighters.
- Please note Type 96 Land-based Attack Aircraft is craftable via Development
- 240 / 260 / 10 / 261 (Flagship - Aircraft Carrier)
- 240
- Please note Type 96 Land-based Attack Aircraft
- Cut-in type Attacks for Night Battle are not required as all Boss Escorts will die to a ship's Double Attack easily. You are recommended to setup all your Ships to use Double Attack during Night Battles.
- You may choose to bring a ship with a Night Battle Cut-In setup if you are trying to take the small chance of her being able to attack the Boss, but the chance of it happening is extremely low, and therefore not recommended.
- Bringing a Submarine as a wildcard can help you very much as she can force and tank all of Enemy Destroyers and PT Imp Pack's attacks and disable them from attacking your ships.
- Please beware the enemies in node S can be fatal towards your Submarine, and there is a chance that Enemy Destroyers equipped with ASW Equipment or PT Imp Pack in Line Abreast or Echelon can damage your Submarine. Use of the Vanguard Formation in the nodes and Sparkling may help decrease the chance of such damages happening before you reach the Boss node.
- For EASY mode, there are additional Ro-class late model DDs in nodes Z9 and ZZ2. Due to the nature of night battle and enemy formation, these DDs have a high chance to damage your Submarine. (Ironically, these do not appear in the higher difficulties.) Use of subcheesing tactic should be considered impractical in phase 3 unless you are prepared to use up to 2 damecons per run.
- Please note that your Yamashiro and Fusou (or any other Battleship you bring as their replacement if you are doing Easy/Medium mode) are the key players in defeating the Boss. Therefore it is important they are in Light or Medium Damage minimum by the time your fleet reaches the Day Battle. If both Battleships are in Heavy Damage by the start of the Day Battle, unfortunately your chance of defeating the Boss in that Battle will be very small.
Night Strait Princesses
- Night Strait Princesses has a Abyssal Patrolling Attack Hawk Kai equipped and requires you to have a certain amount of Air Power so that you can gain Air Superiority against her, in order for Artillery Spotting to be enabled on your Battleships.
- Use of Seaplane Fighters and Land Base Aerial Support will help you gain Air Superiority easily against her.
- If you have 0 Seaplane Fighters, you will be required to have several Seaplane Bomber prepared on your CAVs and BBVs, and have more Fighters on your Land Base Aerial Support (Around 2 Fighters per LBAS).
- Use of Seaplane Fighters
- Bringing a Submarine can make the Night Strait Princess be forced to attack the Submarine, although the Boss will have to have a Bomber remaining in her slot after the Land Base Aerial Support Phase and Aerial Combat Phase in order for this to happen.
- Due to LBAS and Aerial Combat, and Fleet Anti-Air usually shooting down all of the Boss' Bombers, it will be actually quite rare for this to happen.
- Please note that the required Air Power will slightly increase in the Final Battle.
- Please beware that for Medium/Hard mode, Entombed Anti-Air Guardian Princess will come out in the Final Battle as an Escort Ship in the Enemy 2nd Fleet, where she will potentially tank all of your ships' attacks, hindering them from attacking the other major Boss escort ships.
Entombed Anti-Air Guardian Princess
- Please note that once you enter the final phase of facing the Entombed Anti-Air Guardian Princess as the Boss, the Enemy Boss Fleet will have 0 Air Power, making it extremely easy to obtain Air Superiority against her even with a single Seaplane Fighter.
- Please beware however that due to the immense Anti-Air stat of the Boss, bringing any Seaplane Bomber on your Ship(s) will cause it to be completely destroyed off their Aircraft slot down 0, disabling the owner of the aircraft from using any form of Artillery Spotting attacks (Double Attack, AP Cut-in, etc).
- You will still gain Air Superiority for your fleet, enabling other ships to still utilize Artillery Spotting attacks (as long as they were equipped with regular Seaplane).
- You will still gain Air Superiority for your fleet, enabling other ships to still utilize Artillery Spotting attacks (as long as they were equipped with regular Seaplane
- Please beware however that due to the immense Anti-Air stat of the Boss, bringing any Seaplane Bomber
- Despite being based on the Destroyer Suzutsuki, this Boss is classified as a BBV and does not have any Aircraft. Therefore, a Submarine will be unable to force this Boss to attack her.
- This Boss will only have one type of Fleet all the way to the Final Battle, and has lesser stats compared to the previous Night Strait Princesses, where you may actually have an easier time with this Boss.
Easy Mode (丙)
- Possible Fleet Compositions (Please Note XX = Ship of Choice, though restrictions will apply):
- Easy Mode only requires 2 Nishimura Fleet Historical Members to be in the Fleet.
- You may still choose to bring more than 2 if preferred.
- You must have at least minimum 2 Destroyers in the Fleet at least up node Z9 (After reaching that node, if a retreat via Striking Force Fleet Command Facility is required for any of your Destroyers, then you may do so).
- The eLoS(F33) Value required for going Y -> Z9 is approximately above 18.0+ for Easy mode. (Exact value currently unknown)
Medium Mode (乙)
- Possible Fleet Compositions (Please Note XX = Ship of Choice, though restrictions will apply):
- Yamashiro, Fusou, Mogami, Shigure, 2 DD 1 XX(No BB/CV(L))
- Yamashiro, Fusou, 2 Nishimura Fleet Destroyers (Shigure, Michishio, Yamagumo, or Asagumo), and 3 XX(No BB/CV(L))
- It is possible for you to use only 2 Destroyers in the fleet if they are Nishimura Fleet Destroyers. Otherwise you will require 3 Destroyers generally for this difficulty.
- Medium Mode requires 4 Nishimura Fleet Historical Members to be in the Fleet.
- You may still choose to bring more than 4 if preferred.
- The eLoS(F33) Value required for going Y -> Z9 is approximately above 21.0+ for Medium mode. (Exact value currently unknown)
Hard Mode (甲)
- Hard Mode requires 6 Nishimura Fleet Historical Members to be in the Fleet.
- Hard Mode requires your fleet to have 4 Destroyers present in the fleet if you have a SLOW fleet.
- Possible Fleet Compositions:
- Possible Subcheese Composition:
- The eLoS(F33) Value required for going Y -> Z9 is approximately above 24.0+ for Hard mode. (Exact value currently unknown)
LBAS Flight Range
Enemy patterns

Lua error in package.lua at line 80: module 'Module:Collection/EnemyShips' not found. Lua error in package.lua at line 80: module 'Module:Collection/EnemyShips' not found. Lua error in package.lua at line 80: module 'Module:Collection/EnemyShips' not found. Lua error in package.lua at line 80: module 'Module:Collection/EnemyShips' not found. Lua error in package.lua at line 80: module 'Module:Collection/EnemyShips' not found. Lua error in package.lua at line 80: module 'Module:Collection/EnemyShips' not found. Lua error in package.lua at line 80: module 'Module:Collection/EnemyShips' not found. Lua error in package.lua at line 80: module 'Module:Collection/EnemyShips' not found. Lua error in package.lua at line 80: module 'Module:Collection/EnemyShips' not found. Lua error in package.lua at line 80: module 'Module:Collection/EnemyShips' not found. Lua error in package.lua at line 80: module 'Module:Collection/EnemyShips' not found. Lua error in package.lua at line 80: module 'Module:Collection/EnemyShips' not found. Lua error in package.lua at line 80: module 'Module:Collection/EnemyShips' not found. Lua error in package.lua at line 80: module 'Module:Collection/EnemyShips' not found. Lua error in package.lua at line 80: module 'Module:Collection/EnemyShips' not found. Lua error in package.lua at line 80: module 'Module:Collection/EnemyShips' not found. Lua error in package.lua at line 80: module 'Module:Collection/EnemyShips' not found. Lua error in package.lua at line 80: module 'Module:Collection/EnemyShips' not found. Lua error in package.lua at line 80: module 'Module:Collection/EnemyShips' not found. Lua error in package.lua at line 80: module 'Module:Collection/EnemyShips' not found. Lua error in package.lua at line 80: module 'Module:Collection/EnemyShips' not found. Lua error in package.lua at line 80: module 'Module:Collection/EnemyShips' not found. Lua error in package.lua at line 80: module 'Module:Collection/EnemyShips' not found. Lua error in package.lua at line 80: module 'Module:Collection/EnemyShips' not found. Lua error in package.lua at line 80: module 'Module:Collection/EnemyShips' not found. Lua error in package.lua at line 80: module 'Module:Collection/EnemyShips' not found. Lua error in package.lua at line 80: module 'Module:Collection/EnemyShips' not found. Lua error in package.lua at line 80: module 'Module:Collection/EnemyShips' not found. Lua error in package.lua at line 80: module 'Module:Collection/EnemyShips' not found.
Lua error in package.lua at line 80: module 'Module:Collection/EnemyShips' not found. Lua error in package.lua at line 80: module 'Module:Collection/EnemyShips' not found. Lua error in package.lua at line 80: module 'Module:Collection/EnemyShips' not found. Lua error in package.lua at line 80: module 'Module:Collection/EnemyShips' not found. Lua error in package.lua at line 80: module 'Module:Collection/EnemyShips' not found. Lua error in package.lua at line 80: module 'Module:Collection/EnemyShips' not found. Lua error in package.lua at line 80: module 'Module:Collection/EnemyShips' not found. Lua error in package.lua at line 80: module 'Module:Collection/EnemyShips' not found. Lua error in package.lua at line 80: module 'Module:Collection/EnemyShips' not found. Lua error in package.lua at line 80: module 'Module:Collection/EnemyShips' not found. Lua error in package.lua at line 80: module 'Module:Collection/EnemyShips' not found. Lua error in package.lua at line 80: module 'Module:Collection/EnemyShips' not found. Lua error in package.lua at line 80: module 'Module:Collection/EnemyShips' not found. Lua error in package.lua at line 80: module 'Module:Collection/EnemyShips' not found. Lua error in package.lua at line 80: module 'Module:Collection/EnemyShips' not found. Lua error in package.lua at line 80: module 'Module:Collection/EnemyShips' not found. Lua error in package.lua at line 80: module 'Module:Collection/EnemyShips' not found. Lua error in package.lua at line 80: module 'Module:Collection/EnemyShips' not found. Lua error in package.lua at line 80: module 'Module:Collection/EnemyShips' not found. Lua error in package.lua at line 80: module 'Module:Collection/EnemyShips' not found. Lua error in package.lua at line 80: module 'Module:Collection/EnemyShips' not found. Lua error in package.lua at line 80: module 'Module:Collection/EnemyShips' not found. Lua error in package.lua at line 80: module 'Module:Collection/EnemyShips' not found. Lua error in package.lua at line 80: module 'Module:Collection/EnemyShips' not found. Lua error in package.lua at line 80: module 'Module:Collection/EnemyShips' not found. Lua error in package.lua at line 80: module 'Module:Collection/EnemyShips' not found. Lua error in package.lua at line 80: module 'Module:Collection/EnemyShips' not found. Lua error in package.lua at line 80: module 'Module:Collection/EnemyShips' not found. Lua error in package.lua at line 80: module 'Module:Collection/EnemyShips' not found. Lua error in package.lua at line 80: module 'Module:Collection/EnemyShips' not found.
Lua error in package.lua at line 80: module 'Module:Collection/EnemyShips' not found. Lua error in package.lua at line 80: module 'Module:Collection/EnemyShips' not found. Lua error in package.lua at line 80: module 'Module:Collection/EnemyShips' not found. Lua error in package.lua at line 80: module 'Module:Collection/EnemyShips' not found. Lua error in package.lua at line 80: module 'Module:Collection/EnemyShips' not found. Lua error in package.lua at line 80: module 'Module:Collection/EnemyShips' not found. Lua error in package.lua at line 80: module 'Module:Collection/EnemyShips' not found. Lua error in package.lua at line 80: module 'Module:Collection/EnemyShips' not found. Lua error in package.lua at line 80: module 'Module:Collection/EnemyShips' not found. Lua error in package.lua at line 80: module 'Module:Collection/EnemyShips' not found. Lua error in package.lua at line 80: module 'Module:Collection/EnemyShips' not found. Lua error in package.lua at line 80: module 'Module:Collection/EnemyShips' not found. Lua error in package.lua at line 80: module 'Module:Collection/EnemyShips' not found. Lua error in package.lua at line 80: module 'Module:Collection/EnemyShips' not found. Lua error in package.lua at line 80: module 'Module:Collection/EnemyShips' not found. Lua error in package.lua at line 80: module 'Module:Collection/EnemyShips' not found. Lua error in package.lua at line 80: module 'Module:Collection/EnemyShips' not found. Lua error in package.lua at line 80: module 'Module:Collection/EnemyShips' not found. Lua error in package.lua at line 80: module 'Module:Collection/EnemyShips' not found. Lua error in package.lua at line 80: module 'Module:Collection/EnemyShips' not found. Lua error in package.lua at line 80: module 'Module:Collection/EnemyShips' not found. Lua error in package.lua at line 80: module 'Module:Collection/EnemyShips' not found. Lua error in package.lua at line 80: module 'Module:Collection/EnemyShips' not found. Lua error in package.lua at line 80: module 'Module:Collection/EnemyShips' not found. Lua error in package.lua at line 80: module 'Module:Collection/EnemyShips' not found. Lua error in package.lua at line 80: module 'Module:Collection/EnemyShips' not found. Lua error in package.lua at line 80: module 'Module:Collection/EnemyShips' not found. Lua error in package.lua at line 80: module 'Module:Collection/EnemyShips' not found. Lua error in package.lua at line 80: module 'Module:Collection/EnemyShips' not found.