Home Port Expansion maximum 220 ships / 980 equipment
Special Mechanics
Combined Fleet - Surface Fleet combined fleet added and required for E-1 and E-3. E-4 may use either the original MI style Carrier-Escort combined fleet or a Surface Fleet.
Surface Fleet combined fleet has different ship requirements. First Fleet now only allows maximum of 1 CV(B) or 2 CVLs, 4 BBs and 1 Wild card that is not BB, CV or CVL. Second Fleet requires 1 CL 2 DD.
Form a combined fleet by dragging the fleet number 2 over fleet number 1.
Change in combat nodes - Surface Fleet Combined Fleet will now have to go through shelling phrase rather that only having aerial phrase. However, First Fleet will begin shelling first before Second Fleet does.
Ships that are used in E1 and E2 cannot be used in E-3 (as well as ships used in E3 cannot be used in E1 and E2). However, you can use all your ships (even those used in E1, E2 and E3) in E4. No one is locked out of E4.
After you unlock E-4 you will be given the option to form Carrier-Escort Combined fleet when attempting to form a combined fleet (Left option). Right option allows you to form a Surface Fleet for E-1 and E-3.
Support Expeditions
Expedition #133 is for the non-boss battles.
Expedition #134 is for the boss battle.
Requirements for both expeditions: At least 2 destroyers
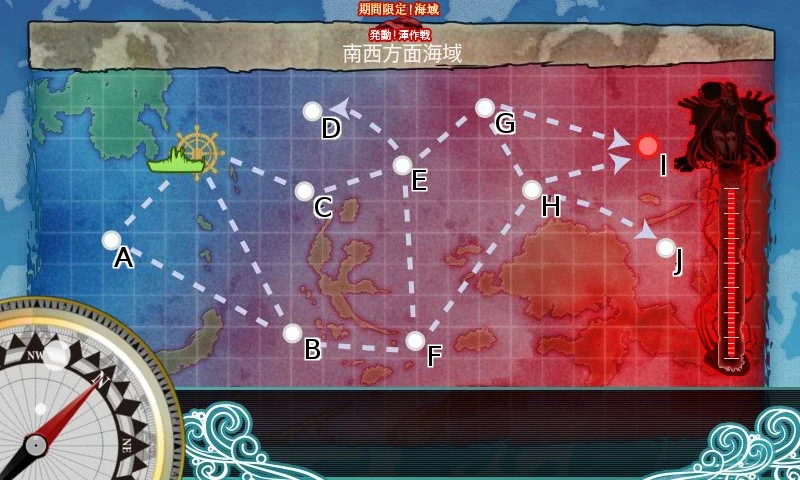
Provisional E-1 set up results. (Need further testing and editing.)
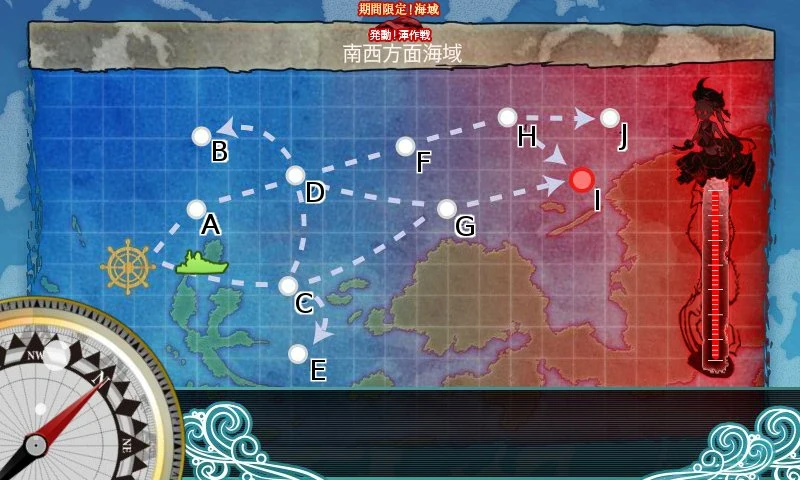
2BBV, 2CA, 2CAV will lead to either ACDF or BDEF
1BBV 1CAV 2CA 1DD 1CVL + 1CL 5DD will lead to A-C-E-F. (proved wrong)
1BBV 2CA 2DD 1CVL will sometimes lead you to B-D-F.
1fBB 3CAV 2DD (BDEF) 2BB 2CAV 1CAV 1CV
1CA 2fBB 1CA 2CAV (ACDEF)
2BB 2CA 1CV 1CLT (BDEF)
1BB 3CA 2CVL (BDEF)
1BBV 2CA 3DD (BDF/ACEF)
1BBV 1BB 1CAV 3CA + 1CL 5DD (ACEF)
1BB 1fBB 2CA 1CAV 1CV (ABDEF)
2fBB 1BBV 1CA 2CAV (ACEF) 2CA 4DD
2fBB 1BBV 1CA 1CAV 1CV (ACDEF) 1CL 1 CLT 2DD 2SS
1CL 1BB 1CA 2CAV 1CV(ACDEF) 1CA 1CAV 4DD
Most likely to South route on E-1 (will skipping 4th battle on E node):
For first fleet: 1xBBV, 2xCAV, 1xCA, 2xDD. Second fleet: 1xCL, 5xDD [not always southern route, also northern route A-E-F]
1x FBB, 2x CA, 1x CAV, 2x DD + 1x CL, 5x DD
2BB, 3 CA(V), 1 CL + 1 CL, 5 DD will go ACDF or BDF avoiding E altogether. High LOS requirements so at least 2 CAVs recommended and recon planes for ships that can carry it. DDs should have radars. Aviation BBs might be a consideration if you still can't make the LOS requirement but consider the loss in firepower.
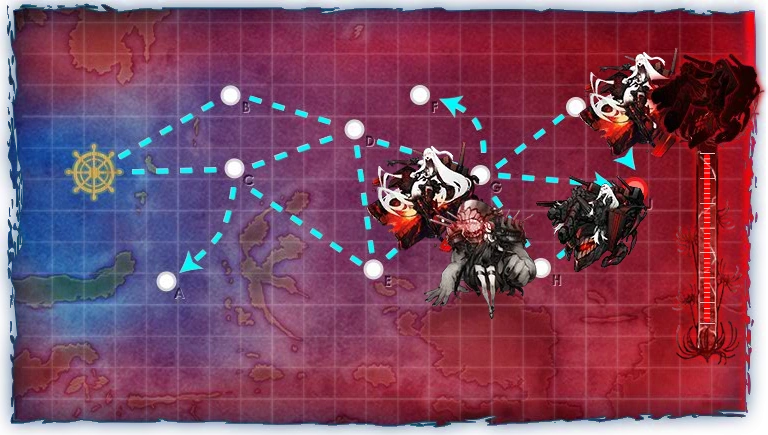
Lv100+ admirals will meet Tsu elite in the final boss battle. [99 also]
A node has 3 or 4 submarines with Ka elite being the flagship. (Admiral lv 100 (99))
G node has 2 patterns with 5 or 6 enemy ships, respectively. (Admiral lv 100 (99))
41 equipment LoS = C to G, with a fleet of 1CL and 5DD, admiral level 100 (99?). The actual threshold may be no higher than 34 equipment LoS.
Having one or no CL allows for to C-G-I routing (1 CL 5 DD or 6 DD).
If you have difficulty with boss, you can run a light support expedition (2 DD 1 CA 1 CL 2 CVL) to give your fleet an edge. If that proves insufficient, Boss Support Expedition fleet of 2xBB(V) + 2xCVL + 2xDD provides good firepower (damage) albeit with increased fuel/ammo consumption.
3FBB, Akitsu Maru, 1CA, 1CV + 1CLT, 1CL, 2DD, 2CA takes B-F-H-I route 100% of the time. This is the most stable route. As per one tip below, consider getting Akitsu Maru Kai-ed so you can equip CV with 1-2 more attack planes.
Having even one BB will lead you through A-B-F-E-G-H-I about half the time, meaning five battles.
There is speculation about a hidden LoS check for F-H or F-E, 110+ combined LoS has been reported to go F-H more reliably. (Needs more testing to confirm/ deny, it is not a guarantee)
Having a fleet of small/medium-sized ships will take you through A-B-F-H-I.
2CA + 2CAV + 2CVL and 1CL + 2DD + 3CLT will go A-B-F-H-I most of the time and works very well, make sure to set Kitakami as your second fleet's flagship so she has a higher chance to trigger a cut-in attack.
You may deploy CLTs on your second fleet, they make the map much, much easier!
To go start->B (and avoid the first maelstrom) you cannot have more than 1 CLT and your first fleet must contain either a CL, DD, or Akitsu Maru and have 2 BB + 2 CA (other combinations may work, still needs testing)
Akitsu Maru can guarantee F->H, plus she can carry Reppuus (Kai only) so Akitsu Maru + a CV can get you air superiority at all nodes. Combined with the previous rule this makes easy B->F->H->I routing.
Myoukou and Haguro in first fleet can also guarantee F-H. Having one in the main fleet and the other in the second fleet may also guarantee F->H.
Going east (C-E-G-I) is possible without carriers. This is probably the best way for farming with 1 fuel maelstrom and easier preboss nodes. Akitsu Maru, 2 BBV, 2 CAV, 1 CL + 3 DD, 1 CL, 1 BB, 1 CLT can be used (126 AS for HQ99+ final boss). One DD can replace by one SS for opening salvo, recommented I-58 for higher chance to cut-in attack.
B/C depends on the second fleet composition. 2 DD + 2 CLT guarantees C, while 5 DD gives a high chance of B. More DDs increases the chances of going to B.
C to D/E is random.
There is a LoS check for both C to D and C to E.
D to E is possible if you have a high number of BB/BBV/CA/CAV, or 3 CLT.
G to I if you have more than 2 CV.
G to H if you have more than 2 BB in your first fleet.
G to J if you have less than two CV or have Akitsu Maru.
Tips
C node is a sub node with no indicator.
D is a very easy combat node. Torpedoes can be a pain if your are using a Combined Task Fleet though, so it's recommended to use the first formation (ASW) to low their damage and increase evasion.
2BB + 2CV + 2CAV and 1CL + 1BB + 2DD + 2CLT will always go C-D/E-G-J and works very well, make sure to set Kitakami as your second fleet's flagship so she has a higher chance to trigger a cut-in attack.
2BB + 2CV + 2CA and 3CLT + 1CL + 2DD goes C-D/E-G-J and also works well. Having 1 more CLT (Kiso Kai 2) increases the chances of clearing the weaker ships.
1CVL + 2BB + 1CA + 2CV and second fleet: 2DD + 1CL + 1BB + 2CLT will always go C-D/E-G-J with LoS check from D->G. Fleet Command Facility is recommended. Try to maximize fighter power for better performance in the shelling salvo.
2BB + 1BBV + 1CAV + 1CV + 1CL and 3DD + 1CL + 2CLT can attain air superiority at node G and reach the boss reliably, but due to lack of air power will have a more difficult time killing the boss.
2BB + 1BBV + 2CVL + Akitsu Maru and 2DD + 1CL + 1CA + 2CLT can take advantage of the surface combined fleet's attack order while still getting air superiority at the boss.
If you find yourself taking too much damage from shelling/night battle during the final kill, consider adding a sub to your secondary fleet. She'll divert the attacks from both Armored Carrier Princesses as well as the two accompanying destroyers. Do keep in mind that a sub may have some trouble surviving until the final node.

 600
600  700)
700) 140
140