(AACI 32 https://twitter.com/syoukuretin/status/1024243981423525888 and http://ja.kancolle.wikia.com/wiki/対空カットイン) |
|||
| (43 intermediate revisions by 9 users not shown) | |||
| Line 112: | Line 112: | ||
Notes: |
Notes: |
||
| − | * {{GreenPlane}}{{Seaplane Fighter}} Fighter planes |
+ | * {{GreenPlane}}{{Seaplane Fighter}} Fighter planes and {{Jet-powered Fighter-Bomber 1}}{{BluePlane}}{{RedPlane}}{{Seaplane}} Jet/Torpedo / Dive / Seaplane bombers participate in the Fighter Combat. |
| + | ** Depending on the air state achieved, '''all''' the above planes will be subjected to plane loss, regardless if they had or didn't have an AA stat. |
||
* Recon planes (carrier based{{YellowPlane}} or seaplane recon{{Seaplane}}) will '''NOT''' participate in Fighter Combat. |
* Recon planes (carrier based{{YellowPlane}} or seaplane recon{{Seaplane}}) will '''NOT''' participate in Fighter Combat. |
||
| + | ** Recon planes are unaffected by the results of Air State and suffer no plane loss from this stage. |
||
* [[Aircraft Proficiency]] is factored into Fighter Power on top of the above formula. The exact formula is under investigation. |
* [[Aircraft Proficiency]] is factored into Fighter Power on top of the above formula. The exact formula is under investigation. |
||
* The allied fleet and enemy fleet's Fighter Powers are compared to determine the result of Fighter Combat: |
* The allied fleet and enemy fleet's Fighter Powers are compared to determine the result of Fighter Combat: |
||
| − | {| class="article-table" style="width: |
+ | {| class="article-table" style="width:90%;" |
|- |
|- |
||
! scope="col" style="width:190px; text-align:center;" |Fighter Power |
! scope="col" style="width:190px; text-align:center;" |Fighter Power |
||
! scope="col" style="width:100px; text-align:center;" |Result |
! scope="col" style="width:100px; text-align:center;" |Result |
||
! scope="col" style="width:165px; text-align:center;" |Text Display |
! scope="col" style="width:165px; text-align:center;" |Text Display |
||
| − | ! scope="col" style="width:110px; text-align:center;" | % Shot Down |
+ | ! scope="col" style="width:110px; text-align:center;" | % Enemy Planes Shot Down (Approx.) |
| − | ! scope="col" style="width:110px; text-align:center;" | % |
+ | ! scope="col" style="width:110px; text-align:center;" | % Allied Planes Shot Down (Approx.) |
! scope="col" style="width:100px; text-align:center;" |[[Combat#Contact|Contact]] |
! scope="col" style="width:100px; text-align:center;" |[[Combat#Contact|Contact]] |
||
! scope="col" style="width:100px; text-align:center;" |[[Combat Screens]] |
! scope="col" style="width:100px; text-align:center;" |[[Combat Screens]] |
||
| Line 130: | Line 132: | ||
| style="text-align:center;" |<span style="color:green">'''制空権確保!'''</span><br />''Seikuuken Kakuho!'' |
| style="text-align:center;" |<span style="color:green">'''制空権確保!'''</span><br />''Seikuuken Kakuho!'' |
||
| style="text-align:center;" |0~100% |
| style="text-align:center;" |0~100% |
||
| − | | style="text-align:center;" | |
+ | | style="text-align:center;" |2.5~5.83% |
| style="text-align:center;" |Allied only |
| style="text-align:center;" |Allied only |
||
| style="text-align:center;" |[[File:Combat_supremacy.jpg|150px]] |
| style="text-align:center;" |[[File:Combat_supremacy.jpg|150px]] |
||
| Line 137: | Line 139: | ||
| style="text-align:center;" |Air Superiority<br />(AS) |
| style="text-align:center;" |Air Superiority<br />(AS) |
||
| style="text-align:center;" |<span style="color:green">'''航空優勢! '''</span><br />''Koukuu Yuusei!'' |
| style="text-align:center;" |<span style="color:green">'''航空優勢! '''</span><br />''Koukuu Yuusei!'' |
||
| − | | style="text-align:center;" |0~ |
+ | | style="text-align:center;" |0~70% |
| − | | style="text-align:center;" | |
+ | | style="text-align:center;" |7.5~17.5% |
| style="text-align:center;" |Both sides |
| style="text-align:center;" |Both sides |
||
| style="text-align:center;" |[[File:Combat_superiority.jpg|150px]] |
| style="text-align:center;" |[[File:Combat_superiority.jpg|150px]] |
||
| Line 145: | Line 147: | ||
| style="text-align:center;" |Air Parity |
| style="text-align:center;" |Air Parity |
||
| style="text-align:center;" |No text displayed |
| style="text-align:center;" |No text displayed |
||
| − | | style="text-align:center;" |0~ |
+ | | style="text-align:center;" |0~50% |
| − | | style="text-align:center;" | |
+ | | style="text-align:center;" |12.5~29.1% |
| style="text-align:center;" |Neither side |
| style="text-align:center;" |Neither side |
||
| style="text-align:center;" |[[File:Combat_parity and incapability.jpg|150px]] |
| style="text-align:center;" |[[File:Combat_parity and incapability.jpg|150px]] |
||
| Line 153: | Line 155: | ||
| style="text-align:center;" |Air Denial |
| style="text-align:center;" |Air Denial |
||
| style="text-align:center;" |No text displayed |
| style="text-align:center;" |No text displayed |
||
| − | | style="text-align:center;" |0~ |
+ | | style="text-align:center;" |0~30% |
| − | | style="text-align:center;" |40 |
+ | | style="text-align:center;" |17.5~40.8% |
| style="text-align:center;" |Both sides |
| style="text-align:center;" |Both sides |
||
| style="text-align:center;" |[[File:Combat_parity and incapability.jpg|150px]] |
| style="text-align:center;" |[[File:Combat_parity and incapability.jpg|150px]] |
||
| Line 163: | Line 165: | ||
| style="text-align:center;" |<span style="color:red">'''制空権喪失! '''</span><br />''Seikuuken Soushitsu!'' |
| style="text-align:center;" |<span style="color:red">'''制空権喪失! '''</span><br />''Seikuuken Soushitsu!'' |
||
| style="text-align:center;" |0~10% |
| style="text-align:center;" |0~10% |
||
| − | | style="text-align:center;" | |
+ | | style="text-align:center;" |25~58.3% |
| style="text-align:center;" |Enemy only |
| style="text-align:center;" |Enemy only |
||
| − | |[[File:Combat_denial.jpg|150px]] |
+ | | style="text-align:center;" | [[File:Combat_denial.jpg|150px]] |
|} |
|} |
||
<strong>Note: For the users who are aware of the terminology switch between {{Tooltip|AD|Air Denial}} and {{Tooltip|AI|Air Inferiority}}, this was caused by a mistranslation. The correct order is {{Tooltip|AD|Air Denial}} > {{Tooltip|AI|Air Incapability}}.</strong> |
<strong>Note: For the users who are aware of the terminology switch between {{Tooltip|AD|Air Denial}} and {{Tooltip|AI|Air Inferiority}}, this was caused by a mistranslation. The correct order is {{Tooltip|AD|Air Denial}} > {{Tooltip|AI|Air Incapability}}.</strong> |
||
*EFP: Enemy Fighter Power, FP: Fighter Power. Abbreviated to save space. |
*EFP: Enemy Fighter Power, FP: Fighter Power. Abbreviated to save space. |
||
| + | *If both sides launch no planes, then the air state is considered Air Parity. |
||
| − | *This calculation does not take into account any anti-air weaponry equipped on ships. Carrier anti-air stat is also not considered. |
||
| + | ** If any planes were launched during the aerial phase, but the fighter power of both sides are zero (Eg. Enemy only launched bombers with 0 AA Stat), the allied fleet will be awarded Air Supremacy. (Due to meeting the AS+ requirement of 0*3=0) |
||
| − | *The percentage of planes shot down was originally believed to apply for both sides' respective outcomes, however it is now under re-checking. If it is true, then for example, securing Air Superiority means allied planes shoot down up to 80% of enemy planes, and the enemy under Air Denial will shoot down up to 40%. |
||
| + | * Carriers will participate in Aerial Phase regardless of their damage state, provided they have planes. |
||
| − | *Planes shot down are calculated per slot, rounded down. |
||
| + | * Night Contact can be triggered under the same air states as normal Day Contact, with the exception of PvP Battles, or when the battle starts at Night. |
||
| − | **As this is applied per slot, 80% of one enemy bomber group can be shot down while a second has 0% shot down. |
||
| + | |||
| − | *Planes loaded on moderately/heavily damaged carriers can still join this stage of fighter combat. |
||
| + | The formula for '''allied''' plane loss (On a per-slot basis) is as follows: |
||
| − | *Even if allied planes secure Air Supremacy, planes can still be lost (up to 10%), and the subsequent anti-air defense stages can eliminate more bombers. |
||
| + | <center> |
||
| − | *If the enemy fleet launches no fighters and any planes are launched from either side, the result defaults to Air Supremacy. If both sides launch no planes, then the rest of the battle is treated the same as if Air Parity was achieved. |
||
| + | <math>\text{Plane Loss} = \big \lfloor S * 0.1 * ( \text{random} \in \left [ 0 , \left ( A / 3 * 100 \right ) \right ] / 100 + \left ( A / 4 \right ) ) \big \rfloor</math> |
||
| − | *Contact can't be triggered in Air Incapability |
||
| + | </center> |
||
| − | **Night Contact can be triggered in most case when it is not Air Incapability, however it can't be triggered when it is under Air Parity, with the exception of during PvP or when it is a night battle node then it still Night Contact still can be triggered even if it is under Air Parity state. |
||
| + | |||
| − | *[[Artillery Spotting]] can only be triggered with at least Air Superiority. |
||
| + | Where: |
||
| − | * If fighter combat occured but the fighter power of both sides are zero, then friendly fleet side would get Air Supremacy automatically. |
||
| + | *<math> S </math> is the plane's slot size. |
||
| − | *Not all shot down roll result carry same probability. For instance, in the situation of AS+, enemies are most likely to lost 30%-70% planes, and is less likely to lost close to 0% or 100% of all of their planes. |
||
| + | *<math> A </math> is the Air State modifier, where: |
||
| + | **<math>A = \begin{cases} 1, & \text{ for Air Supremacy} \\ 3, & \text{ for Air Superiority } \\ 5, & \text{ for Air Parity } \\ 7, & \text{ for Air Denial } \\ 10, & \text{ for Air Incapability } \end{cases}</math> |
||
| + | *Random function takes an random integer within <math>0</math> and <math>\left ( A / 3 * 100 \right )</math> in a linear distribution. |
||
| + | |||
| + | The formula for '''enemy''' plane loss (On a per-slot basis) is as follows: |
||
| + | <center> |
||
| + | <math>\text{Plane Loss} = \big \lfloor S * \left ( 0.035 * \text{random} \in \left [ 0 , A \right ] + 0.065 * \text{random} \in \left [ 0 , A \right ] \right ) \big \rfloor</math> |
||
| + | </center> |
||
| + | |||
| + | Where: |
||
| + | *<math> S </math> is the enemy plane's slot size. |
||
| + | *<math> A </math> is the '''Player's''' Air State modifier, where: |
||
| + | **<math>A = \begin{cases} 10, & \text{ for Air Supremacy} \\ 7, & \text{ for Air Superiority } \\ 5, & \text{ for Air Parity } \\ 3, & \text{ for Air Denial } \\ 1, & \text{ for Air Incapability } \end{cases}</math> |
||
| + | *Random function takes an random integer within <math>0</math> and <math>A</math> in a linear distribution. |
||
===Contact=== |
===Contact=== |
||
| Line 302: | Line 318: | ||
*<math>\hat{F} = 1.54 \cdot \left \lfloor F \cdot \sum^\text{All Ships} \bigg \lfloor \sum^{\text{All Slots}} \left ( \left ( E_{fmod} \cdot E_{aa} \right ) + \left ( E_{f\bigstar} \cdot \sqrt{\bigstar} \right ) \right ) \bigg \rfloor \right \rfloor</math> |
*<math>\hat{F} = 1.54 \cdot \left \lfloor F \cdot \sum^\text{All Ships} \bigg \lfloor \sum^{\text{All Slots}} \left ( \left ( E_{fmod} \cdot E_{aa} \right ) + \left ( E_{f\bigstar} \cdot \sqrt{\bigstar} \right ) \right ) \bigg \rfloor \right \rfloor</math> |
||
**<math>\hat{F}</math> is the adjusted AA value of the fleet, following the formula above. This is only added to the adjusted AA value for Fixed Air Defense, as a bonus. |
**<math>\hat{F}</math> is the adjusted AA value of the fleet, following the formula above. This is only added to the adjusted AA value for Fixed Air Defense, as a bonus. |
||
| − | **<math>F</math> is the formation modifier. |
+ | **<math>F</math> is the formation modifier. (see: '''Formation Modifiers''') |
| + | **<math>E_{fmod}</math> is the equipment type multiplier for fleet AA (see: '''Equipment Modifiers'''), not to be confused with the regular equipment type modifier. |
||
| − | ***Cruising Formation 1: 1.1 |
||
| − | ***Cruising Formation 2: 1.0 |
||
| − | ***Cruising Formation 3: 1.5 |
||
| − | ***Cruising Formation 4: 1.0 |
||
| − | **<math>E_{fmod}</math> is the equipment type multiplier for fleet AA (see: '''Equipment Fleet AA Multiplier'''), not to be confused with the regular equipment type modifier. |
||
**<math>E_{f\bigstar}</math> is the equipment's improvement modifier to fleet AA. |
**<math>E_{f\bigstar}</math> is the equipment's improvement modifier to fleet AA. |
||
***High-Angle Mounts: 3 |
***High-Angle Mounts: 3 |
||
| Line 391: | Line 403: | ||
<center> |
<center> |
||
| − | <math>S_{\text{Proportional}} = \left \lfloor \frac{ \lfloor \hat{A} \rfloor }{400} \cdot N \right \rfloor</math> |
+ | <math>S_{\text{Proportional}} = \left \lfloor \frac{ \lfloor \hat{A} \rfloor }{400} \cdot N \right \rfloor</math> |
<math>S_{\text{Fixed}} = \left \lfloor \frac{ \lfloor \hat{A} + \hat{F} \rfloor }{10.6} \right \rfloor</math> |
<math>S_{\text{Fixed}} = \left \lfloor \frac{ \lfloor \hat{A} + \hat{F} \rfloor }{10.6} \right \rfloor</math> |
||
| Line 397: | Line 409: | ||
Where: |
Where: |
||
| − | *<math>\hat{A} = 2 \cdot \sqrt{A_{base}} + \sum^{\text{All Slots}} \left ( E_{mod} \cdot E_{aa} \right )</math> |
+ | *<math>\hat{A} = \bigg (2 \cdot \sqrt{A_{base}} + \sum^{\text{All Slots}} \left ( E_{mod} \cdot E_{aa} \right ) \bigg ) \cdot R</math> |
| − | *<math>\hat{F} = 2 \cdot \left \lfloor F \cdot \sum^\text{All Abyssals} \bigg \lfloor \sum^{\text{All Slots}} \left ( E_{fmod} \cdot E_{aa} \right ) \bigg \rfloor \right \rfloor</math> |
+ | *<math>\hat{F} = 2 \cdot \left \lfloor F \cdot \sum^\text{All Abyssals} \bigg \lfloor \sum^{\text{All Slots}} \left ( E_{fmod} \cdot E_{aa} \right ) \bigg \rfloor \right \rfloor \cdot \hat{R}</math> |
| + | *<math> R </math> is the '''Ship AA Resistance''' of the plane the ship is defending against. (See '''Plane AA Resist Modifiers''') |
||
| + | *<math> \hat{R} </math> is the '''Fleet AA Resistance''' of the plane the ship is defending against. |
||
====Formation Modifiers==== |
====Formation Modifiers==== |
||
| − | {| class="article-table" style="width: |
+ | {| class="article-table" style="width:80%;" |
|- |
|- |
||
! scope="col" style="text-align:center;" |Formation |
! scope="col" style="text-align:center;" |Formation |
||
| Line 415: | Line 429: | ||
| style="text-align:center;" |1.6 |
| style="text-align:center;" |1.6 |
||
|- |
|- |
||
| − | + | ! colspan="2" style="text-align:center;" | Combined Fleet |
|
|- |
|- |
||
| + | | Cruising Formation 1 |
||
| − | |Abyssal Line Ahead |
||
| − | | style="text-align:center;" |1 |
+ | | style="text-align:center;" |1.1 |
|- |
|- |
||
| + | | Cruising Formation 2 |
||
| − | |Abyssal Double Line |
||
| − | | style="text-align:center;" |1. |
+ | | style="text-align:center;" |1.0 |
|- |
|- |
||
| + | | Cruising Formation 3 |
||
| − | |Abyssal Diamond |
||
| − | | style="text-align:center;" |1. |
+ | | style="text-align:center;" |1.5 |
| + | |- |
||
| + | | Cruising Formation 4 |
||
| + | | style="text-align:center;" |1.0 |
||
|} |
|} |
||
| − | *Modifiers for Combined Fleet Formations are to be investigated. |
||
====Equipment Modifiers==== |
====Equipment Modifiers==== |
||
| − | {| class="article-table" style="width: |
+ | {| class="article-table" style="width:80%;" |
|- |
|- |
||
! scope="col" |Equipment Type |
! scope="col" |Equipment Type |
||
| − | ! scope="col" style="text-align:center;" |Modifier |
+ | ! scope="col" style="text-align:center;" |Ship AA Modifier |
| + | ! scope="col" style="text-align:center;" |Fleet AA Modifier |
||
|- |
|- |
||
|High-angle Mounts, Anti-aircraft Fire Directors |
|High-angle Mounts, Anti-aircraft Fire Directors |
||
| style="text-align:center;" |4 |
| style="text-align:center;" |4 |
||
| + | | style="text-align:center;" |0.35 |
||
|- |
|- |
||
|Machine Guns & Rocket Launchers |
|Machine Guns & Rocket Launchers |
||
| style="text-align:center;" |6 |
| style="text-align:center;" |6 |
||
| + | | style="text-align:center;" |0.2 |
||
|- |
|- |
||
|AA Radars |
|AA Radars |
||
| style="text-align:center;" |3 |
| style="text-align:center;" |3 |
||
| + | | style="text-align:center;" |0.4 |
||
|- |
|- |
||
| − | | |
+ | |Main Gun, Seaplanes |
| style="text-align:center;" |0 |
| style="text-align:center;" |0 |
||
| + | | style="text-align:center;" |0.2 |
||
|- |
|- |
||
| + | |Type 3 Shell |
||
| − | | colspan="2" | |
||
| + | | style="text-align:center;" |0 |
||
| + | | style="text-align:center;" |0.6 |
||
|- |
|- |
||
| + | | colspan="3" | |
||
| − | |Abyssal CIC, High-angle Single-Mount |
||
| + | |- |
||
| + | |Other Abyssal AA Equipment, including CIC, High-angle Single-Mount |
||
| style="text-align:center;" |0 |
| style="text-align:center;" |0 |
||
| + | | style="text-align:center;" |0.2 |
||
|} |
|} |
||
*There may be other types of equipment with modifiers that affect the air defense equations which are not yet known. |
*There may be other types of equipment with modifiers that affect the air defense equations which are not yet known. |
||
| − | ==== |
+ | ====Plane AA Resist Modifiers==== |
| + | |||
| − | {| class="article-table" style="width:350px;" |
||
| + | {| class="article-table" style="width:80%;" |
||
|- |
|- |
||
| + | ! colspan="3" style="text-align:center;" | {{BluePlane}} Torpedo Bombers |
||
| − | ! scope="col" |Equipment Type |
||
| − | ! scope="col" style="text-align:center;" |Multiplier |
||
|- |
|- |
||
| + | ! scope="col" |Plane Type |
||
| − | |High-angle Mounts, Anti-aircraft Fire Directors |
||
| − | + | ! scope="col" style="text-align:center;" |Ship AA Modifier |
|
| + | ! scope="col" style="text-align:center;" |Fleet AA Modifier |
||
|- |
|- |
||
| + | |{{EquipmentLink|Type 97 Torpedo Bomber (Murata Squadron)}} |
||
| − | |Main Gun, Secondary Gun, Machine Guns & Rocket Launchers, Seaplane Recon, Fighters, Bombers |
||
| − | | style="text-align:center;" |0. |
+ | | style="text-align:center;" |0.6 |
| + | | style="text-align:center;" |1 |
||
|- |
|- |
||
| + | |{{EquipmentLink|Tenzan Model 12 (Murata Squadron)}} |
||
| − | |AA Radars |
||
| − | | style="text-align:center;" |0. |
+ | | style="text-align:center;" |0.6 |
| + | | style="text-align:center;" |1 |
||
|- |
|- |
||
| + | |{{EquipmentLink|Type 97 Torpedo Bomber (Tomonaga Squadron)}} |
||
| − | |Type 3 Shell |
||
| style="text-align:center;" |0.6 |
| style="text-align:center;" |0.6 |
||
| + | | style="text-align:center;" |1 |
||
|- |
|- |
||
| + | |{{EquipmentLink|Tenzan Model 12 (Tomonaga Squadron)}} |
||
| − | | colspan="2" | |
||
| + | | style="text-align:center;" |0.6 |
||
| + | | style="text-align:center;" |1 |
||
| + | |- |
||
| + | ! colspan="3" style="text-align:center;" | {{RedPlane}} Dive Bombers |
||
| + | |- |
||
| + | ! scope="col" |Plane Type |
||
| + | ! scope="col" style="text-align:center;" |Ship AA Modifier |
||
| + | ! scope="col" style="text-align:center;" |Fleet AA Modifier |
||
| + | |- |
||
| + | |{{EquipmentLink|Type 99 Dive Bomber (Egusa Squadron)}} |
||
| + | | style="text-align:center;" |0.6 |
||
| + | | style="text-align:center;" |1 |
||
| + | |- |
||
| + | |{{EquipmentLink|Suisei (Egusa Squadron)}} |
||
| + | | style="text-align:center;" |0.6 |
||
| + | | style="text-align:center;" |0.7 |
||
| + | |- |
||
| + | |{{EquipmentLink|Zero Fighter Model 62 (Fighter-bomber / Iwai Squadron)}} |
||
| + | | style="text-align:center;" |0.6 |
||
| + | | style="text-align:center;" |0.7 |
||
| + | |- |
||
| + | ! colspan="3" style="text-align:center;" | {{Seaplane}} Seaplane Bombers |
||
| + | |- |
||
| + | ! scope="col" |Plane Type |
||
| + | ! scope="col" style="text-align:center;" |Ship AA Modifier |
||
| + | ! scope="col" style="text-align:center;" |Fleet AA Modifier |
||
| + | |- |
||
| + | |{{EquipmentLink|Zuiun (634 Air Group)}} |
||
| + | | style="text-align:center;" |0.6 |
||
| + | | style="text-align:center;" |1 |
||
| + | |- |
||
| + | |{{EquipmentLink|Zuiun Model 12}} |
||
| + | | style="text-align:center;" |0.6 |
||
| + | | style="text-align:center;" |1 |
||
| + | |- |
||
| + | |{{EquipmentLink|Zuiun Model 12 (634 Air Group)}} |
||
| + | | style="text-align:center;" |0.6 |
||
| + | | style="text-align:center;" |0.7 |
||
| + | |- |
||
| + | |{{EquipmentLink|Zuiun (634 Air Group/Skilled)}} |
||
| + | | style="text-align:center;" |0.6 |
||
| + | | style="text-align:center;" |0.7 |
||
| + | |- |
||
| + | |{{EquipmentLink|Zuiun Kai Ni (634 Air Group)}} |
||
| + | | style="text-align:center;" |0.5 |
||
| + | | style="text-align:center;" |0.7 |
||
| + | |- |
||
| + | |{{EquipmentLink|Zuiun Kai Ni (634 Air Group/Skilled)}} |
||
| + | | style="text-align:center;" |0.5 |
||
| + | | style="text-align:center;" |0.5 |
||
| + | |- |
||
| + | ! colspan="3" style="text-align:center;" | {{Jet-powered Fighter-Bomber 1}} {{Jet-powered Fighter-Bomber 2}} Jets |
||
| + | |- |
||
| + | ! scope="col" |Plane Type |
||
| + | ! scope="col" style="text-align:center;" |Ship AA Modifier |
||
| + | ! scope="col" style="text-align:center;" |Fleet AA Modifier |
||
| + | |- |
||
| + | |{{EquipmentLink|Jet Keiun Kai}} |
||
| + | | style="text-align:center;" |0.5 |
||
| + | | style="text-align:center;" |0.7 |
||
| + | |- |
||
| + | |{{EquipmentLink|Kikka Kai}} |
||
| + | | style="text-align:center;" |0.5 |
||
| + | | style="text-align:center;" |0.5 |
||
| + | |- |
||
| + | ! colspan="3" style="text-align:center;" | {{Land-based Attack Aircraft}} Land-based Attack Aircraft |
||
| + | |- |
||
| + | ! scope="col" |Plane Type |
||
| + | ! scope="col" style="text-align:center;" |Ship AA Modifier |
||
| + | ! scope="col" style="text-align:center;" |Fleet AA Modifier |
||
| + | |- |
||
| + | |{{EquipmentLink|Type 1 Land-based Attack Aircraft (Nonaka Squadron)}} |
||
| + | | style="text-align:center;" |0.6 |
||
| + | | style="text-align:center;" |1 |
||
|- |
|- |
||
| − | |Other Abyssal AA Equipment, including CIC, High-angle Single-Mount |
||
| − | | style="text-align:center;" |0.2 |
||
|} |
|} |
||
| Line 496: | Line 598: | ||
As of the 17th November 2017 update and Fall 2017 event, Abyssals are now able to AACI as long as they follow the proper equipment setup, but the animation is not shown. Known instances are [[Air Defense Princess]] and [[Artillery Imp|Artillery Imp III]]. |
As of the 17th November 2017 update and Fall 2017 event, Abyssals are now able to AACI as long as they follow the proper equipment setup, but the animation is not shown. Known instances are [[Air Defense Princess]] and [[Artillery Imp|Artillery Imp III]]. |
||
| − | Trigger chance of AACI is determined |
+ | Trigger chance of AACI is solely determined by the API type. Fleet AA does not affect trigger chances<ref>http://kankoregouchin.blog.fc2.com/blog-entry-45.html</ref>. Luck does not affect AACI trigger rate<ref>http://kankoregouchin.blog.fc2.com/blog-entry-40.html</ref>. |
Be noted that AACI effects are added on to the regular anti-air fire of your fleet, thus anti-air stat of other ships or/and equipment on those ships in your fleet would still matter even if an AACI has been activated. |
Be noted that AACI effects are added on to the regular anti-air fire of your fleet, thus anti-air stat of other ships or/and equipment on those ships in your fleet would still matter even if an AACI has been activated. |
||
====Equipment, API==== |
====Equipment, API==== |
||
| − | The following table |
+ | The following table summarizes current known information about the various AACI types.<ref>http://kancolle.wikia.com/wiki/User_blog:Homuhomu123/Trigger_Rates_%26_Effectiveness_of_Anti-Air_Cut-In_(AACI)</ref><ref>https://www.ptt.cc/bbs/KanColle/M.1428751788.A.613.html</ref><ref>http://ja.kancolle.wikia.com/wiki/%E5%AF%BE%E7%A9%BA%E3%82%AB%E3%83%83%E3%83%88%E3%82%A4%E3%83%B3</ref><ref>http://ja.kancolle.wikia.com/wiki/%E3%82%B9%E3%83%AC%E3%83%83%E3%83%89:363?file=%E5%A4%89%E5%8B%95%E3%83%9C%E3%83%BC%E3%83%8A%E3%82%B9.png#8</ref> |
| − | {| class=" |
+ | {| class="wikitable" style="width:100%; text-align: center; vertical-align: middle;" |
| + | |- |
||
| − | !style="text-align:center"|API value |
||
| + | !API value |
||
| − | !style="text-align:center"|Type |
||
| − | !style=" |
+ | !style="width:25%"|Type |
| + | !Shot down per slot |
||
| − | !style="text-align:center"|K value |
||
| + | !K value |
||
| − | !style="text-align:center"|Uncontrolled test prob. |
||
| + | !Proc Rate |
||
| − | !style="text-align:center"|Vita prob. |
||
| + | !User |
||
| − | !style="text-align:center"|User |
||
| + | !Note |
||
| − | !style="text-align:center"|Note |
||
|- |
|- |
||
| + | !None |
||
| − | !style="text-align:center"|None |
||
|'''-''' |
|'''-''' |
||
|'''+1''' |
|'''+1''' |
||
|1.0 |
|1.0 |
||
| + | |N/A |
||
| − | |'''-''' |
||
| − | |'''-''' |
||
|Player's fleet only |
|Player's fleet only |
||
|Triggers if no other AACI is activated |
|Triggers if no other AACI is activated |
||
|- |
|- |
||
| + | !1 |
||
| − | !style="text-align:center"|1 |
||
| − | |nowrap|'''HHR'''<br>{{GreenGunDP}}{{GreenGunDP}}{{Radar}} |
+ | |nowrap|'''HHR'''<br />{{GreenGunDP}}{{GreenGunDP}}{{Radar}} |
|'''+8''' |
|'''+8''' |
||
|nowrap|1.7<ref group="†">1.75 in Vita</ref> |
|nowrap|1.7<ref group="†">1.75 in Vita</ref> |
||
| − | |'''67%''' |
||
|65% |
|65% |
||
| − | |rowspan="3 |
+ | |rowspan="3"|'''{{ShipLink|Akizuki/Kai|Teruzuki/Kai|Hatsuzuki/Kai|Suzutsuki/Kai|text=Akizuki-Class}}''' |
|'''HA mount x2 + Radar''' |
|'''HA mount x2 + Radar''' |
||
|- |
|- |
||
| + | !2 |
||
| − | !style="text-align:center"|2 |
||
| − | |nowrap|HR<br>{{GreenGunDP}}{{Radar}} |
+ | |nowrap|HR<br />{{GreenGunDP}}{{Radar}} |
| +7 |
| +7 |
||
|1.7 |
|1.7 |
||
| − | |58% |
||
|58% |
|58% |
||
|HA mount + Radar |
|HA mount + Radar |
||
|- |
|- |
||
| + | !3 |
||
| − | !style="text-align:center"|3 |
||
| − | |nowrap|HH<br>{{GreenGunDP}}{{GreenGunDP}} |
+ | |nowrap|HH<br />{{GreenGunDP}}{{GreenGunDP}} |
| +5 |
| +5 |
||
|1.6 |
|1.6 |
||
| − | |~62% |
||
|50% |
|50% |
||
|HA mount x2 |
|HA mount x2 |
||
|- |
|- |
||
| + | !4 |
||
| − | !style="text-align:center"|4 |
||
| − | |nowrap|MSAR<br>{{RedGunHeavy}}{{GreenAmmo}}[[File:Aafd_c.png]]{{Radar}} |
+ | |nowrap|MSAR<br />{{RedGunHeavy}}{{GreenAmmo}}[[File:Aafd_c.png]]{{Radar}} |
| +7 |
| +7 |
||
|1.5 |
|1.5 |
||
| − | |? |
||
|52% |
|52% |
||
| − | |Battleships |
+ | |'''Battleships''' |
|Large Main Gun + Sanshiki + AAFD + Air Radar |
|Large Main Gun + Sanshiki + AAFD + Air Radar |
||
|- |
|- |
||
| + | !5 |
||
| − | !style="text-align:center"|5 |
||
| − | |nowrap|'''BBR'''<br>[[File:Customized HA plus AAFD icon.png]][[File:Customized HA plus AAFD icon.png]]{{Radar}} |
+ | |nowrap|'''BBR'''<br />[[File:Customized HA plus AAFD icon.png]][[File:Customized HA plus AAFD icon.png]]{{Radar}} |
|'''+5''' |
|'''+5''' |
||
|nowrap|1.5<ref group="†">1.55 in Vita</ref> |
|nowrap|1.5<ref group="†">1.55 in Vita</ref> |
||
| − | |'''~62%''' |
||
|55% |
|55% |
||
| − | |All |
+ | |'''All''' |
|'''Built-in HA mount x2 + Air Radar''' |
|'''Built-in HA mount x2 + Air Radar''' |
||
|- |
|- |
||
| + | !6 |
||
| − | !style="text-align:center"|6 |
||
| − | |nowrap|MSA<br>{{RedGunHeavy}}{{GreenAmmo}}[[File:Aafd_c.png]] |
+ | |nowrap|MSA<br />{{RedGunHeavy}}{{GreenAmmo}}[[File:Aafd_c.png]] |
| +5 |
| +5 |
||
|nowrap|1.45<ref group="†">1.5 in Vita</ref> |
|nowrap|1.45<ref group="†">1.5 in Vita</ref> |
||
| − | |~50% ? |
||
|40% |
|40% |
||
| − | |Battleships |
+ | |'''Battleships''' |
|Large Main Gun + Sanshiki + AAFD |
|Large Main Gun + Sanshiki + AAFD |
||
|- |
|- |
||
| + | !7 |
||
| − | !style="text-align:center"|7 |
||
| − | |nowrap|HAR<br>{{GreenGunDP}}[[File:Aafd_c.png]]{{Radar}} |
+ | |nowrap|HAR<br />{{GreenGunDP}}[[File:Aafd_c.png]]{{Radar}} |
| +4 |
| +4 |
||
|1.35 |
|1.35 |
||
| − | |~45% |
||
|45% |
|45% |
||
| − | |rowspan="3 |
+ | |rowspan="3"|'''All''' |
|HA mount + AAFD + Air Radar |
|HA mount + AAFD + Air Radar |
||
|- |
|- |
||
| + | !8 |
||
| − | !style="text-align:center"|8 |
||
| − | |nowrap|BR<br>[[File:Customized HA plus AAFD icon.png]]{{Radar}} |
+ | |nowrap|BR<br />[[File:Customized HA plus AAFD icon.png]]{{Radar}} |
| +5 |
| +5 |
||
|nowrap|1.4<ref group="†">1.45 in Vita</ref> |
|nowrap|1.4<ref group="†">1.45 in Vita</ref> |
||
| − | |~40% |
||
|50% |
|50% |
||
|Built-in HA mount + Air Radar |
|Built-in HA mount + Air Radar |
||
|- |
|- |
||
| + | !9 |
||
| − | !style="text-align:center"|9 |
||
| − | |nowrap|HA<br>{{GreenGunDP}}[[File:Aafd_c.png]] |
+ | |nowrap|HA<br />{{GreenGunDP}}[[File:Aafd_c.png]] |
| +3 |
| +3 |
||
|1.3 |
|1.3 |
||
| − | |34%~43% |
||
|40% |
|40% |
||
| − | |HA mount + AAFD |
+ | |HA mount + AAFD |
|- |
|- |
||
| + | !10 |
||
| − | !style="text-align:center"|10 |
||
| − | |nowrap|'''HCR'''<br>{{GreenGunDP}}[[File:CDMG.png]]{{Radar}} |
+ | |nowrap|'''HCR'''<br />{{GreenGunDP}}[[File:CDMG.png]]{{Radar}} |
|'''+9''' |
|'''+9''' |
||
|1.65 |
|1.65 |
||
| − | |'''~62%''' |
||
|60% |
|60% |
||
| − | |rowspan="2 |
+ | |rowspan="2"|'''{{ShipLink|Maya/Kai Ni}}''' |
|'''HA + CDMG + Air Radar''' |
|'''HA + CDMG + Air Radar''' |
||
|- |
|- |
||
| + | !11 |
||
| − | !style="text-align:center"|11 |
||
| − | |nowrap|HC<br>{{GreenGunDP}}[[File:CDMG.png]] |
+ | |nowrap|HC<br />{{GreenGunDP}}[[File:CDMG.png]] |
| +7 |
| +7 |
||
|1.5 |
|1.5 |
||
| − | |~56% ? |
||
|55% |
|55% |
||
|HA + CDMG |
|HA + CDMG |
||
|- |
|- |
||
| + | !12 |
||
| − | !style="text-align:center"|12 |
||
| − | |nowrap|CGR<br>[[File:CDMG.png]]{{GreenGunMG}}{{Radar}} |
+ | |nowrap|CGR<br />[[File:CDMG.png]]{{GreenGunMG}}{{Radar}} |
| +4 |
| +4 |
||
|1.25 |
|1.25 |
||
| − | |? |
||
|45% |
|45% |
||
| − | |All |
+ | |'''All''' |
|CDMG + AA Gun + Air Radar |
|CDMG + AA Gun + Air Radar |
||
|- |
|- |
||
| + | !13 |
||
| − | !style="text-align:center"|13 |
||
| − | |colspan=" |
+ | |colspan="6"|''cannot be activated'' |
| + | <ref group="†">Non-MayaK2, Akigun + CDMG + AA Radar, 35%, +4, K-value 1.35</ref> |
||
|- |
|- |
||
| + | !14 |
||
| − | !style="text-align:center"|14 |
||
| − | |nowrap|HGR<br>{{GreenGunDP}}{{GreenGunMG}}{{Radar}} |
+ | |nowrap|HGR<br />{{GreenGunDP}}{{GreenGunMG}}{{Radar}} |
|nowrap| +5<ref>used to be Z+4 before 2016-01-19 update</ref> |
|nowrap| +5<ref>used to be Z+4 before 2016-01-19 update</ref> |
||
|1.45 |
|1.45 |
||
| − | | |
+ | | |
| + | |rowspan="2"|'''{{ShipLink|Isuzu/Kai Ni}}''' |
||
| − | |rowspan="19" style="text-align:center"|N/A |
||
| − | |rowspan="2" style="text-align:center"|Isuzu K2 |
||
|HA + AA Gun + Air Radar |
|HA + AA Gun + Air Radar |
||
|- |
|- |
||
| + | !15 |
||
| − | !style="text-align:center"|15 |
||
| − | |nowrap|HG<br>{{GreenGunDP}}{{GreenGunMG}} |
+ | |nowrap|HG<br />{{GreenGunDP}}{{GreenGunMG}} |
| +4 |
| +4 |
||
|1.3 |
|1.3 |
||
| − | | |
+ | | |
|HA + AA Gun |
|HA + AA Gun |
||
|- |
|- |
||
| + | !16 |
||
| − | !style="text-align:center"|16 |
||
| − | |nowrap|HGR<br>{{GreenGunDP}}{{GreenGunMG}}{{Radar}} |
+ | |nowrap|HGR<br />{{GreenGunDP}}{{GreenGunMG}}{{Radar}} |
| +5 |
| +5 |
||
|1.4 |
|1.4 |
||
| − | | |
+ | | |
| + | |'''{{ShipLink|Kasumi/Kai Ni B}}'''<br />'''{{ShipLink|Yuubari/Kai Ni}} |
||
| − | |rowspan="2" style="text-align:center"|Kasumi K2B |
||
|HA + AA Gun + Air Radar |
|HA + AA Gun + Air Radar |
||
|- |
|- |
||
| + | !17 |
||
| − | !style="text-align:center"|17 |
||
| − | |nowrap|HG<br>{{GreenGunDP}}{{GreenGunMG}} |
+ | |nowrap|HG<br />{{GreenGunDP}}{{GreenGunMG}} |
| +3 |
| +3 |
||
|1.25 |
|1.25 |
||
| − | | |
+ | | |
| + | |'''{{ShipLink|Kasumi/Kai Ni B}}''' |
||
|HA + AA Gun |
|HA + AA Gun |
||
|- |
|- |
||
| + | !18 |
||
| − | !style="text-align:center"|18 |
||
| − | |nowrap|C<br>[[File:CDMG.png]] |
+ | |nowrap|C<br />[[File:CDMG.png]] |
| +3 |
| +3 |
||
|1.2 |
|1.2 |
||
| − | | |
+ | | |
| − | |Satsuki |
+ | |'''{{ShipLink|Satsuki/Kai Ni}}''' |
|CDMG |
|CDMG |
||
|- |
|- |
||
| + | !19 |
||
| − | !style="text-align:center"|19 |
||
| − | |nowrap|HC<br>{{GreenGunDP}}[[File:CDMG.png]] |
+ | |nowrap|HC<br />{{GreenGunDP}}[[File:CDMG.png]] |
| +6 |
| +6 |
||
|1.45 |
|1.45 |
||
| − | | |
+ | | |
| − | |rowspan="2" |
+ | |rowspan="2"|'''{{ShipLink|Kinu/Kai Ni}}''' |
| − | |HA + CDMG<br> |
+ | |HA + CDMG<br />(Cannot be Built-in HA) |
|- |
|- |
||
| + | !20 |
||
| − | !style="text-align:center"|20 |
||
| − | |nowrap|C<br>[[File:CDMG.png]] |
+ | |nowrap|C<br />[[File:CDMG.png]] |
| +4 |
| +4 |
||
|1.25 |
|1.25 |
||
| − | | |
+ | | |
|CDMG |
|CDMG |
||
|- |
|- |
||
| + | !21 |
||
| − | !style="text-align:center"|21 |
||
| − | |nowrap|HR<br>{{GreenGunDP}}{{Radar}} |
+ | |nowrap|HR<br />{{GreenGunDP}}{{Radar}} |
| +6 |
| +6 |
||
|1.45 |
|1.45 |
||
| − | | |
+ | | |
| + | |'''{{ShipLink|Yura/Kai Ni}}''' |
||
| − | |Yura K2 |
||
|HA + Air Radar |
|HA + Air Radar |
||
|- |
|- |
||
| + | !22 |
||
| − | !style="text-align:center"|22 |
||
| − | |nowrap|C<br>[[File:CDMG.png]] |
+ | |nowrap|C<br />[[File:CDMG.png]] |
| +3 |
| +3 |
||
|1.2 |
|1.2 |
||
| − | | |
+ | | |
| − | |Fumizuki |
+ | |'''{{ShipLink|Fumizuki/Kai Ni}}''' |
|CDMG |
|CDMG |
||
|- |
|- |
||
| + | !23 |
||
| − | !style="text-align:center"|23 |
||
| − | |nowrap|G<br>{{GreenGunMG}} |
+ | |nowrap|G<br />{{GreenGunMG}} |
| +2 |
| +2 |
||
|1.05 |
|1.05 |
||
| − | | |
+ | | |
| − | |UIT-25 |
+ | |'''{{ShipLink|UIT-25}} or<br />{{ShipLink|I-504}}''' |
|AA Gun (Cannot be CDMG) |
|AA Gun (Cannot be CDMG) |
||
|- |
|- |
||
| + | !24 |
||
| − | !style="text-align:center"|24 |
||
| − | |nowrap|HG<br>{{GreenGunDP}}{{GreenGunMG}} |
+ | |nowrap|HG<br />{{GreenGunDP}}{{GreenGunMG}} |
| +4 |
| +4 |
||
|1.25 |
|1.25 |
||
| − | | |
+ | | |
| − | |Tatsuta |
+ | |'''{{ShipLink|Tatsuta/Kai Ni}}''' |
|HA + AA Gun (Cannot be CDMG) |
|HA + AA Gun (Cannot be CDMG) |
||
|- |
|- |
||
| + | !25 |
||
| − | !style="text-align:center"|25 |
||
| − | |nowrap|GRS<br>{{GreenGunMG}}{{Radar}}{{GreenAmmo}} |
+ | |nowrap|GRS<br />{{GreenGunMG}}{{Radar}}{{GreenAmmo}} |
| +8 |
| +8 |
||
|1.55 |
|1.55 |
||
| − | | |
+ | | |
| + | |'''{{ShipLink|Ise/Kai Ni|Hyuuga/Kai Ni|text=Ise-class Kai/Kai Ni}}''' |
||
| − | |Ise-class Kai |
||
|Rocket Launcher K2 + Air Radar + Sanshiki |
|Rocket Launcher K2 + Air Radar + Sanshiki |
||
|- |
|- |
||
| + | !26 |
||
| − | !style="text-align:center"|26 |
||
| − | |nowrap|HR<br>{{GreenGunDP}}{{Radar}} |
+ | |nowrap|HR<br />{{GreenGunDP}}{{Radar}} |
| +7 |
| +7 |
||
|1.4 |
|1.4 |
||
| − | | |
+ | | |
| − | |Musashi |
+ | |'''{{ShipLink|Musashi/Kai Ni}}''' |
|10cm Twin HA Mount Kai + Air Radar |
|10cm Twin HA Mount Kai + Air Radar |
||
|- |
|- |
||
| + | !27 |
||
| − | !style="text-align:center"|27 |
||
| + | !colspan="6"|Unknown |
||
| − | |? |
||
| − | |? |
||
| − | |? |
||
| − | |? |
||
| − | |? |
||
| − | |? |
||
|- |
|- |
||
| + | !28 |
||
| − | !style="text-align:center"|28 |
||
| − | |nowrap|GR<br>{{GreenGunMG}}{{Radar}} |
+ | |nowrap|GR<br />{{GreenGunMG}}{{Radar}} |
| +5 |
| +5 |
||
|1.4 |
|1.4 |
||
| − | | |
+ | | |
| − | |Ise-class Kai/Kai Ni |
+ | |'''{{ShipLink|Ise/Kai Ni|Hyuuga/Kai Ni|text=Ise-class Kai/Kai Ni}} &<br />{{ShipLink|Musashi/Kai Ni}}''' |
|Rocket Launcher K2 + Air Radar |
|Rocket Launcher K2 + Air Radar |
||
|- |
|- |
||
| + | !29 |
||
| − | !style="text-align:center"|29 |
||
| − | |nowrap|HR<br>{{GreenGunDP}}{{Radar}} |
+ | |nowrap|HR<br />{{GreenGunDP}}{{Radar}} |
| +6 |
| +6 |
||
|1.55 |
|1.55 |
||
| − | | |
+ | | |
| − | |Hamakaze |
+ | |'''{{ShipLink|Hamakaze/B Kai}} &<br />{{ShipLink|Isokaze/B Kai}}''' |
| − | |HA + Air Radar<br> |
+ | |HA + Air Radar<br />Using Akiguns has a high chance to proc AACI 5/8 instead. |
|- |
|- |
||
| + | !30 |
||
| − | !style="text-align:center"|30 |
||
| − | |nowrap|HHH<br>{{GreenGunDP}}{{GreenGunDP}}{{GreenGunDP}} |
+ | |nowrap|HHH<br />{{GreenGunDP}}{{GreenGunDP}}{{GreenGunDP}} |
| − | | + |
+ | | +4 |
|1.3 |
|1.3 |
||
| − | | |
+ | | |
| + | |rowspan="2"|'''{{ShipLink|Tenryuu/Kai Ni}} &'''<br />'''{{ShipLink|Gotland/Kai}}''' |
||
| − | |Tenryuu Kai Ni |
||
|HA + HA + HA |
|HA + HA + HA |
||
|- |
|- |
||
| + | !31 |
||
| − | !style="text-align:center"|31 |
||
| − | |nowrap|HH<br>{{GreenGunDP}}{{GreenGunDP}} |
+ | |nowrap|HH<br />{{GreenGunDP}}{{GreenGunDP}} |
| − | | + |
+ | | +3 |
|1.2 |
|1.2 |
||
| − | | |
+ | | |
| − | |Tenryuu Kai Ni |
||
|HA + HA |
|HA + HA |
||
|- |
|- |
||
| + | !32 |
||
| − | !style="text-align:center"|32 |
||
| − | |nowrap| |
+ | |nowrap|CM/GG/GC<br />[[File:CDMG.png]]{{RedGunHeavy}}/{{GreenGunMG}}{{GreenGunMG}}/{{GreenGunMG}}[[File:CDMG.png]] |
| − | | + |
+ | | +4 |
|1.2 |
|1.2 |
||
| − | | |
+ | | |
| − | |HMS Royal Navy Ships |
+ | |'''{{ShipLink|Nelson/Kai|Warspite/Kai|Ark Royal/Kai|Jervis/Kai|Janus/Kai|text=HMS Royal Navy Ships}} &<br /> {{ShipLink|Kongou/Kai Ni C|Hiei/Kai Ni|Kirishima/Kai Ni|Haruna/Kai Ni|text=Kongou-class Kai Ni}}''' |
| − | |[[QF 2-pounder Octuple Pom-pom Gun Mount|QF 2-pounder]] + [[20-tube 7inch UP Rocket Launchers|20-tube 7inch UP]] |
+ | |[[QF 2-pounder Octuple Pom-pom Gun Mount|QF 2-pounder]] + [[16inch Mk.I Triple Gun Mount Kai + FCR Type 284|16inch Mk.I Triple + FCR]] <br />'''OR'''<br /> [[20-tube 7inch UP Rocket Launchers|20-tube 7inch UP]] + [[20-tube 7inch UP Rocket Launchers|20-tube 7inch UP]] / [[QF 2-pounder Octuple Pom-pom Gun Mount|QF 2-pounder]] |
| + | |- |
||
| + | !33 |
||
| + | |nowrap|HG<br />{{GreenGunDP}}{{GreenGunMG}} |
||
| + | | +4 |
||
| + | |1.35 |
||
| + | | |
||
| + | |'''{{ShipLink|Gotland/Kai}}''' |
||
| + | |HA + AA Gun |
||
| + | |- |
||
| + | !34 |
||
| + | |nowrap|{{EquipmentCardKai|5inch Single Gun Mount Mk.30 Kai + GFCS Mk.37|size=70px}}{{EquipmentCardKai|5inch Single Gun Mount Mk.30 Kai + GFCS Mk.37|size=70px}} |
||
| + | | +8 |
||
| + | |1.6 |
||
| + | | |
||
| + | |rowspan="4"|'''{{ShipLink|Fletcher/Kai|Johnston/Kai|text=Fletcher-Class}}''' |
||
| + | | |
||
| + | |- |
||
| + | !35 |
||
| + | |nowrap|{{EquipmentCardKai|5inch Single Gun Mount Mk.30 Kai + GFCS Mk.37|size=70px}}{{EquipmentCardKai|5inch Single Gun Mount Mk.30 Kai|size=70px}} |
||
| + | | +7 |
||
| + | |1.55 |
||
| + | | |
||
| + | |rowspan="3"|The {{EquipmentLink|5inch Single Gun Mount Mk.30}} can also be used in place of the Kai variant. |
||
| + | |- |
||
| + | !36 |
||
| + | |nowrap|{{EquipmentCardKai|5inch Single Gun Mount Mk.30 Kai|size=70px}}{{EquipmentCardKai|5inch Single Gun Mount Mk.30 Kai|size=70px}}{{EquipmentCardKai|GFCS Mk.37|size=70px}} |
||
| + | | +7 |
||
| + | |1.55 |
||
| + | | |
||
| + | |- |
||
| + | !37 |
||
| + | |nowrap|{{EquipmentCardKai|5inch Single Gun Mount Mk.30 Kai|size=70px}}{{EquipmentCardKai|5inch Single Gun Mount Mk.30 Kai|size=70px}} |
||
| + | | +5 |
||
| + | |1.45 |
||
| + | | |
||
| + | |- |
||
| + | !38 |
||
| + | !colspan="6"|Unknown |
||
| + | |- |
||
| + | !39 |
||
| + | |nowrap|{{EquipmentCardKai|GFCS Mk.37 + 5inch Twin Dual-purpose Gun Mount (Concentrated Deployment)|size=70px}}{{EquipmentCardKai|5inch Twin Dual-purpose Gun Mount (Concentrated Deployment)|size=70px}} |
||
| + | | '''+11''' |
||
| + | |1.7 |
||
| + | | |
||
| + | |rowspan="4"|'''{{ShipLink|Atlanta/Kai|text=Atlanta-class}}''' |
||
| + | | |
||
| + | |- |
||
| + | !40 |
||
| + | |nowrap|{{EquipmentCardKai|5inch Twin Dual-purpose Gun Mount (Concentrated Deployment)|size=70px}}{{EquipmentCardKai|5inch Twin Dual-purpose Gun Mount (Concentrated Deployment)|size=70px}}{{EquipmentCardKai|GFCS Mk.37|size=70px}} |
||
| + | | '''+11''' |
||
| + | |1.7 |
||
| + | | |
||
| + | |The {{EquipmentLink|GFCS Mk.37 + 5inch Twin Dual-purpose Gun Mount (Concentrated Deployment)|text=GFCS+5inch(CD)}} variant of the gun can also be used. |
||
| + | |- |
||
| + | !41 |
||
| + | |nowrap|{{EquipmentCardKai|5inch Twin Dual-purpose Gun Mount (Concentrated Deployment)|size=70px}}{{EquipmentCardKai|5inch Twin Dual-purpose Gun Mount (Concentrated Deployment)|size=70px}} |
||
| + | | '''+10''' |
||
| + | |1.65 |
||
| + | | |
||
| + | ||The {{EquipmentLink|GFCS Mk.37 + 5inch Twin Dual-purpose Gun Mount (Concentrated Deployment)|text=GFCS+5inch(CD)}} variant of the gun can also be used. |
||
|} |
|} |
||
| − | * [[File:CDMG.png]] and [[File:Customized HA plus AAFD icon.png]] are provisional |
+ | * [[File:CDMG.png]] and [[File:Customized HA plus AAFD icon.png]] are provisional icons to display CDMG and Built-in HA Mount-type guns. |
| − | * '''Built-in HA mount''' |
+ | ** '''Built-in HA mount''' is defined as a single {{GreenGunDP}} High-Angle gun that has 8{{AA}} stat or higher. |
| + | **CDMG is defined as any Anti-Air gun that has 9{{AA}} stat or higher. |
||
| − | ** [[10cm Twin High-angle Gun Mount + Anti-Aircraft Fire Director]] ("Akiguns") |
||
| + | *'''API 1/2''' are the only AACIs that can be activated with any Radar regardless of AA Stat. All other AACIs require that a radar with at least 2 {{AA}} or higher be equipped. |
||
| − | ** [[12.7cm High-angle Gun + Anti-Aircraft Fire Director]] |
||
| + | *The probability of AACI occurring is '''fixed''' (Approx 40-65% depending on API) and is not affected by any in-game stat. |
||
| − | ** [[90mm Single High-angle Gun Mount]] |
||
| + | *'''If a ship fulfills multiple requirements, the API with the highest priority will be checked first''' |
||
| − | ** [[5inch Twin Gun Mount Mk.28 mod.2]] |
||
| + | **A single roll is done to check for all AACIs in descending priority. This means that an AACI with lower priority but higher trigger chance can occur. |
||
| − | ** [[10cm Twin High-angle Gun Mount Kai + Additional Machine Guns]] |
||
| + | **For instance Akizuki with 2 akiguns and a T13K air radar fulfills the requirements of AACI with API values 1, 2, 3, 5, 8 - the only API that will ever trigger is 1. This is because API 1 has both the highest trigger probability and priority. In the event that the Akizuki fails the roll for API 1, no other AACI can succeed as their trigger probabilities are below that of API 1. |
||
| − | *CDMG refer to any of the following equipment: |
||
| + | **Fletcher-class and Atlanta AACIs (API 34-37 & API 39-41) have the unique exception of independently rolling for each AACI they currently fulfil the conditions of. If all these rolls fail, they will roll an additional time for API 5. This effectively drastically increases their AACI chance when fulfilling multiple conditions. |
||
| − | **[[25mm Triple Autocannon Mount (Concentrated Deployment)]] |
||
| + | **AACI priority is currently being determined, but some notable situations are highlighted below. |
||
| − | ** [[Bofors 40mm Quadruple Autocannon Mount]] |
||
| − | ** [[QF 2-pounder Octuple Pom-pom Gun Mount]] |
||
| − | *Except AACI Type 1/2, so far, only Air Radars have been found to satisfy the requirement for a radar in all other types AACI. It is not clear if Surface Radars can potentially trigger an AACI if they have an AA stat, though at present there are no such radars in existence. |
||
| − | *'''If a ship fulfils multiple requirements, the API which shoots down the most planes per slot will be activated''' |
||
| − | **For instance Akizuki with 2 akiguns and a T13K air radar fulfills the requirements of AACI with API values 1, 2, 3, 5, 8 - the only API that will ever trigger is 1. |
||
| − | **It is impossible for an Akizuki-class to ever trigger API 5 or 8 as any equipment setup that will trigger these will also trigger 1 and 2 respectively, which will override it. |
||
| − | **'''Exceptions exists:''' |
||
***For instance, AACI with the API values of 7 and 8 can both be triggered by the same ship if she has fulfilled both requirements.<ref>https://gyazo.com/2472468c10c0dacd28a493a79ff140da</ref> |
***For instance, AACI with the API values of 7 and 8 can both be triggered by the same ship if she has fulfilled both requirements.<ref>https://gyazo.com/2472468c10c0dacd28a493a79ff140da</ref> |
||
***Another instance of that happening is with API values 19 and 20. [[Kinu Kai Ni]] can trigger API 20 as well if she fulfills the requirements for API 19. |
***Another instance of that happening is with API values 19 and 20. [[Kinu Kai Ni]] can trigger API 20 as well if she fulfills the requirements for API 19. |
||
| − | ***The same thing happens with API 8 and 20. |
+ | ***The same thing happens with API 8 and 20, 5 and 29. |
*'''If multiple ships fulfill AACI requirements, the one with the highest API number will be triggered first''' |
*'''If multiple ships fulfill AACI requirements, the one with the highest API number will be triggered first''' |
||
| + | **Due to higher API numbers having priority rather than AACI strength, a weaker AACI may be triggered first if present in the fleet. Take note when equipping your fleet. |
||
| − | **While Akiguns are the most powerful guns Destroyers may equip, non-Akizuki-class Destroyers equipped with an API 5 build will override an Akizuki-class Destroyer's API 1 AACI; to avoid this, non-Akizuki-class Destroyers sortied in the same fleet as Akizuki class Destroyer(s) should not equip Air Radars. |
||
| − | **AACI Type 18 is apparently an exception |
||
| − | *While API 14 formerly shot down 3 planes per slot, it was buffed on 19/01/2016 and API 15 was added. The number of planes shot down per slot for API 14 and 15 is unknown at present and currently under investigation. |
||
==Stage 3== |
==Stage 3== |
||
| Line 839: | Line 975: | ||
Activation chance can be estimated by: |
Activation chance can be estimated by: |
||
| + | <math>\text{AAPB}% = \frac{AdjustedAA + 0.9 \cdot Luck}{281} + (N - 1) \cdot 15 + C_b </math><ref>See Noratako's posts: https://kancolle.fandom.com/ja/wiki/%E3%82%B9%E3%83%AC%E3%83%83%E3%83%89:2471#5. See also his newer research https://twitter.com/noratako5/status/1062027534026428416. Further verification still needed.</ref> |
||
| − | <math>\text{AAPB}% = \frac{AdjustedAA + Luck}{400 - ( R + N_b + C_b )} </math> |
||
| + | *<math>N</math> is number of 12cm 30-tube Rocket Launcher Kai Ni equipped.<ref>Minegumo Teitoku (@hata_mine) reports that three 12cm 30-tube Rocket Launcher Kai Ni may increase the activation chance by 30%: https://twitter.com/hata_mine/status/1044262169087369217. The details of the testing are, however, not provided.</ref> |
||
| + | *<math>C_b</math> is the class bonus, 25 for Ise-class BBVs. |
||
| + | |||
| + | <!-- Obsoleted formula, based on an early speculation |
||
| + | <math>\text{AAPB}% = \frac{AdjustedAA + 0.9 \cdot Luck}{400 - ( R + N_b + C_b )} </math> |
||
*<math>R</math> is the barrage constant. For the Rocket Launcher Kai Ni, it is 48. |
*<math>R</math> is the barrage constant. For the Rocket Launcher Kai Ni, it is 48. |
||
*<math>N_b</math> is the bonus for having more related equipment. |
*<math>N_b</math> is the bonus for having more related equipment. |
||
| Line 845: | Line 986: | ||
*<math>C_b</math> is the class bonus, 70 for Ise-class BBVs. |
*<math>C_b</math> is the class bonus, 70 for Ise-class BBVs. |
||
*For calculation of adjusted AA, see [[Combat#/Aerial#System_Mechanics|Fleet Anti-Air]]. |
*For calculation of adjusted AA, see [[Combat#/Aerial#System_Mechanics|Fleet Anti-Air]]. |
||
| + | --> |
||
'''Notes:''' |
'''Notes:''' |
||
| − | *There seems to be diminishing returns on luck. The exact relationship is still unclear. |
+ | *There seems to be diminishing returns on luck. The exact relationship is still unclear.<ref>For instance, Muu suggests the existence of Luck cap. See https://kancolle.fandom.com/ja/wiki/%E3%82%B9%E3%83%AC%E3%83%83%E3%83%89:2471#6. </ref> |
*It's possible to achieve 100% activation rate. |
*It's possible to achieve 100% activation rate. |
||
*The formula above is only for 12cm 30-tube Rocket Launcher Kai Ni, there are two other barrages: Type 3 Shell and Type 3 Shell + Rocket Launcher Kai Ni. Effects and trigger chance currently unknown. |
*The formula above is only for 12cm 30-tube Rocket Launcher Kai Ni, there are two other barrages: Type 3 Shell and Type 3 Shell + Rocket Launcher Kai Ni. Effects and trigger chance currently unknown. |
||
Revision as of 12:41, 15 January 2020
Template:Under Construction
Aerial Combat refers to one of the stages conducted during combat in the game, conducted after detection and before Support Expedition, Opening Torpedo Salvo (if condition for them to happen are fulfilled), and display of the engagement form.
In Aerial Battle nodes, after finishing Aerial Combat rundown for the first time, the engagement form will be displayed a second process of Aerial Combat will occur, with the potential exception of the contact phase.
In Night Battle nodes, Aerial Combat usually does not occur. In some rare cases when Night Battle nodes can conditionally be turned into Day Battle, the Aerial Combat phase will start immediately without a detection phase.
If Jet plane(s) is(/are) carried by carrier(s), then an additional jet assault would occur before the regular opening air strike phase.
For the mechanism applied on aircrafts in support expedition, land-based aerial support, shelling phase and anti-submarine operations, please refer to respective pages for further information.
Note that, unless otherwise specified, all the numerical values on this page are only applicable to the player's side.
Aerial Combat Stages
| Stage | Notes | |
|---|---|---|
| Stage 1 | Fighter Combat | Battle for air supremacy. Determines if Artillery Spotting and/or Contact are possible. Both fighters and bombers are shot down in this phase. |
| Contact | Successful Contact would increase Opening Air Strike damage. | |
| Stage 2 | Fleet Anti-air Defense | Fleet defends against enemy bombers, shooting down a number of enemy bombers |
| Anti-air Cut-in | An anti-aircraft fire director-guided attack may cause damage to all enemy bombers | |
| Stage 3 | Bombing | Each bomber squad attacks one random target. See Damage Calculation for details |
Stage 1
Fighter Combat

Where:
- is the total Fighter Power of the fleet.
- is the current plane count (slot size) of that slot.
- is the plane's displayed AA stat.
- is the plane's improvement bonus to the AA stat.
- for fighters, for (fighter-)bombers
- is the plane's Aircraft Proficiency bonus.


Notes:

 Fighter planes and
 Jet/Torpedo / Dive / Seaplane bombers participate in the Fighter Combat.
- Depending on the air state achieved, all the above planes will be subjected to plane loss, regardless if they had or didn't have an AA stat.
- Recon planes (carrier based or seaplane recon) will NOT participate in Fighter Combat.
- Recon planes are unaffected by the results of Air State and suffer no plane loss from this stage.
- Aircraft Proficiency is factored into Fighter Power on top of the above formula. The exact formula is under investigation.
- The allied fleet and enemy fleet's Fighter Powers are compared to determine the result of Fighter Combat:
| Fighter Power | Result | Text Display | % Enemy Planes Shot Down (Approx.) | % Allied Planes Shot Down (Approx.) | Contact | Combat Screens |
|---|---|---|---|---|---|---|
| FP ≥ 3*EFP | Air Supremacy (AS+) |
制空権確保! Seikuuken Kakuho! |
0~100% | 2.5~5.83% | Allied only | 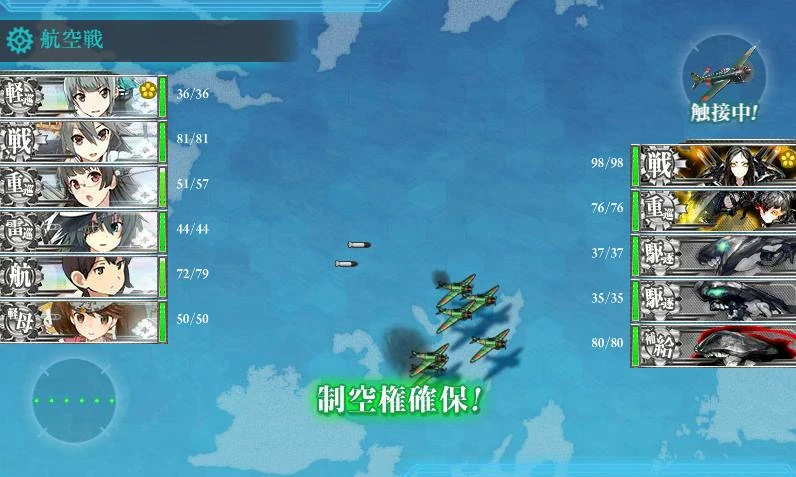
|
| 3*EFP > FP ≥ 1.5*EFP | Air Superiority (AS) |
航空優勢! Koukuu Yuusei! |
0~70% | 7.5~17.5% | Both sides | 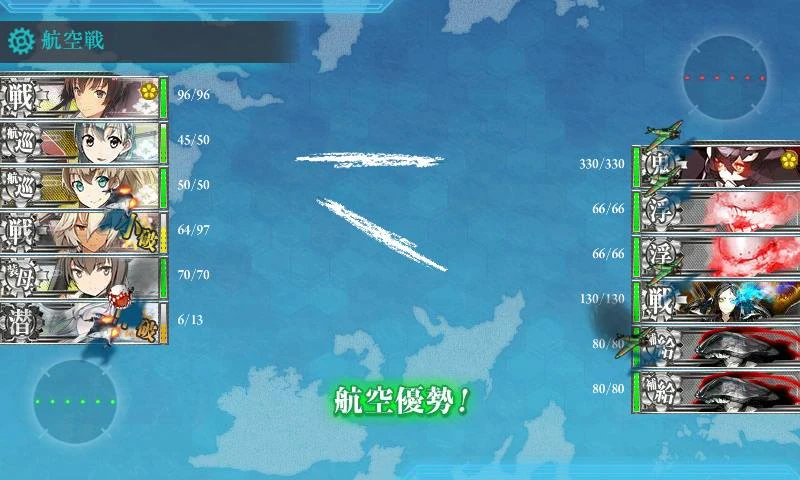
|
| 1.5*EFP > FP > 2/3*EFP | Air Parity | No text displayed | 0~50% | 12.5~29.1% | Neither side | 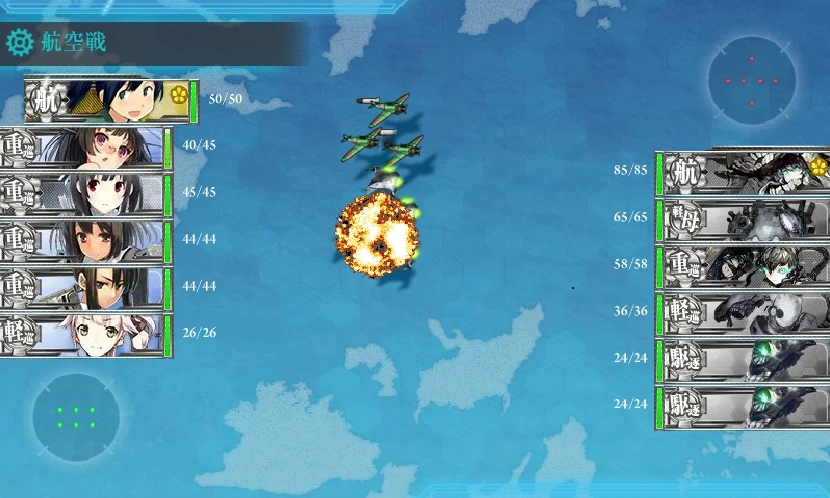
|
| 2/3*EFP ≥ FP > 1/3*EFP | Air Denial | No text displayed | 0~30% | 17.5~40.8% | Both sides |
|
| FP ≤ 1/3*EFP |
Air Incapability |
制空権喪失! Seikuuken Soushitsu! |
0~10% | 25~58.3% | Enemy only | 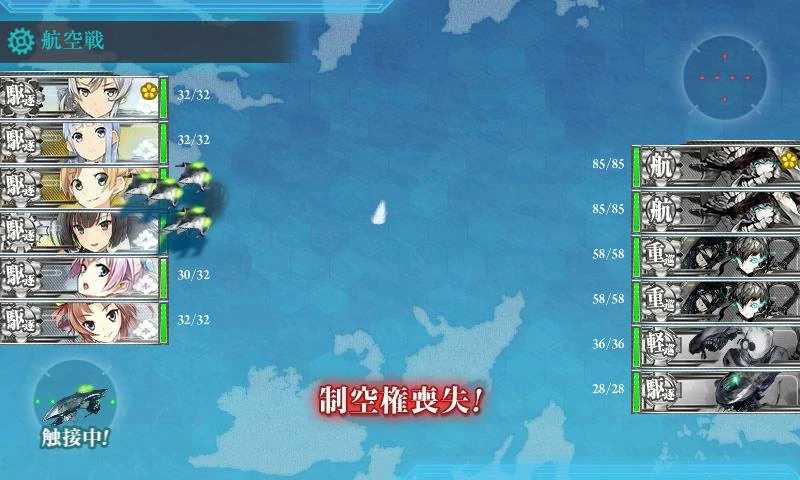
|
Note: For the users who are aware of the terminology switch between AD and AI, this was caused by a mistranslation. The correct order is AD > AI.
- EFP: Enemy Fighter Power, FP: Fighter Power. Abbreviated to save space.
- If both sides launch no planes, then the air state is considered Air Parity.
- If any planes were launched during the aerial phase, but the fighter power of both sides are zero (Eg. Enemy only launched bombers with 0 AA Stat), the allied fleet will be awarded Air Supremacy. (Due to meeting the AS+ requirement of 0*3=0)
- Carriers will participate in Aerial Phase regardless of their damage state, provided they have planes.
- Night Contact can be triggered under the same air states as normal Day Contact, with the exception of PvP Battles, or when the battle starts at Night.
The formula for allied plane loss (On a per-slot basis) is as follows:
![{\displaystyle {\text{Plane Loss}}={\big \lfloor }S*0.1*({\text{random}}\in \left[0,\left(A/3*100\right)\right]/100+\left(A/4\right)){\big \rfloor }}](https://services.fandom.com/mathoid-facade/v1/media/math/render/svg/3a823804ed2f43b1b0d6362fd8ee066c72d8a38d)
Where:
- is the plane's slot size.
- is the Air State modifier, where:
- Random function takes an random integer within and in a linear distribution.


The formula for enemy plane loss (On a per-slot basis) is as follows:
![{\displaystyle {\text{Plane Loss}}={\big \lfloor }S*\left(0.035*{\text{random}}\in \left[0,A\right]+0.065*{\text{random}}\in \left[0,A\right]\right){\big \rfloor }}](https://services.fandom.com/mathoid-facade/v1/media/math/render/svg/e4e446b0a86d9865f114337cfbb2454775e4c060)
Where:
- is the enemy plane's slot size.
- is the Player's Air State modifier, where:
- Random function takes an random integer within and in a linear distribution.

Contact
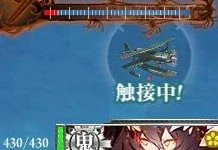
Contact takes place during the Aerial Combat phase. It increases bombing damage for all allied bombers. When successful, an image of the squadron performing contact is shown in the opposing fleet's formation indicator, with the text "触接中".
- Trigger conditions:
- Air Denial, Air Superiority, or Air Supremacy (i.e. not Air Incapability or Air Parity)
- At least one carrier scout plane, seaplane scout, or torpedo bomber equipped.
- Seaplane bombers, Type 3 Spotter, and Ka-type Autogyros cannot perform contact.
- Trigger rate depends on the number, slot size, and types of planes equipped, detailed below.
Contact Trigger Chance
The process that determines whether or not Contact triggers consists of two parts.[1]
Phase 1: Contact Trigger
In this stage, the system merely determines whether Contact triggers at all.
Which plane triggers it has not been determined yet.
Each plane has its own "trigger rate", which according to current research is based on the plane's LoS and the size of the slot it's in. The trigger rates of all planes in your fleet are then added together to determine the chance of successful Contact. A provisional approximation formula is given by:

Where:
- is the overall chance of successful Contact
- is the current plane count (slot size) of that slot
- is the plane's displayed LoS stat
- is the plane type modifier.
- For Carrier-based Reconnaissance and Reconnaissance Seaplanes,
- For Torpedo Bombers, the value would be much smaller.
- is the Air Control Status.
- For Air Supremacy (AS+),
- For Air Superiority (AS),


If Contact is determined to be successful, the system proceeds to Stage 2. If Contact fails, nothing else happens.
Phase 2: Contact Plane Selection
Now that Phase 1 has been successful the system has to determine which plane is going to trigger Contact. The priority among planes is as follows:
- Higher Accuracy stats mean higher priority
- If two or more planes have the same amount of Accuracy, the selection process goes through them from top to bottom, start from the first ship first slot then first ship second slot and end with the sixth ship last slot.
The system goes through each plane from top to bottom priority until either one is selected or none is. Current data suggests that a plane's selection rate is determined by its LoS stat and that improvements seems to increase the chances as well[2]. Another provisional approximation formula is given by:

Where:
- is the selection rate of a given plane
- is the plane's displayed LoS value
- is the Air Control Status.
- For Air Supremacy (AS+),
- For Air Superiority (AS),
- For Air Denial (AD),


If no plane is selected in the end, then Contact is cancelled and doesn't trigger.
Contact Damage Modifier
- The damage increase depends on the +accuracy bonus of the squadron performing contact.
| Accuracy Bonus |
Damage Modifier |
Example Planes |
|---|---|---|
| +0 | 112% | Ryuusei Kai |
| +1 | 112% | Type 0 Reconnaissance Seaplane, Ryuusei (601 Air Group), Type 2 Large Flying Boat |
| +2 | 117% | Type 0 Observation Seaplane, Saiun, PBY-5A Catalina, Prototype Keiun |
| +3 or more | 120% | Type 2 Reconnaissance Aircraft, Tenzan Model 12 (Tomonaga Squadron), Type 97 Torpedo Bomber (Tomonaga Squadron) |
Notes
- Type 2 Recon Aircraft is useful in the case that the bombing damage bonus is desired while not removing the chance for T-disadvantage, due to its high trigger rate.
- With contact, the maximum attack power of bombing (before defense, critical and ammo) is around 180. With some luck, it's possible to sink even Ru-class Flagships (Armor = 99) in one strike without a critical.
- Contact only triggers during AD, AS or AS+. This means that it does not work during AI or AP.
Stage 2
Fleet Anti-air Defense
The Fleet Anti-air Defense system was updated on 14 November 2014, alongside the addition of the Anti-air Cut-in system. It was then patched on 26 June 2015 to fix several bugs.
System Mechanics
- Each enemy bomber slot is assigned at random to a defending ship.
- Those ships then, for each assigned enemy slot, have two approximately 50% concurrent but independent chances to shoot down enemy planes.
- The first chance (termed Proportional Air Defense) can shoot down a number proportional to the initial size of the enemy bomber squadron after anti-bomber combat.
- The second chance (termed Fixed Air Defense) can shoot down a fixed number of enemy bombers determined by stats and equipment only.
- Simply speaking, There's a 25% chance you can trigger both Proportional and Fixed Air Defense, 25% only trigger Proportional, 25% only Fixed, and 25% none of them being triggered, for every slot.
- Finally, one bomber from each enemy squadron will always be shot down regardless of success or failure of the previous two chances for friendly ships on abyssal. If AACI was committed, then it would also shoot down a specific amount of planes per slot according to the AACI's API type.
The numbers of planes shot down are given by the equations below:


Where:
- is the number of planes shot down by Proportional Air Defense
- is the number of planes shot down by Fixed Air Defense
-
- is the adjusted AA value of the ship, following the formula above.
- is the basic AA value of the ship; that is, its numeric AA value without factoring equipment.
- is the equipment type modifier (see: Equipment Modifiers).
- is the equipment's displayed AA stat.
- is the equipment's improvement modifier to adjusted AA.
- High-Angle Mounts: 3
- Air Radars: 0
- Anti-Air Guns: 4
- is the current plane count (slot size) of the targeted slot.
-
- is the adjusted AA value of the fleet, following the formula above. This is only added to the adjusted AA value for Fixed Air Defense, as a bonus.
- is the formation modifier. (see: Formation Modifiers)
- is the equipment type multiplier for fleet AA (see: Equipment Modifiers), not to be confused with the regular equipment type modifier.
- is the equipment's improvement modifier to fleet AA.
- High-Angle Mounts: 3
- Air Radars: 1.5
- Anti-Air Guns: 0
-
- If the ship is not equipped with anything,
- If the ship is equipped with something,
- is the floor function; that is, the rounding down of input
- is the Anti Air Cut-In multiplier to Fixed Air Defense, default 1 if no AACI is triggered. This is a modifier independent of the flat shootdown caused by AACI, and depends on the API identity of the triggered AACI. When AACI is triggered, this multiplier is applied individually for each ship in the fleet, not only the ship performing AACI. See the Anti Air Cut In table in the respective section for a list of K-values corresponding to different AACI API numbers.
- is the Combined Fleet modifier. Defaults to 1 if the fleet is not combined.
- Main Fleet: 0.72
- Escort Fleet: 0.48


To see this formula in use, click below.
| Anti-Air Defense Formula Example |
|---|
|
Example on how to use the Fleet Anti-air Defense formula to calculate the number of planes shot down by Fixed and Proportional Air Defense. This example is for a fleet consisting of Maya Kai Ni, with 90mm Single High-angle Gun Mount +4 / 90mm Single High-angle Gun Mount +4 / Bofors 40mm Quadruple Autocannon Mount / Type 21 Air Radar Kai. To begin, we start by calculating the adjusted AA value for Maya.
Afterwards, we can pass this value into the step function , which rounds down the adjusted AA value in steps of 2 when a ship has equips.
Then, we calculate the adjusted AA value for the fleet, which in this example only includes Maya Kai Ni herself.
Using these two values, we can calculate the number of planes shot down by Proportional Air Defense:
And the number of planes shot down by Fixed Air Defense, assuming AACI activates, with a multiplier K = 1.65
From these two numbers, we can conclude that Maya Kai Ni with the previously mentioned setup will shoot down 64% of an enemy plane slot with Proportional Air Defense, and/or 47 planes from Fixed Air Defense. We can add this number to the AACI shootdown and the single plane always shot down, to get a final value of 56 planes shot down, if both AACI and Fixed Air Defense triggers. |


Abyssal Anti Air Formula


Where:
- is the Ship AA Resistance of the plane the ship is defending against. (See Plane AA Resist Modifiers)
- is the Fleet AA Resistance of the plane the ship is defending against.


Formation Modifiers
| Formation | Modifier |
|---|---|
| Line Ahead, Line Abreast, Echelon | 1.0 |
| Double Line | 1.2 |
| Diamond | 1.6 |
| Combined Fleet | |
| Cruising Formation 1 | 1.1 |
| Cruising Formation 2 | 1.0 |
| Cruising Formation 3 | 1.5 |
| Cruising Formation 4 | 1.0 |
Equipment Modifiers
| Equipment Type | Ship AA Modifier | Fleet AA Modifier |
|---|---|---|
| High-angle Mounts, Anti-aircraft Fire Directors | 4 | 0.35 |
| Machine Guns & Rocket Launchers | 6 | 0.2 |
| AA Radars | 3 | 0.4 |
| Main Gun, Seaplanes | 0 | 0.2 |
| Type 3 Shell | 0 | 0.6 |
| Other Abyssal AA Equipment, including CIC, High-angle Single-Mount | 0 | 0.2 |
- There may be other types of equipment with modifiers that affect the air defense equations which are not yet known.
Plane AA Resist Modifiers
| Plane Type | Ship AA Modifier | Fleet AA Modifier |
|---|---|---|
Type 97 Torpedo Bomber (Murata Squadron)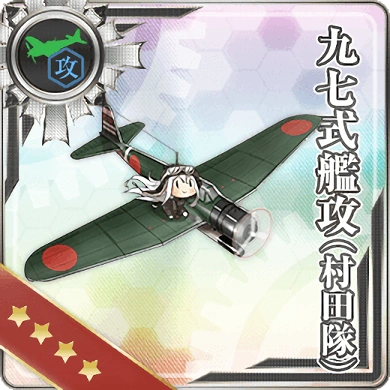
|
0.6 | 1 |
Tenzan Model 12 (Murata Squadron)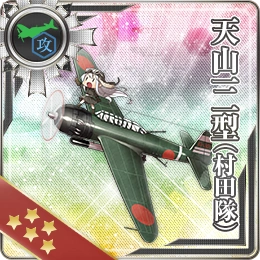
|
0.6 | 1 |
Type 97 Torpedo Bomber (Tomonaga Squadron)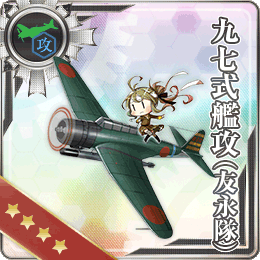
|
0.6 | 1 |
Tenzan Model 12 (Tomonaga Squadron)
|
0.6 | 1 |
| Plane Type | Ship AA Modifier | Fleet AA Modifier |
Type 99 Dive Bomber (Egusa Squadron)
|
0.6 | 1 |
Suisei (Egusa Squadron)
|
0.6 | 0.7 |
Zero Fighter Model 62 (Fighter-bomber / Iwai Squadron)
|
0.6 | 0.7 |
| Plane Type | Ship AA Modifier | Fleet AA Modifier |
Zuiun (634 Air Group)
|
0.6 | 1 |
Zuiun Model 12
|
0.6 | 1 |
Zuiun Model 12 (634 Air Group)
|
0.6 | 0.7 |
Zuiun (634 Air Group/Skilled)
|
0.6 | 0.7 |
Zuiun Kai Ni (634 Air Group)
|
0.5 | 0.7 |
Zuiun Kai Ni (634 Air Group/Skilled)
|
0.5 | 0.5 |
| Plane Type | Ship AA Modifier | Fleet AA Modifier |
Jet Keiun Kai
|
0.5 | 0.7 |
Kikka Kai
|
0.5 | 0.5 |
| Plane Type | Ship AA Modifier | Fleet AA Modifier |
Type 1 Land-based Attack Aircraft (Nonaka Squadron)
|
0.6 | 1 |
Notes
- The ship selected to defend is not necessarily the target of the bomber. Any allied ship, including submarines, may be chosen to defend against bombers.
- The forward sliding and machine gun animations seem to have no correlation with the calculations.
- As per formula above, abyssal fleets use a different anti-air formula (and is believed to be weaker than player's anti-air in most of the cases).
Anti-Air Cut-In
- This section mainly describe the effect of Anti-Air Cut-In. For perspective on how to setup Anti-Air Cut-In, Please read the Anti-Air Cut-In tab in Combat#Combat_Equipment_Setup section of the page.
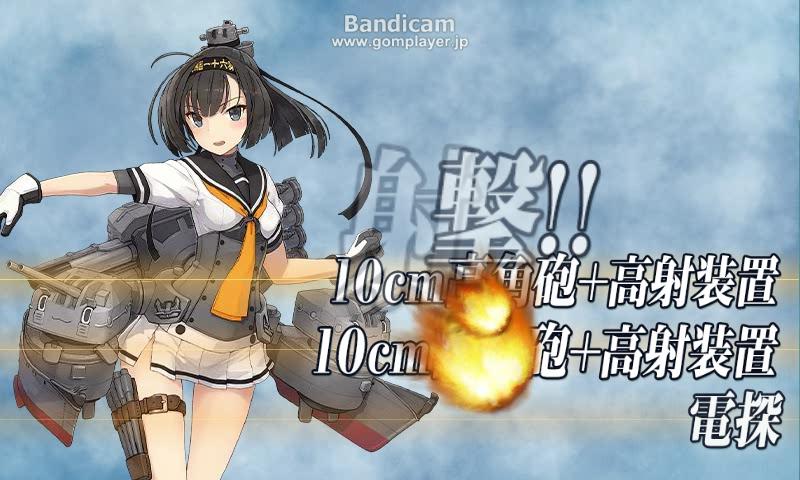
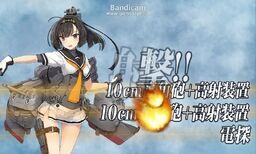
An Anti-Air Cut-In
Certain equipment combinations (see below) will provide a chance for an Anti-Air Cut-In (AACI) during the Aerial Combat Phase. When activated, the cut-in animation (shown on the right) appears before engaging the enemy fighters. However, the effect of an Anti-Air Cut-In does not affect the resulting air control state (AS+, AS, Air Parity or Denial), and calculation-wise, it only takes effect after fighters engage bombers in air combat. With an AA Cut-In and a good anti-air composition, it is sometimes possible to obliterate all incoming bombers before they inflict any damage, and even prevent enemy carriers from attacking during the shelling phase (due to having 0 bombers left).
Although several ships can be equipped with an AACI setup in one fleet, only one ship can perform an AACI during the aerial phase. The number of planes shot down is dependent on the ship performing the AACI and their equipment. Bringing more AACI capable ships will NOT increase the number of planes shot down via AACI.
Akizuki-class destroyers and Maya Kai-2 have a hidden bonus to certain AA Cut-in setups which increases the effectiveness tremendously.
In PVP Exercises, opposing fleets can do AACI, but the animation is not shown.
As of the 17th November 2017 update and Fall 2017 event, Abyssals are now able to AACI as long as they follow the proper equipment setup, but the animation is not shown. Known instances are Air Defense Princess and Artillery Imp III.
Trigger chance of AACI is solely determined by the API type. Fleet AA does not affect trigger chances[4]. Luck does not affect AACI trigger rate[5].
Be noted that AACI effects are added on to the regular anti-air fire of your fleet, thus anti-air stat of other ships or/and equipment on those ships in your fleet would still matter even if an AACI has been activated.
Equipment, API
The following table summarizes current known information about the various AACI types.[6][7][8][9]
| API value | Type | Shot down per slot | K value | Proc Rate | User | Note |
|---|---|---|---|---|---|---|
| None | - | +1 | 1.0 | N/A | Player's fleet only | Triggers if no other AACI is activated |
| 1 | HHR |
+8 | 1.7[† 1] | 65% | Akizuki-Class |
HA mount x2 + Radar |
| 2 | HR |
+7 | 1.7 | 58% | HA mount + Radar | |
| 3 | HH |
+5 | 1.6 | 50% | HA mount x2 | |
| 4 | MSAR |
+7 | 1.5 | 52% | Battleships | Large Main Gun + Sanshiki + AAFD + Air Radar |
| 5 | BBR |
+5 | 1.5[† 2] | 55% | All | Built-in HA mount x2 + Air Radar |
| 6 | MSA |
+5 | 1.45[† 3] | 40% | Battleships | Large Main Gun + Sanshiki + AAFD |
| 7 | HAR |
+4 | 1.35 | 45% | All | HA mount + AAFD + Air Radar |
| 8 | BR |
+5 | 1.4[† 4] | 50% | Built-in HA mount + Air Radar | |
| 9 | HA |
+3 | 1.3 | 40% | HA mount + AAFD | |
| 10 | HCR |
+9 | 1.65 | 60% | Maya Kai Ni | HA + CDMG + Air Radar |
| 11 | HC |
+7 | 1.5 | 55% | HA + CDMG | |
| 12 | CGR |
+4 | 1.25 | 45% | All | CDMG + AA Gun + Air Radar |
| 13 | cannot be activated | |||||
| 14 | HGR |
+5[10] | 1.45 | Isuzu Kai Ni | HA + AA Gun + Air Radar | |
| 15 | HG |
+4 | 1.3 | HA + AA Gun | ||
| 16 | HGR |
+5 | 1.4 | Kasumi Kai Ni B Yuubari Kai Ni |
HA + AA Gun + Air Radar | |
| 17 | HG |
+3 | 1.25 | Kasumi Kai Ni B | HA + AA Gun | |
| 18 | C |
+3 | 1.2 | Satsuki Kai Ni | CDMG | |
| 19 | HC |
+6 | 1.45 | Kinu Kai Ni | HA + CDMG (Cannot be Built-in HA) | |
| 20 | C |
+4 | 1.25 | CDMG | ||
| 21 | HR |
+6 | 1.45 | Yura Kai Ni | HA + Air Radar | |
| 22 | C |
+3 | 1.2 | Fumizuki Kai Ni | CDMG | |
| 23 | G |
+2 | 1.05 | UIT-25 or I-504 |
AA Gun (Cannot be CDMG) | |
| 24 | HG |
+4 | 1.25 | Tatsuta Kai Ni | HA + AA Gun (Cannot be CDMG) | |
| 25 | GRS |
+8 | 1.55 | Ise-class Kai/Kai Ni |
Rocket Launcher K2 + Air Radar + Sanshiki | |
| 26 | HR |
+7 | 1.4 | Musashi Kai Ni | 10cm Twin HA Mount Kai + Air Radar | |
| 27 | Unknown | |||||
| 28 | GR |
+5 | 1.4 | Ise-class Kai/Kai Ni & Musashi Kai Ni |
Rocket Launcher K2 + Air Radar | |
| 29 | HR |
+6 | 1.55 | Hamakaze B Kai & Isokaze B Kai |
HA + Air Radar Using Akiguns has a high chance to proc AACI 5/8 instead. | |
| 30 | HHH |
+4 | 1.3 | Tenryuu Kai Ni & Gotland Kai |
HA + HA + HA | |
| 31 | HH |
+3 | 1.2 | HA + HA | ||
| 32 | CM/GG/GC |
+4 | 1.2 | HMS Royal Navy Ships & Kongou-class Kai Ni |
QF 2-pounder + 16inch Mk.I Triple + FCR OR 20-tube 7inch UP + 20-tube 7inch UP / QF 2-pounder | |
| 33 | HG |
+4 | 1.35 | Gotland Kai | HA + AA Gun | |
| 34 | 
|
+8 | 1.6 | Fletcher-Class |
||
| 35 | 
|
+7 | 1.55 | The 5inch Single Gun Mount Mk.30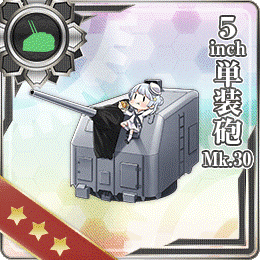 can also be used in place of the Kai variant. can also be used in place of the Kai variant.
| ||
| 36 | 
|
+7 | 1.55 | |||
| 37 |
|
+5 | 1.45 | |||
| 38 | Unknown | |||||
| 39 |  
|
+11 | 1.7 | Atlanta-class | ||
| 40 |
|
+11 | 1.7 | The GFCS+5inch(CD)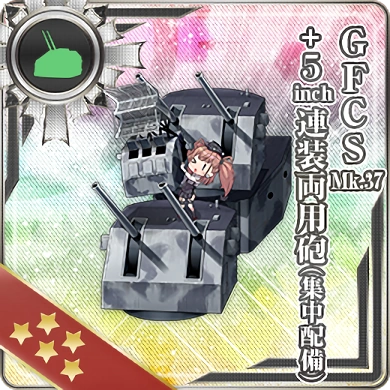 variant of the gun can also be used. variant of the gun can also be used.
| ||
| 41 |
|
+10 | 1.65 | The GFCS+5inch(CD) variant of the gun can also be used.
| ||


- and are provisional icons to display CDMG and Built-in HA Mount-type guns.
- Built-in HA mount is defined as a single High-Angle gun that has 8 stat or higher.
- CDMG is defined as any Anti-Air gun that has 9 stat or higher.
- Built-in HA mount is defined as a single
- API 1/2 are the only AACIs that can be activated with any Radar regardless of AA Stat. All other AACIs require that a radar with at least 2 or higher be equipped.
- The probability of AACI occurring is fixed (Approx 40-65% depending on API) and is not affected by any in-game stat.
- If a ship fulfills multiple requirements, the API with the highest priority will be checked first
- A single roll is done to check for all AACIs in descending priority. This means that an AACI with lower priority but higher trigger chance can occur.
- For instance Akizuki with 2 akiguns and a T13K air radar fulfills the requirements of AACI with API values 1, 2, 3, 5, 8 - the only API that will ever trigger is 1. This is because API 1 has both the highest trigger probability and priority. In the event that the Akizuki fails the roll for API 1, no other AACI can succeed as their trigger probabilities are below that of API 1.
- Fletcher-class and Atlanta AACIs (API 34-37 & API 39-41) have the unique exception of independently rolling for each AACI they currently fulfil the conditions of. If all these rolls fail, they will roll an additional time for API 5. This effectively drastically increases their AACI chance when fulfilling multiple conditions.
- AACI priority is currently being determined, but some notable situations are highlighted below.
- For instance, AACI with the API values of 7 and 8 can both be triggered by the same ship if she has fulfilled both requirements.[11]
- Another instance of that happening is with API values 19 and 20. Kinu Kai Ni can trigger API 20 as well if she fulfills the requirements for API 19.
- The same thing happens with API 8 and 20, 5 and 29.
- If multiple ships fulfill AACI requirements, the one with the highest API number will be triggered first
- Due to higher API numbers having priority rather than AACI strength, a weaker AACI may be triggered first if present in the fleet. Take note when equipping your fleet.
Stage 3
Opening Air Strike
- Bombers attack ships in this stage[12]
- If Detection fails, this stage will not occur.
- Each slot's planes would target one ship and attack for one time.
- [13]
- refer to bombing or torpedo value
- refer to number of plane in the slot
- is a fixed for Dive Bombers, but is a random or for Torpedo Bombers/[14]
- The probability for Torpedo Bombers acquiring an multiplier in 1-1-A is around 50% [15]
- refer to the attack power cap, see Combat page for detail.
- refer to Critical hit bonus from Aircraft Proficiency system. See Combat page and Aircraft Proficiency for details about its effect and etc.
- If you bring more proficient planes, the rate to trigger it would increase.[16]
- With max proficiency Suisei Model 12A on 3 slot of a ship, critical hit rate is around 20%.[17]
- refer to contact multiplier, if contact failed
- refer to enemy armor, see Combat page for detail.
- refer to ammo modifier, see Combat page for detail.
- No effect from engagement/formation/ship health when they launch planes/morale/fatigue on firepower or accuracy. [18]
- Affected by the Aircraft Proficiency system.[16][17]
- Carrier's level and plane's accuracy stat do not affect this stage.[19]
- Accuracy is around 80% against destroyers in 1-1-A.


Anti-air Propellant Barrage
Added during the 2018 January 27 update, Anti-air Propellant Barrage (AAPB) is a system by which bombing damage can be negated on individual ships. Unlike other anti-air mechanics, this mechanic negates damage instead of reducing enemy bomber counts.
Activation requirements
To trigger:
- Ship must be AV, BBV, CAV, CV or CVL
- Note: BB, CA, etc. do not count
- Ship must be equipped with one or more 12cm 30-tube Rocket Launcher Kai Ni
Activation chance
Each ship triggers AAPB individually. Activation chance is affected by:
- Ship adjusted AA
- Ship luck
- Ise-class bonus
- Number of 12cm 30-tube Rocket Launcher Kai Ni equipped on ship
Activation chance can be estimated by:

- is number of 12cm 30-tube Rocket Launcher Kai Ni equipped.[21]
- is the class bonus, 25 for Ise-class BBVs.

Notes:
- There seems to be diminishing returns on luck. The exact relationship is still unclear.[22]
- It's possible to achieve 100% activation rate.
- The formula above is only for 12cm 30-tube Rocket Launcher Kai Ni, there are two other barrages: Type 3 Shell and Type 3 Shell + Rocket Launcher Kai Ni. Effects and trigger chance currently unknown.
Effects
- The ship card will slide forward, and the text "噴進弾幕成功" will be displayed on the right.
Anti-air Propellant Barrage visual effects
- Any damage to the ship(s) performing AARB by opening airstrikes will be negated (no damage or miss text is shown).
Note that activation of AARB does not mean the ship was targeted by opening airstrikes.
Jet Assault
If any carriers on either side are equipped with jet-powered aircraft, a Jet Assault phase will commence before the main aerial combat phase and Land Base Aerial Support phases.
If jet-powered aircraft exist in the Land Base Aerial Support phase, then that aircraft with perform its own Jet Assault phase before the main Land Base Aerial Support.
Jet Assault phase will not take place where aerial combat does not happen, for instance in night battle nodes or anti-submarine-only nodes. Additionally, Jet Assault will not occur in Air Raid node.
Ships sank by jets in Jet Assault phase will not launch planes for aerial combat and is likely not going to commence anti-air fire, however their anti-air equipment would still contribute to Fleet Anti-Air. [23]
The jet assault phase does not involve the contact mechanic.[24]
The mechanics of this phase are identical to the standard air combat phase, however only jet aircraft on both sides will be able to participate.
Notes
Examples
- ↑ Example on how to calculate a ship's fighter power using the formula. Akagi Kai's fighter power with Reppuu in slots 1 and 2, Reppuu Kai in slot 3, Type 0 Fighter Model 62 (Fighter-bomber) in slot 4. All aircraft without proficiency.

References
- ↑ http://bbs.ngacn.cc/read.php?tid=8652088
- ↑ https://twitter.com/noratako5/status/704574021048741888
- ↑ http://jbbs.shitaraba.net/bbs/read.cgi/netgame/13745/1439793270/47
- ↑ http://kankoregouchin.blog.fc2.com/blog-entry-45.html
- ↑ http://kankoregouchin.blog.fc2.com/blog-entry-40.html
- ↑ http://kancolle.wikia.com/wiki/User_blog:Homuhomu123/Trigger_Rates_%26_Effectiveness_of_Anti-Air_Cut-In_(AACI)
- ↑ https://www.ptt.cc/bbs/KanColle/M.1428751788.A.613.html
- ↑ http://ja.kancolle.wikia.com/wiki/%E5%AF%BE%E7%A9%BA%E3%82%AB%E3%83%83%E3%83%88%E3%82%A4%E3%83%B3
- ↑ http://ja.kancolle.wikia.com/wiki/%E3%82%B9%E3%83%AC%E3%83%83%E3%83%89:363?file=%E5%A4%89%E5%8B%95%E3%83%9C%E3%83%BC%E3%83%8A%E3%82%B9.png#8
- ↑ used to be Z+4 before 2016-01-19 update
- ↑ https://gyazo.com/2472468c10c0dacd28a493a79ff140da
- ↑ http://ja.kancolle.wikia.com/wiki/%E8%88%AA%E7%A9%BA%E6%88%A6
- ↑ shitaraba 6-502,515,531,540,
- ↑ shitaraba 6-531,540,攻1-601 http://jbbs.shitaraba.net/bbs/read.cgi/netgame/13745/1400461230/601
- ↑ shitaraba 6-533,539
- ↑ 16.0 16.1 http://ja.kancolle.wikia.com/wiki/%E3%82%B9%E3%83%AC%E3%83%83%E3%83%89:464#15
- ↑ 17.0 17.1 http://jbbs.shitaraba.net/bbs/read.cgi/netgame/13745/1439793270/13-14
- ↑ shitaraba 4-531,576,579
- ↑ shitaraba攻1-119,121
- ↑ See Noratako's posts: https://kancolle.fandom.com/ja/wiki/%E3%82%B9%E3%83%AC%E3%83%83%E3%83%89:2471#5. See also his newer research https://twitter.com/noratako5/status/1062027534026428416. Further verification still needed.
- ↑ Minegumo Teitoku (@hata_mine) reports that three 12cm 30-tube Rocket Launcher Kai Ni may increase the activation chance by 30%: https://twitter.com/hata_mine/status/1044262169087369217. The details of the testing are, however, not provided.
- ↑ For instance, Muu suggests the existence of Luck cap. See https://kancolle.fandom.com/ja/wiki/%E3%82%B9%E3%83%AC%E3%83%83%E3%83%89:2471#6.
- ↑ https://docs.google.com/spreadsheets/d/1_mL4UKnQ-wahaKk-p4HiSSHzgGO1VEv92fC_1hH_tPE/edit#gid=627125573
- ↑ https://docs.google.com/spreadsheets/d/1xUjN11cckDBpnC0NGl805Gcqoris1HNS0u_rQrF8Qbo/edit#gid=798242294