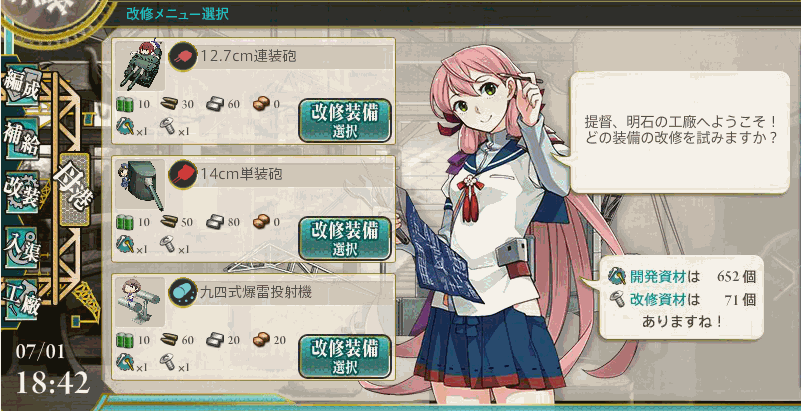
This system is made for Akashi and Akashi Kai. Now if you have her as your secretary ship, you will be able to use Akashi's Improvement Arsenal.
By using Improvement Material, development material and resources, equipment can be improved and upgraded into a better equipment. Equipment that can be improved depends on the day of the week and the ship in the second slot.
How to Enter
- Set Akashi or Akashi Kai as your secretary (first ship of the first fleet).
- At the home screen, hover your mouse cursor over the factory icon (do not click).
- The Improvement Arsenal Icon will appear next to it as shown.
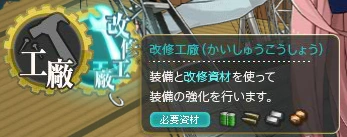
- Move your cursor to that icon and click.
How to Use
- To use this new factory, you need Improvement Materials
 . They can be obtained through the following methods:
- Certain quests reward Improvement Materials.
- Medals can be exchanged for 4 Improvement Materials per medal.
- Present Box or Hishimochi obtainable during special occasion can be exchanged for 1 Improvement Material each together with a few Development Material.
- The in-game cash shop sells them in a package of 10 Improvement Materials for 700 DMM points.
- The 2nd ship of the fleet can aid Akashi and influence the possible improvement and upgrade options.
- There is a chance to fail when doing improvements and upgrades
- If the improvement level is low, then you will have a higher chance of success, and vice versa.
- Akashi Kai has a higher success rate than Akashi herself.
- On failure, resources, Development Materials, Improvement Materials and any extra equipment used will disappear. Equipment being improved or upgraded is left unchanged.
- There is a slider for guaranteed success that increases the required DevMats and ImproveMats.
- Equipment that has been improved will have a ★ beside them. Improvement ranges from ★+1 to ★+10. ★+10 appears as ★max.
- Starting from ★+6. you will have to spend a certain amount of equipment that have the same type (name) in order to gain ★+7 up to ★+10.
- Equipment to be spent must be unlocked and unimproved.
- Some equipment require different equipment. 41cm Twin Gun Mount requires spending equipment starting on the first improvement.
- As equipment is spent even on failure, using the guaranteed success slider for difficult to obtain equipment may be considered.
- There's no visible stat difference between unimproved and improved equipment.
- Improvements on equipment have been shown to have bonus to firepower, torpedo, accuracy and anti-submarine damage.
- Japanese sources are currently testing the effect of improvements. Preliminary results as of 2015/1/13 are:
- Small/medium Main Guns, Machine Guns, Torpedoes, etc.
- ★+1~3: +1 bonus to firepower/torpedo
- ★+4~8: +2 bonus to firepower/torpedo
- ★+9~10: +3 bonus to firepower/torpedo
- Large-caliber Main Guns (e.g. 35.6cm Twin Gun Mount)
- ★+1: +1 bonus to firepower
- ★+2~4: +2 bonus to firepower
- ★+5~7: +3 bonus to firepower
- ★+8~10: +4 bonus to firepower
- Depth Charge/Sonar
- ★+2~7: +1 bonus to anti-submarine damage
- ★+8~10: +2 bonus to anti-submarine damage
- Effect on the AA Guns and AA Directors is unknown as of 2014/11/17
- Depth Charges, Sonars, AA Directors and Searchlights have an additional firepower bonus when improved, and as of 26th June 2015, Sonars now give bonus evasion against torpedo when improved
- ★+1~3: +1 bonus to firepower
- ★+4~8: +2 bonus to firepower
- ★+9~10: +3 bonus to firepower
- Machine Guns give bonuses to torpedo when improved.
- Small/medium Main Guns, Machine Guns, Torpedoes, etc.
- According to an official Twitter post
- RADARs give extra accuracy, AA, LoS after improvement.
- If the equipment reaches the maximum improvement level (★max), it may be possible to upgrade to a stronger variant. Any lock on the equipment must be removed, and an upgrade must exist for this to be possible. Be aware that the improvement level will be reset if you do this, and a ★+10 equipment could be stronger than an unimproved upgrade.
- If the new equipment after upgrading is something you can develop from the conventional development, the improvement level will be automatically reset to ★+3.
- This has the highest chance of failure, so using the guaranteed success slider can be considered.
- Equipment to be upgraded must not be locked.
Possible Improvements
Equipment that can be improved depends on the day of the week and the ship in the second slot of the first fleet. The improvement list changes at 0:00 JST.
When the 2nd Ship varies by day, the ship's Initial is used; '✓' usually denotes that either may be used.
Light Guns
| Type | Name | ★ | Resource | Day | 2nd Ship | Upgrades to | ||||||||||
|---|---|---|---|---|---|---|---|---|---|---|---|---|---|---|---|---|
| S | M | T | W | T | F | S | ||||||||||
| 12.7cm Twin Gun | 0 | 1/2 | 1/2 | - | 10 | 60 | ✓ | ✓ | ✓ | ✓ | ✓ | ✓ | ✓ | Any | 12.7cm Twin Gun Type-B Kai 2 | |
| 6 | 1/2 | 1/2 | 1 | |||||||||||||
| 30 | 0 | |||||||||||||||
| 10 | 2/3 | 3/6 | 2 | |||||||||||||
| 12.7cm Twin Gun Type-B Kai 2 | 0 | 2/2 | 2/3 | - | 10 | 100 | X | ✓ | ✓ | ✓ | X | X | X | Yuudachi Kai-2 Ayanami Kai-2 |
None | |
| 6 | 2/2 | 2/4 | 1 | |||||||||||||
| 60 | 0 | |||||||||||||||
| 10 | - | - | - | |||||||||||||
| 10cm Twin High-angle Mount + Anti-Aircraft Fire Director | 0 | 6/7 | 3/4 | - | 10 | 150 | X |
A |
A |
A |
A T |
T |
T |
Akizuki Teruzuki |
None | |
| 6 | 5/8 | 4/7 | 2* | |||||||||||||
| 60 | 50 | |||||||||||||||
| 10 | - | - | - | |||||||||||||
Medium Guns
| Type | Name | ★ | Resource | Day | 2nd Ship | Upgrades to | ||||||||||
|---|---|---|---|---|---|---|---|---|---|---|---|---|---|---|---|---|
| S | M | T | W | T | F | S | ||||||||||
| 14cm Single Gun | 0 | 1/2 | 1/2 | - | 10 | 80 | ✓ | ✓ | ✓ | ✓ | ✓ | ✓ | ✓ | Any | 14cm Twin Gun | |
| 6 | 1/2 | 1/2 | 1 | |||||||||||||
| 50 | 0 | |||||||||||||||
| 10 | 3/4 | 3/6 | 2 | |||||||||||||
| 14cm Twin Gun | 0 | 2/2 | 1/2 | - | 10 | 100 | X | ✓ | X | X | ✓ | X | X | Yuubari | None | |
| 6 | 2/4 | 2/3 | 1 | |||||||||||||
| 60 | 0 | |||||||||||||||
| 10 | - | - | - | |||||||||||||
| 15.2cm Twin Gun | 0 | 2/2 | 2/3 | - | 10 | 100 | N . |
N Y |
Y. |
Y. |
A Y |
A N . |
A N . |
Agano Noshiro Yahagi |
15.2cm Twin Gun Kai | |
| 6 | 2/3 | 2/4 | 1 | |||||||||||||
| 70 | 0 | |||||||||||||||
| 10 | 5/8 | 4/10 | 1* | |||||||||||||
| 15.2cm Twin Gun Kai | 0 | 3/4 | 2/3 | 1* |
20 | 100 | S |
S |
S |
Y |
Y |
Y |
S Y |
Sakawa Yahagi |
None | |
| 6 | 4/6 | 3/6 | 1* | |||||||||||||
| 80 | 30 | |||||||||||||||
| 10 | - | - | - | |||||||||||||
| 15.5cm Triple Gun (Main) | 0 | 2/2 | 2/3 | 0 | 10 | 120 | O |
O |
X | X | X | M |
M |
Mogami Ooyodo |
None | |
| 6 | 2/3 | 2/4 | 1 | |||||||||||||
| 90 | 0 | |||||||||||||||
| 10 | - | - | - | |||||||||||||
| 20.3cm Twin Gun | 0 | 1/2 | 2/3 | - | 10 | 120 | ✓ | K |
✓ | ✓ | ✓ | ✓ | ✓ | Kinugasa Aoba |
20.3cm(no.2) Twin Gun | |
| 6 | 2/3 | 2/3 | 1 | |||||||||||||
| 90 | 0 | |||||||||||||||
| 10 | 2/5 | 4/10 | 2 | |||||||||||||
| 20.3cm(no.2) Twin Gun | 0 | 2/3 | 2/3 | - | 10 | 130 | ✓ | ✓ | ✓ | X | X | X | X | Myoukou | 20.3cm(no.3) Twin Gun | |
| 6 | 2/4 | 2/4 | 1 | |||||||||||||
| 100 | 0 | |||||||||||||||
| 10 | 4/8 | 4/11 | 2 | |||||||||||||
| 20.3cm(no.3) Twin Gun | 0 | 3/4 | 2/3 | - | 10 | 140 | X | X | ✓ | ✓ | X | X | X | Mikuma | None | |
| 6 | 3/5 | 3/5 | 1 | |||||||||||||
| 110 | 0 | |||||||||||||||
| 10 | - | - | - | |||||||||||||
Heavy Guns
| Type | Name | ★ | Resource | Day | 2nd Ship | Upgrades to | ||||||||||
|---|---|---|---|---|---|---|---|---|---|---|---|---|---|---|---|---|
| S | M | T | W | T | F | S | ||||||||||
| 35.6cm Twin Gun | 0 | 2/3 | 1/2 | - | 20 | 300 | ✓ | X | X | X | X | ✓ | ✓ | Fusou | Prototype 35.6cm Triple Gun | |
| 6 | 3/4 | 2/4 | 1 | |||||||||||||
| 240 | 0 | |||||||||||||||
| 10 | 6/12 | 5/12 | 3 | |||||||||||||
| 38cm Twin Gun | 0 | 4/5 | 2/3 | 1* |
20 | 450 | X | X | X | X | ✓ | ✓ | ✓ | Bismarck | 38cm Twin Gun Kai ★+3 | |
| 6 | 5/8 | 3/5 | 2* | |||||||||||||
| 380 | 20 | |||||||||||||||
| 10 | 10/20 | 6/13 | 2* | |||||||||||||
| 38cm Twin Gun Kai | 0 | 5/7 | 3/4 | 1* |
30 | 470 | ✓ | ✓ | ✓ | X | X | X | X | Bismarck | None | |
| 6 | 6/9 | 4/6 | 2* | |||||||||||||
| 390 | 30 | |||||||||||||||
| 10 | - | - | - | |||||||||||||
| 381mm/50 Triple Gun | 0 | 4/5 | 2/3 | 1* |
30 | 480 | R |
R |
L |
L |
L |
L |
R |
Littorio Roma |
381mm/50 Triple Gun Kai ★+3 | |
| 6 | 5/8 | 3/5 | 2* | |||||||||||||
| 400 | 20 | |||||||||||||||
| 10 | 12/20 | 7/14 | 2* | |||||||||||||
| 381mm/50 Triple Gun Kai | 0 | 5/7 | 3/4 | 1* |
40 | 500 | L |
L |
R |
R |
R |
R |
L |
Littorio Roma |
None | |
| 6 | 7/10 | 4/6 | 2* | |||||||||||||
| 440 | 50 | |||||||||||||||
| 10 | - | - | - | |||||||||||||
| 41cm Twin Gun | 0 | 3/4 | 2/3 | 1 | 30 | 480 | M |
M |
N |
X | M |
N |
N |
Mutsu Nagato |
None | |
| 6 | 4/7 | 3/6 | 2 | |||||||||||||
| 350 | 0 | |||||||||||||||
| 10 | - | - | - | |||||||||||||
| Prototype 46cm Twin Gun | 0 | 5/6 | 3/5 | 2* |
40 | 650 | Y |
Y |
M |
M |
X | X | X | Musashi Yamato |
46cm Triple Gun ★+5 | |
| 6 | 6/8 | 4/7 | 3* | |||||||||||||
| 420 | 40 | |||||||||||||||
| 10 | 12/18 | 8/14 | 4* | |||||||||||||
| 46cm Triple Gun | 0 | 6/8 | 4/6 | 1 | 50 | 800 | M |
M |
X | X | X | Y |
Y |
Musashi Yamato |
None | |
| 6 | 8/10 | 5/8 | 2 | |||||||||||||
| 480 | 50 | |||||||||||||||
| 10 | - | - | - | |||||||||||||
| Prototype 51cm Twin Cannon | 0 | 7/9 | 5/7 | 2* |
50 | 950 | X | M Y |
Y |
M |
X | X | X | Musashi Kai Yamato Kai |
None | |
| 6 | 10/15 | 7/10 | 3* | |||||||||||||
| 550 | 80 | |||||||||||||||
| 10 | - | - | - | |||||||||||||
Secondary Guns
| Type | Name | ★ | Resource | Day | 2nd Ship | Upgrades to | ||||||||||
|---|---|---|---|---|---|---|---|---|---|---|---|---|---|---|---|---|
| S | M | T | W | T | F | S | ||||||||||
| 15.2cm Gun | 0 | 2/2 | 1/2 | - | 10 | 90 | A K |
A K Y |
A Y |
Y |
X | X | K |
Agano Kongou Yamashiro |
15.2cm Twin Gun | |
| 6 | 2/3 | 2/3 | 1 | |||||||||||||
| 60 | 0 | |||||||||||||||
| 10 | 3/4 | 3/5 | 2 | |||||||||||||
| OTO 152mm Triple Rapid Fire Gun | 0 | 2/3 | 2/3 | - | 10 | 120 | L R |
R |
L |
L |
R |
R |
L |
Littorio Roma |
None | |
| 6 | 3/4 | 3/5 | 1* | |||||||||||||
| 90 | 0 | |||||||||||||||
| 10 | - | - | - | |||||||||||||
| 90mm Single High-angle Gun | 0 | 1/2 | 1/2 | 1* |
10 | 70 | R |
L |
L |
L |
L R |
R |
R |
Littorio Roma |
None | |
| 6 | 2/3 | 1/2 | 2* | |||||||||||||
| 20 | 10 | |||||||||||||||
| 10 | - | - | - | |||||||||||||
Shells+AA Equipment
| Type | Name | ★ | Resource | Day | 2nd Ship | Upgrades to | ||||||||||
|---|---|---|---|---|---|---|---|---|---|---|---|---|---|---|---|---|
| S | M | T | W | T | F | S | ||||||||||
| Type 91 AP Shell | 0 | 2/3 | 1/1 | - | 30 | 310 | K |
K |
X | H |
H |
H K |
H K |
Hiei Kirishima |
Type 1 AP Shell | |
| 6 | 3/5 | 1/2 | 1 | |||||||||||||
| 150 | 10 | |||||||||||||||
| 10 | 6/9 | 4/9 | 3 | |||||||||||||
| Type 1 AP Shell | 0 | 3/5 | 1/1 | 2* |
30 | 330 | K |
H |
H |
H |
X | K |
K |
Kongou Haruna |
None | |
| 6 | 4/6 | 2/4 | 1 | |||||||||||||
| 170 | 20 | |||||||||||||||
| 10 | - | - | - | |||||||||||||
| 25mm Twin Autocannon | 0 | 0/1 | 1/1 | - | 0 | 10 | ✓ | X | X | X | X | ✓ | ✓ | Isuzu Kai-2 | 25mm Triple Autocannon ★+3 | |
| 6 | 1/2 | 1/2 | 1 | |||||||||||||
| 20 | 10 | |||||||||||||||
| 10 | 2/3 | 1/2 | 1 | |||||||||||||
| 25mm Triple Autocannon | 0 | 1/2 | 1/1 | - | 0 | 20 | M |
I M |
I M |
I M |
M |
M |
M |
Isuzu Kai-2 Maya Maya Kai-2 |
25mm Triple Autocannon (Concentrated Deployment) | |
| 6 | 1/3 | 1/2 | 1 | |||||||||||||
| 30 | 10 | |||||||||||||||
| 10 | 5/9 | 3/7 | 5 | |||||||||||||
| Type 91 Anti-Aircraft Fire Director | 0 | 3/4 | 1/2 | - | 0 | 60 | M A |
M A |
X |
X |
T |
M A T |
M A |
Maya Akizuki Teruzuki |
Type 94 Anti-Aircraft Fire Director | |
| 6 | 3/5 | 2/4 | 1* | |||||||||||||
| 0 | 40 | |||||||||||||||
| 10 | 4/9 | 4/7 | 2* | |||||||||||||
| Type 94 Anti-Aircraft Fire Director | 0 | 4/5 | 2/3 | - | 0 | 80 | A F |
A T |
A T |
A T |
A T F |
A T F |
A F |
Akizuki Teruzuki Fubuki Kai-2 |
10cm Twin High-angle Gun + AAFD | |
| 6 | 3/5 | 3/5 | 1* | |||||||||||||
| 10 | 8/10 | 5/10 | 2* | |||||||||||||
| 0 | 4/5 | 2/3 | - | 0 | 70 | M | X | X | X | M | M | M | Maya Kai-2 | 12.7cm Twin High-angle Gun + AAFD | ||
| 6 | 3/5 | 3/5 | 1* | |||||||||||||
| 10 | 7/9 | 5/9 | 2* | |||||||||||||
Torpedoes
| Type | Name | ★ | Resource | Day | 2nd Ship | Upgrades to | ||||||||||
|---|---|---|---|---|---|---|---|---|---|---|---|---|---|---|---|---|
| S | M | T | W | T | F | S | ||||||||||
| 61cm Triple Torpedo Mount | 0 | 1/2 | 1/1 | - | 50 | 60 | M |
M |
M |
X | F |
F |
F |
Fubuki Kai* Murakumo |
61cm Triple (Oxygen) Torpedo Mount | |
| 6 | 2/3 | 1/2 | 1 | |||||||||||||
| 70 | 20 | |||||||||||||||
| 10 | 3/5 | 2/4 | 2 | |||||||||||||
| 61cm Triple (Oxygen) Torpedo Mount | 0 | 1/2 | 1/1 | - | 60 | 60 | X | X | X | X | ✓ | ✓ | ✓ | Fubuki Kai-2 | 61cm Quad (Oxygen) Torpedo Mount ★+5 | |
| 6 | 3/5 | 1/3 | 1* | |||||||||||||
| 90 | 20 | |||||||||||||||
| 10 | 4/8 | 3/6 | 2* | |||||||||||||
| 61cm Quad Torpedo Mount | 0 | 1/2 | 1/2 | - | 70 | 70 | ✓ | ✓ | ✓ | X | X | ✓ | ✓ | Any | 61cm Quad (Oxygen) Torpedo Mount ★+3 | |
| 6 | 2/3 | 1/2 | 1 | |||||||||||||
| 100 | 20 | |||||||||||||||
| 10 | 3/5 | 3/6 | 2 | |||||||||||||
| 61cm Quad (Oxygen) Torpedo Mount | 0 | 2/3 | 1/2 | - | 80 | 80 | ✓ | ✓ | ✓ | ✓ | ✓ | ✓ | ✓ | Ooi Kitakami |
61cm Quint (Oxygen) Torpedo Mount | |
| 6 | 4/8 | 2/4 | 1 | |||||||||||||
| 120 | 20 | |||||||||||||||
| 10 | 5/10 | 5/11 | 3 | |||||||||||||
| 61cm Quint (Oxygen) Torpedo Mount | 0 | 3/4 | 3/5 | - | 100 | 90 | X | X | X | ✓ | ✓ | X | X | Shimakaze | None | |
| 6 | 5/9 | 3/7 | 1 | |||||||||||||
| 150 | 30 | |||||||||||||||
| 10 | - | - | - | |||||||||||||
Radars
| Type | Name | ★ | Resource | Day | 2nd Ship | Upgrades to | ||||||||||
|---|---|---|---|---|---|---|---|---|---|---|---|---|---|---|---|---|
| S | M | T | W | T | F | S | ||||||||||
| Type 13 Air Radar | 0 | 4/5 | 2/3 | - | 10 | 20 | I S |
I T |
A T |
A T |
I A |
I S |
I S |
Isuzu Kai-2 Shigure Akizuki Teruzuki |
Type 13 Air Radar Kai | |
| 6 | 5/7 | 3/5 | 1 | |||||||||||||
| 0 | 30 | |||||||||||||||
| 10 | 10/15 | 5/12 | 1*
| |||||||||||||
| Type 13 Air Radar Kai | 0 | 5/7 | 3/4 | 1*
|
10 | 30 | H |
Y |
Y |
Y |
I |
H I |
H I |
Hatsushimo Kai-2 Isokaze Kai Yukikaze |
None | |
| 6 | 7/9 | 4/8 | 2*
| |||||||||||||
| 0 | 40 | |||||||||||||||
| 10 | - | - | - | |||||||||||||
| Type 21 Air Radar | 0 | 5/6 | 2/3 | - | 10 | 40 | I |
I |
X | H |
H |
I H |
I H |
Ise Hyuuga |
Type 21 Air Radar Kai | |
| 6 | 6/8 | 3/5 | 1 | |||||||||||||
| 0 | 50 | |||||||||||||||
| 10 | 12/16 | 5/13 | 2 | |||||||||||||
| Type 21 Air Radar Kai | 0 | 6/8 | 2/3 | 1*
|
10 | 60 | Y |
X | M |
M |
M Y |
M Y |
Y |
Musashi Yamato |
None | |
| 6 | 10/12 | 4/8 | 2*
| |||||||||||||
| 0 | 70 | |||||||||||||||
| 10 | - | - | - | |||||||||||||
| Type 22 Surface Radar | 0 | 4/5 | 2/3 | 1 | 10 | 30 | H |
H Y |
Y |
S |
S |
H Y S |
H Y S |
Hyuuga Yuugumo Shimakaze |
Type 22 Surface Radar Kai 4 | |
| 6 | 7/10 | 3/5 | 2 | |||||||||||||
| 0 | 30 | |||||||||||||||
| 10 | 12/16 | 5/13 | 3 | |||||||||||||
| Type 22 Surface Radar Kai 4 | 0 | 5/8 | 3/4 | 1*
|
10 | 40 | M H |
H |
K |
K |
M K |
M H K |
M H |
Myoukou Kai-2 Haguro Kai-2 Kongou Kai-2 |
None | |
| 6 | 8/10 | 4/8 | 1 | |||||||||||||
| 0 | 40 | |||||||||||||||
| 10 | - | - | - | |||||||||||||
| Type 32 Surface Radar | 0 | 6/10 | 3/4 | 1*
|
10 | 60 | H |
H |
H |
I |
I |
I |
I |
Ise Hyuuga |
Type 32 Surface Radar Kai | |
| 6 | 12/15 | 4/7 | 2*
| |||||||||||||
| 0 | 50 | |||||||||||||||
| 10 | 15/22 | 10/15 | 1 | |||||||||||||
| Type 32 Surface Radar Kai | 0 | 10/15 | 5/6 | 3*
|
10 | 100 | I |
I |
I |
H |
H |
H |
H |
Ise Hyuuga |
None | |
| 6 | 14/18 | 7/10 | 1*
| |||||||||||||
| 0 | 80 | |||||||||||||||
| 10 | - | - | - | |||||||||||||
ASW Equipment
| Type | Name | ★ | Resource | Day | 2nd Ship | Upgrades to | ||||||||||
|---|---|---|---|---|---|---|---|---|---|---|---|---|---|---|---|---|
| S | M | T | W | T | F | S | ||||||||||
| Type 93 SONAR | 0 | 2/2 | 1/2 | - | 10 | 30 | Y |
I |
X | X | X | I Y |
I Y |
Isuzu Kai-2 Yuubari |
Type 3 SONAR ★+3 | |
| 6 | 3/4 | 2/3 | 1 | |||||||||||||
| 0 | 30 | |||||||||||||||
| 10 | 6/9 | 3/5 | 2 | |||||||||||||
| Type 3 SONAR | 0 | 4/5 | 2/3 | - | 10 | 30 | I |
X | I Y |
I Y |
X | X | X | Isuzu Kai-2 Yuubari |
None | |
| 6 | 5/7 | 3/5 | 1 | |||||||||||||
| 0 | 50 | |||||||||||||||
| 10 | - | - | - | |||||||||||||
| Type 94 Depth Charge | 0 | 1/2 | 1/2 | - | 10 | 20 | X | X | X | ✓ | ✓ | X | X | Any | Type 3 Depth Charge ★+3 | |
| 6 | 2/3 | 1/3 | 1 | |||||||||||||
| 60 | 20 | |||||||||||||||
| 10 | 3/6 | 3/8 | 2 | |||||||||||||
| Type 3 Depth Charge | 0 | 3/3 | 2/3 | - | 10 | 20 | X | X | X | ✓ | ✓ | X | X | Isuzu Kai-2 | None | |
| 6 | 3/5 | 2/4 | 1 | |||||||||||||
| 80 | 30 | |||||||||||||||
| 10 | - | - | - | |||||||||||||
Other Equipment
| Type | Name | ★ | Resource | Day | 2nd Ship | Upgrades to | ||||||||||
|---|---|---|---|---|---|---|---|---|---|---|---|---|---|---|---|---|
| S | M | T | W | T | F | S | ||||||||||
| Searchlight | 0 | 3/3 | 2/3 | - | 10 | 0 | J |
Ao Ay |
Ao Ay |
Ao Ay |
Ak |
Ak J |
Ak J |
Akatsuki Aoba Ayanami Kai-2 Jintsuu |
Type 96 150cm Searchlight | |
| 6 | 3/5 | 2/4 | 1 | |||||||||||||
| 30 | 20 | |||||||||||||||
| 10 | 5/10 | 3/7 | 1* File:Equipment129-4.png | |||||||||||||
| Type 96 150cm Searchlight | 0 | 4/5 | 3/4 | 1* |
20 | 70 | H |
H |
K |
K |
K |
H K |
H |
Hiei Kirishima |
None | |
| 6 | 5/10 | 3/7 | 1* | |||||||||||||
| 0 | 30 | |||||||||||||||
| 10 | - | - | - | |||||||||||||
Note
- 10cm Twin High-angle Gun + Anti-Aircraft Fire Director uses 10cm Twin High-angle Gun for improvement past ★+6.
- 38cm Twin Gun uses 35.6cm Twin Gun for improvement and use 41cm Twin Gun for upgrading.
- 38cm Twin Gun Kai uses 41cm Twin Gun for improvement.
- 381mm/50 Triple Gun Mount uses 35.6cm Twin Gun for improvement and 25mm Twin Autocannon for upgrading.
- 381mm/50 Triple Gun Mount Kai uses 41cm Twin Gun for improvement.
- Prototype 46cm Twin Gun uses 41cm Twin Gun for improvement and upgrading.
- Prototype 51cm Twin Cannon uses 46cm Triple Gun Mount for improvement
- 90mm Single High-angle Gun uses 10cm Twin High-angle gun for improvement.
- OTO 152mm Triple Rapid Fire Gun Mount uses 15.5cm Triple Gun (Main) for improvement
- Type 1 AP Shell uses Type 91 AP Shell for improvement before ★+6. Consumes itself past ★+6.
- Type 91 Anti-Aircraft Fire Director uses 12.7cm Twin High-angle Gun for improvement past ★+6 and use 10cm Twin High-angle Gun for upgrading.
- Type 94 Anti-Aircraft Fire Director
- For Improvement consumes:
- 10cm Twin High-angle Gun with Akizuki or Fubuki Kai-2
- 12.7cm Twin High-angle Gun with Maya Kai-2
- For upgrading consumes:
- 10cm Twin High-angle Gun to make 10cm Twin High-angle Gun + Anti-Aircraft Fire Director with Akizuki or Fubuki Kai-2
- 12.7cm Twin High-angle Mount to make 12.7cm Twin High-angle Mount + Anti-Aircraft Fire Director with Maya Kai-2
- Type 94 Anti-Aircraft Fire Director can be improved with Maya Kai-2 using 12.7cm Twin High-angle Gun Mount first, and later upgraded with Akizuki or Fubuki Kai-2 into 10cm Twin High-angle Gun Mount + Anti-Aircraft Fire Director.
- For Improvement consumes:
- 61cm Triple Torpedo Mount requires Fubuki or Fubuki Kai as 2nd ship, Fubuki Kai-2 not valid.
- 61cm Triple (Oxygen) Torpedo Mount uses 61cm Triple Torpedo Mount for improvement past ★+6 and use 61cm Quad Torpedo Mount for upgrading.
- 15.2cm Twin Gun Mount consumes itself for improvement past ★+6 and use Type 22 Surface Radar for upgrading.
- 15.2cm Twin Gun Mount Kai uses 15.2cm Twin Gun Mount for improvement.
- Searchlight consumes itself for improvement past ★+6 and use Skilled Lookouts for upgrading.
- Type 96 150cm Searchlight consumes Searchlight for improvement.
- Type 13 Air Radar uses Type 21 Air Radar for upgrading.
- Type 13 Air Radar Kai uses Type 13 Air Radar for improvement.
- Type 21 Air Radar Kai uses Type 21 Air Radar for improvement.
- Type 22 Surface Radar Kai 4 uses Type 22 Surface Radar for improvement before ★+6.
- Type 32 Surface Radar uses Type 22 Surface Radar for improvement.
- Type 32 Surface Radar Kai uses Type 22 Surface Radar for improvement.
Improvement Material (Quest Rewards)
| Quest Type | Quest ID | Quest Name (JP) | Description | Note | |
|---|---|---|---|---|---|
| Once | A45 | 改修工廠を準備せよ! | Have Akashi as flagship in your main fleet. | 5 | |
| F17 | はじめての「装備改修」! | Do equipment modernization 1 time | 7 | consumes | |
| A44 | 「西村艦隊」を再編成せよ! | Organize the Nishimura Fleet | 3 | ||
| B33 | 「西村艦隊」南方海域へ進出せよ! | Deploy the Nishimura Fleet to 5-1 and obtain S-victory at boss node | 5 | ||
| B38 | 「那智戦隊」抜錨せよ! | Deploy the Nachi Squadron to 2-2 and obtain S-victory at boss node | 2 | ||
| B41 | 新編「三川艦隊」ソロモン方面へ! | Deploy the new Mikawa fleet to the Solomon waters (5-1) and obtain S-victory at boss | 3 | ||
| C6 | 演習を強化、艦隊の練度向上に努めよ! | Get 4 victories in practice mode within the same day. | 1 | ||
| D18 | 観艦式を敢行せよ! | Complete Expedition 8. | 1 | ||
| B44 | 海上突入部隊、進発せよ! | Deploy Hiei, Kirishima, Nagara, Akatsuki, Ikazuchi and Inazuma to 5-1 and obtain S-victory at boss node | 2 | ||
| B45 | 「第六駆逐隊」対潜哨戒を徹底なのです! | Deploy the new 6th Destroyer Division on an ASW patrol (1-5) and obtain at least A-victory at boss node | 2 | ||
| C7 | 北方再突入に備え、練度向上に努めよ! | Get 4 victories in Exercises within the same day | 1 | ||
| B47 | 「第一水雷戦隊」北方ケ号作戦、再突入! | Deploy Abukuma Kai Ni as flagship, Hibiki, Yuugumo, Naganami, Akigumo and Shimakaze to 3-2 and obtain S-victory at boss node | 4 | ||
| B49 | 「空母機動部隊」北方海域に進出せよ! | Sortie a fleet with CV(B) flagship to World 3-5 and obtain an S-Rank at the boss | 3 | ||
| Daily | F18 | 装備の改修強化 | Do equipment modernization 1 time (failure OK) | 1 | Consumes |
| Weekly | Bw5 | 海上護衛戦 | Sink 15 submarines. | 1 | |
| Bw7 | 敵北方艦隊主力を撃滅せよ! | Defeat 5 bosses in the Northern Sea (3-3, 3-4, or 3-5). | 3 | ||
| Bw9 | 南方海域珊瑚諸島沖の制空権を握れ! | Sortie to 5-2 and get S-rank at the boss node 2 times. | 2 | ||
| Bw10 | 海上輸送路の安全確保に努めよ! | Sortie to 1-5 and get at least A-rank at the boss node 3 times. | 3 | ||
| C4 | 大規模演習 | Get 20 victories in practice mode within the same week. | 1 | ||
| D11 | 南方への鼠輸送を継続実施せよ! | Complete Expedition 37 or 38 a total of 7 times in a week. | 1 | ||
| Monthly | Bm3 | 「水雷戦隊」南西へ! | Deploy a Torpedo Squadron to 1-4 and win S-victory at boss node. | 3 | |
| Bm4 | 「水上打撃部隊」南方へ! | Deploy a Battleship Squadron to 5-1 and win S-victory at boss node. | 4 | ||
| Bm5 | 海上護衛強化月間 | Dispatch a fleet to 1-5. You must reach the boss and achieve A-rank victory or above 10 times | 3 | ||
| Bm6 | 「空母機動部隊」西へ! | Dispatch a fleet consisting of 2 CV, 2 DD and additional 2 ships to 4-2. You must reach the boss an achieve S-rank Victory. | 2 | ||
| Bm7 | 「水上反撃部隊」突入せよ! | Consists of 1 CA 1 CL 4 DD. You MUST deploy to World 2-5, and obtain an S-Rank victory at the boss node. Flagship MUST be DD. | 2 |
Trivia

Background on Akashi's Improvement Arsenal
- Akashi is animated on the Improvement Arsenal screen, blinking her eyes and occasionally looking towards the options on the left.
- She also has two separate sprites for her basic and Kai forms, reflecting her headband and heftier rigging. See here.


Click to see the animation
- She also has two separate sprites for her basic and Kai forms, reflecting her headband and heftier rigging. See here.